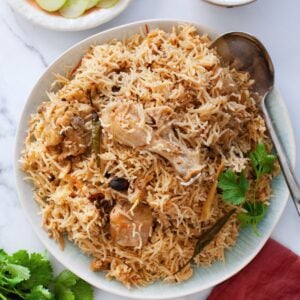
Quick One-Pot Chicken Pulao (Instant Pot Option)
A hearty one-pot indian style pilaf made with tender chicken, long grain basmati rice, aromatic indian spices and a touch of yogurt. No need to marinate the chicken. Perfect for weeknights!
Ingredients
- 1 cup long grain basmati rice
- ⅓ cup oil
- 1 large (195g) onion I use red onion, sliced
- 700 g bone-in chicken use 500g-600g boneless chicken thighs instead
- ½ tablespoon garlic paste
- 1 inch ginger julinned, divided
- 1 teaspoon red chili flakes adjust quantity to taste or use 2-3 whole dried chilies
- 1 (80g) tomato I use roma tomato, sliced
- ¾ teaspoon coriander powder
- 2 tablespoon plain yogurt I use whole greek yogurt
- 2 indian green chilies (hot), I throw in whole chilies but you could slit them for extra kick, adjust quantity to taste
- ½ teaspoon lime juice
- 1.5 teaspoon salt adjust quantity to taste, divided
- 1.5 cup water You might need to adjust slightly depending on how much water you see in the pot after bhunai of chicken and yogurt. Use 1.75 cup water for softer pulao.
Whole Spices
- 1 teaspoon cumin seeds
- 1 black cardamom or use 3 green cardamom if you do not have black cardamom
- ½ inch cinnamon stick
- 3 cloves
- 1 large bay leaf
- 8-10 black peppercorns
Instructions
Wash and Soak Basmati Rice
- Measure the basmati rice and place it in a large bowl. Cover the rice with water and gently scrub it with your hands. Initially, the water will turn white and starchy. Repeat this rinsing process, and by the third or fourth rinse, the water should become clear. After rinsing, soak the rice in an ample amount of water for about 20-30 minutes.
Make The Chicken Masala base
- In a heavy bottomed, wide cooking pot (I use a 12 inch stainless steel cooking pot), add the cooking oil and let heat up on high flame.
- To the warm oil, carefully add all the whole spices. If you are using dried chilies instead of chili flakes, add them at this stage. Stir and fry for 5 seconds taking care that the spices don't burn. Whole spices like cloves and black pepper tend to pop when added to hot oil so be careful.
- Add the sliced onions next. For the next 7-10 minutes, we are going to fry the onions in oil and and let them turn golden brown. Stir the onions intermittently and keep an eye. Don't stir too much else the onions start breaking down and turning pasty. This step takes a bit of time and patience but it is a key step since the color of onion contributes to the color of your pulao. Avoid very dark brown or blackish onions else their smell & taste becomes too strong (pulao is a mild tasting dish).
- Now layer the chicken over the browned onions. Sprinkle ½ teaspoon salt over the chicken and add garlic paste,half of ginger julinnes, coriander powder, chili flakes and sliced tomatoes on top of chicken.
- Now we are going to do bhuno (frying on constant heat) the chicken on medium-high heat. Make sure that the flame is constant, if it's too low the chicken will get watery. This bhunai process helps sear the chicken on outside and seals the juices inside(so that they release slowly while the chicken cooks with rice). The bhuna (seared )chicken tastes immensely flavorful.
- Once you see that the chicken is no longer pink and the tomatoes slices are little soft, reduce the flame to low, wait for 1-2 minutes and then add beaten yogurt. Immediately start stirring and continue on low heat for 2-5 minutes or until the yogurt is mixed in and is warmed up. This prevents yogurt from curdling.
Make Chicken Pulao
- Fry the yogurt and chicken for 2-3 minutes. After frying with yogurt, you will see a little liquid in the cooking pot. Add the soaked rice now and pour water on top. Add remaining ginger julinnes, few drops of lime juice (or lemon juice) and green chilies(optional). You could add a tablespoon of ghee righnow for added aroma in the pulao. Stir around gently 1-2 times to mix, taste and adjust salt as needed. At this stage, make sure that the cooking liquid tastes sharp salty- this will make sure that the rice is seasoned properly.
- Once water comes to rolling boil, cover the pot with a tight-fitting lid, reduce the heat to low, and let cook for 10-15 minutes or until all the water is absorbed.
- Open the lid and check if all the water has been absorbed. If so, switch off the stove. Cover the pot again and let the pulao sit for 15-20 minutes to allow the rice to firm up. Avoid fluffing the rice at this stage, as it is very soft and can easily become mushy.
- Gently fluff the rice using a soft spatula or a small saucer, scooping the pulao from the side of the pot.Garnish the chicken pulao with chopped coriander leaves. Serve it with a tangy side such as cucumber raita, kachumber, and green chutney. Pulao leftovers can be refrigerated and will stay fresh without losing their taste for 2-3 days.
Notes
- For instant pot and pressure cooker instructions, please refer to the written post.
- Using Boneless Chicken - You could easily use bone less chicken thighs. I avoid chicken breast since it tends to get stringy and dries up by the time pulao finishes cooking. Cut chicken thighs into 2 -2.5 inch pieces and adjust cooking time.
- Always Soak the Rice: - Soaking softens the rice, ensuring even cooking. The soluble starches in rice are removed , which reduces stickiness and results in fluffier rice. Additionally, soaked rice cooks faster and has a softer texture.
- Don't Skimp on Oil: An optimum quantity of oil is essential for a non sticky, fluffy pulao, as oil prevents the grains from sticking together. Using less oil steals the flavor and might make your pulao taste like steamed rice.
- Don't go heavy on Spices: Ideally, pulao is mildly spiced. This helps the flavor of the chicken shine through without being overpowered by excessive seasonings.
- Use a Wide and Heavy Pot: I use a heavy indian wok, however a dutch oven is also excellent for stovetop cooking. A heavy pot retains heat well, prevents scorching, and ensures even, consistent cooking. As the pulao cooks, the rice grains swell, if your pot is wide, there is space for the grains to remain fluffy without sticking to each other. Also, a wide pot helps in fluffing the pulao post cooking without breaking the rice grain.
Tried this recipe?Let us know how it was!