

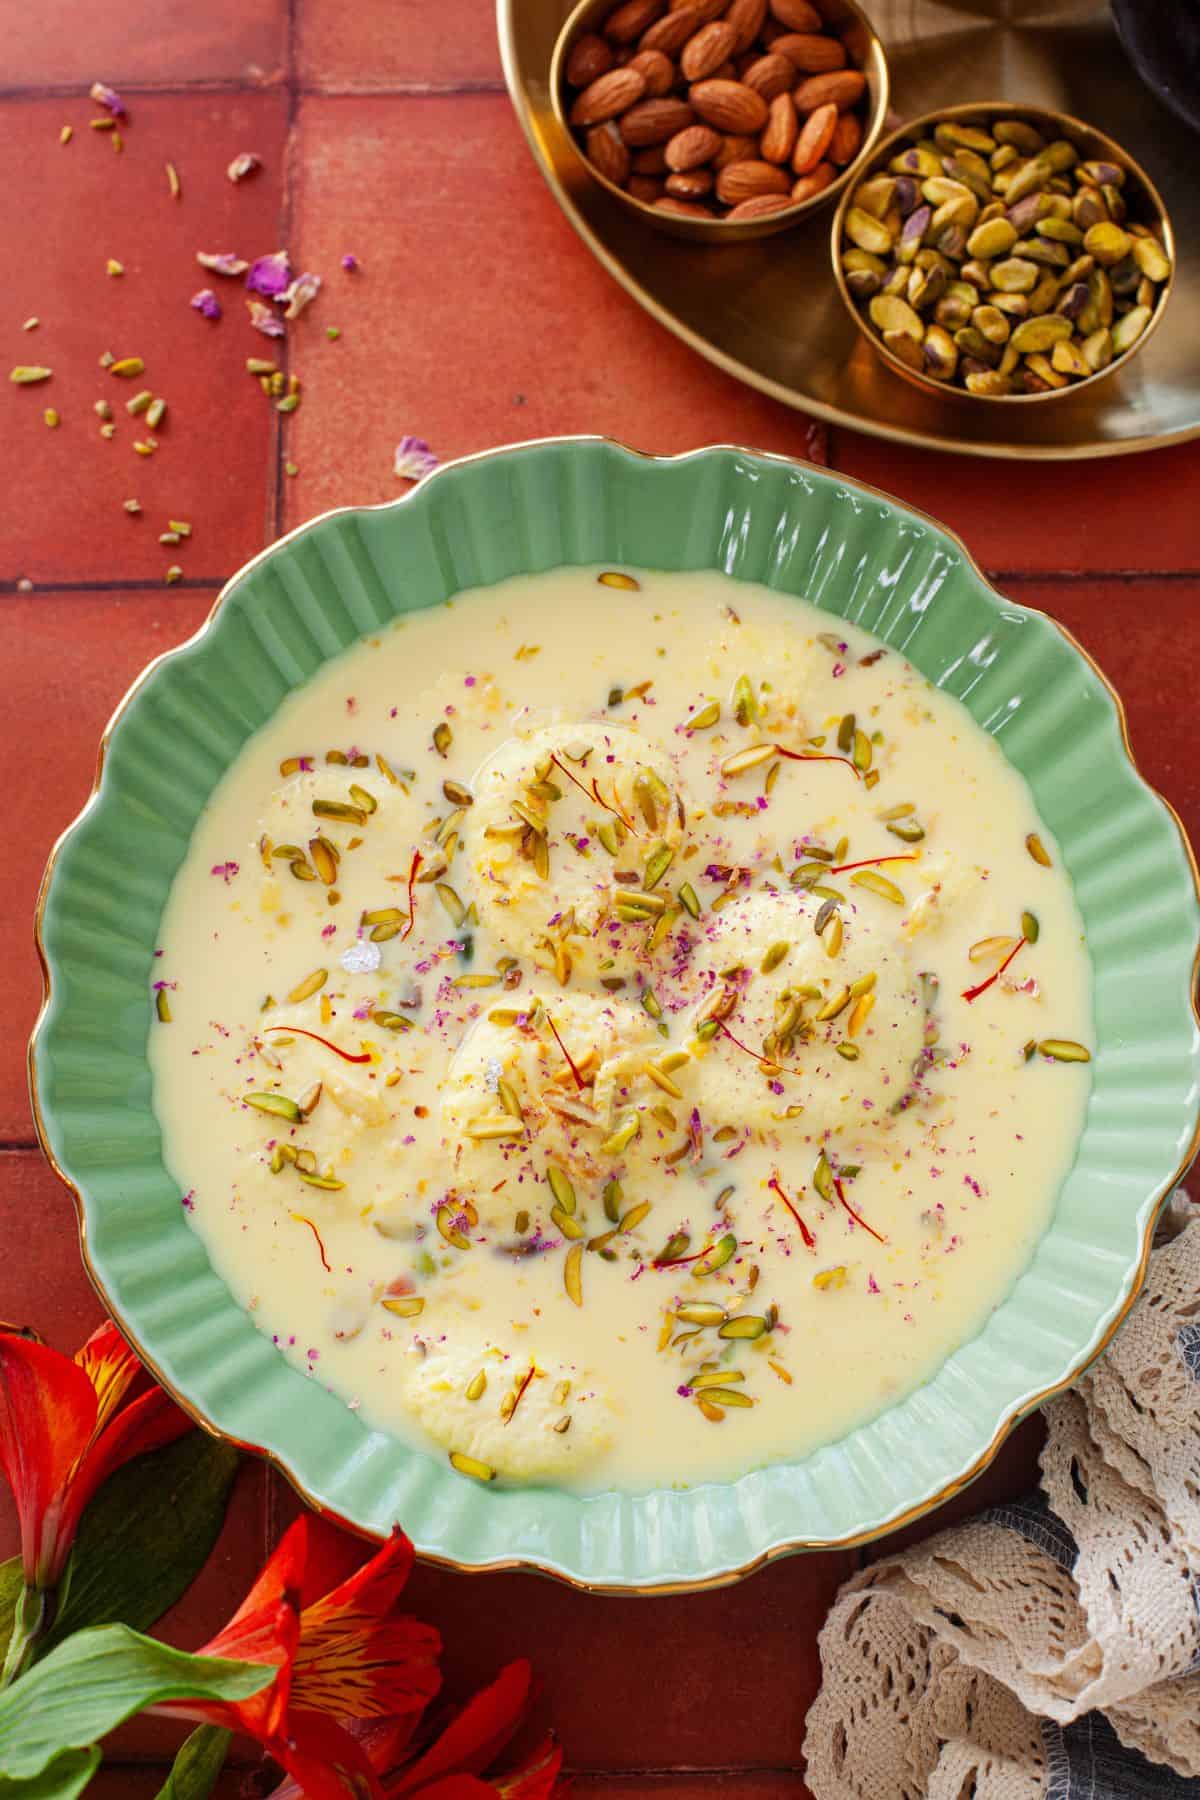
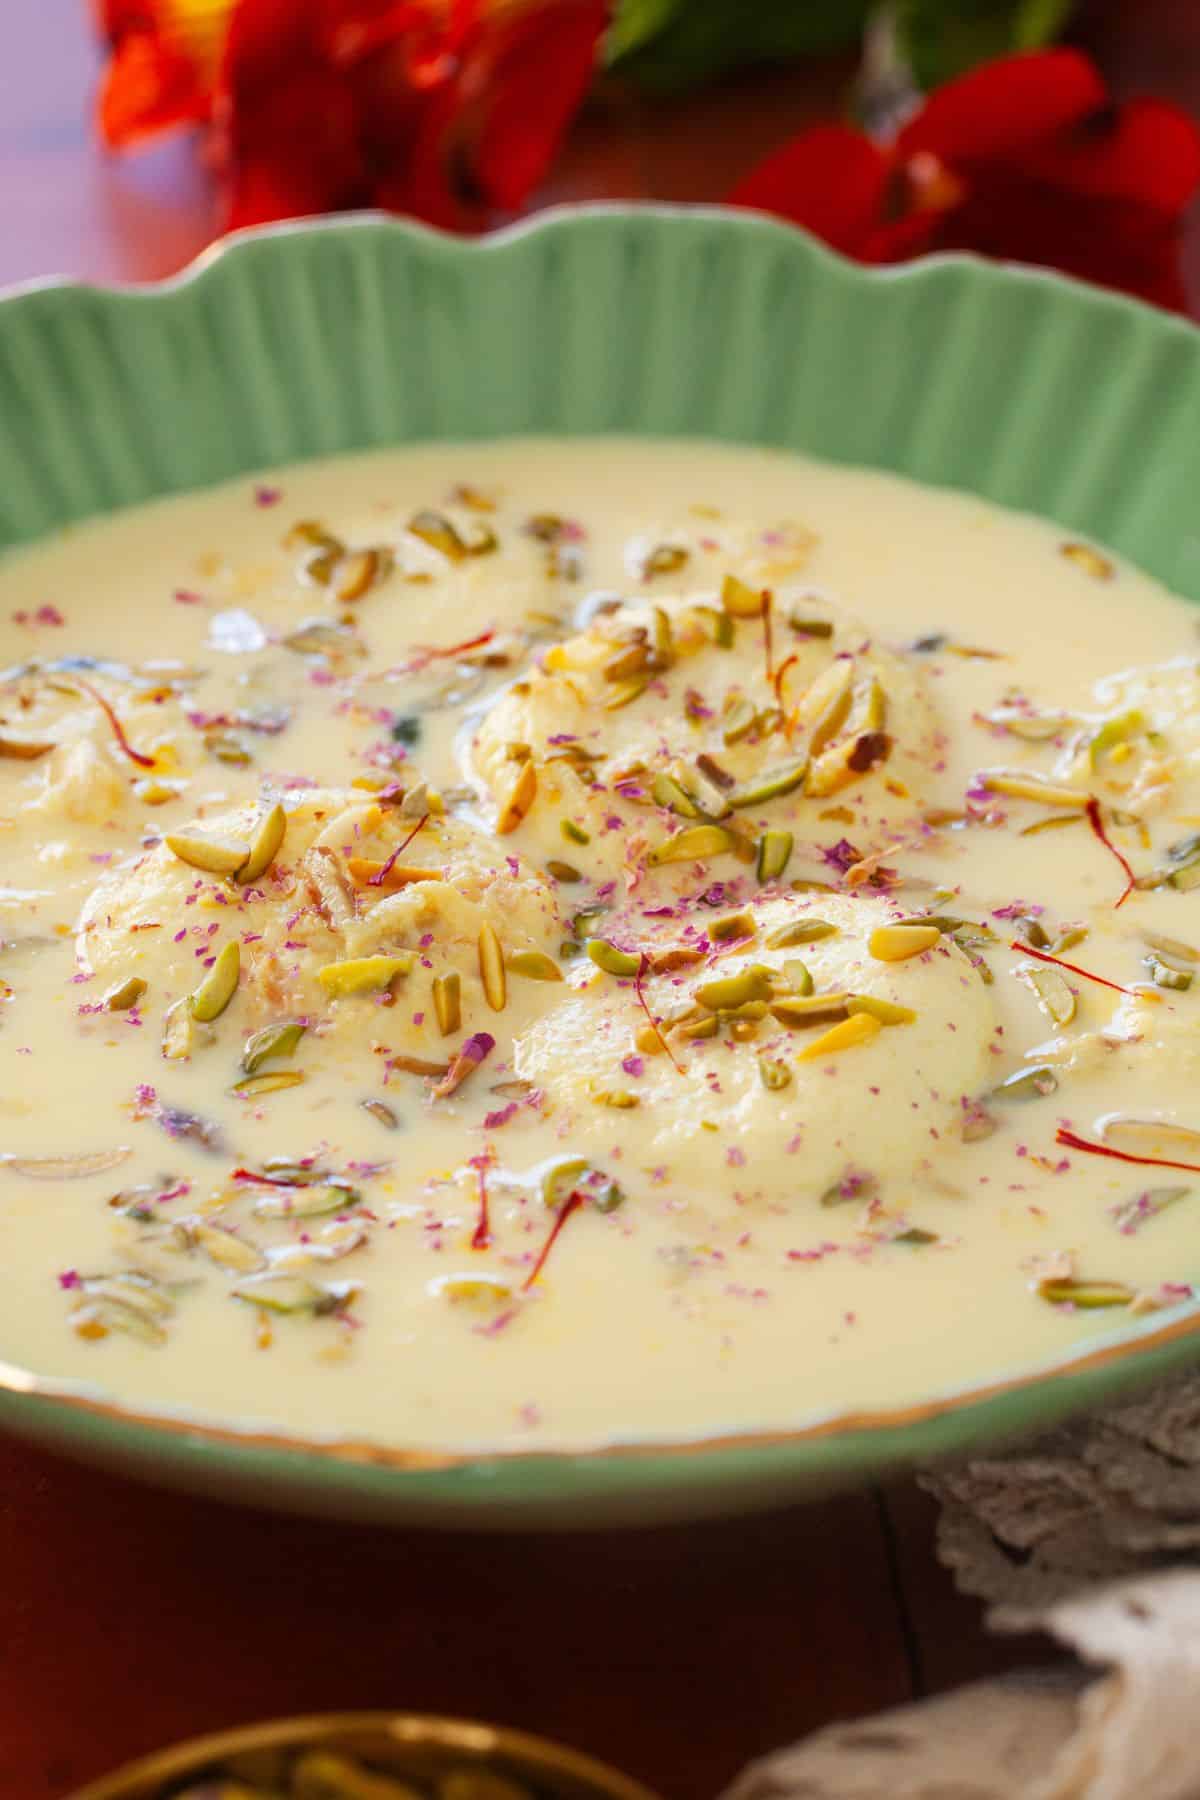
By following the tips and timings outlined in my rasmalai recipe, you'll achieve the softest and creamiest rasmalai that can easily rival store-bought varieties. I've included a wealth of tricks and step-by-step photos to guide you through the entire process of creating this dreamy, melt-in-your-mouth Bengali sweet at home!
Growing up, homemade rasmalai was not a part of my experience. In fact, aside from a few basic sweets like ladoos and halwa, all mithai was typically store-bought. After moving to the United States, I taught myself how to make decent mithai because,on most days, I refuse to eat frozen sweets.
And let me tell you, Bengali sweets are quite challenging! I've spent many years trying to perfect the texture of my rasgullas and rasmalai. After watching countless tutorials and doing extensive cookbook reading, I finally cracked the code. I am utterly satisfied with this rasmalai recipe, and my Bengali husband gave it two thumbs up. So, let's get started!
What is Rasmalai
In Hindi, "ras" means juice, and "malai" means cream. In essence, rasmalai consists of soft and creamy chenna (cottage cheese) dumplings soaking in sweetened, flavored milk full of nuts. As the dumplings soak, they absorb the milk, becoming juicy and are infused with its rich flavor.
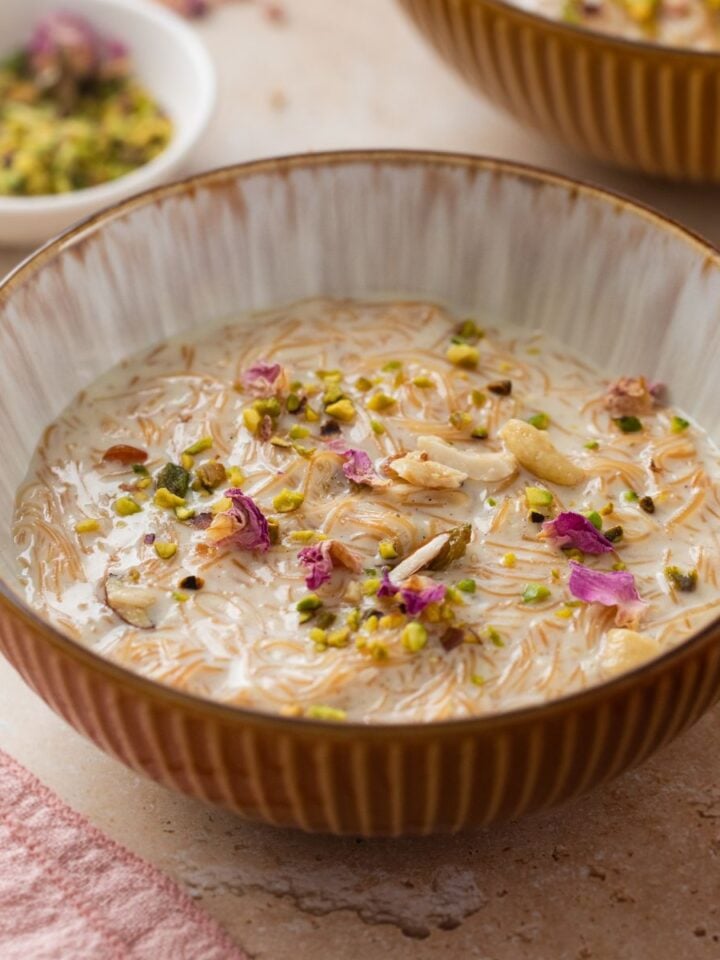
Rasmalai is a classic dessert from Bengali cuisine, which is renowned for its milk and chenna-based sweets. It is one of the most popular dessert served on indian festivals. In recent time, on social media there are also many versions and fusion recipes that have been created around the classic flavors (do take a look at my mango rasmalai and rasmalai boba!).
While there are many quick and easy rasmalai recipes available, making this traditional Indian dessert from scratch is a lengthy process, taking about 2 to 2.5 hours. However, trust me, it is totally worth the effort. Rasmalai is the perfect dessert for parties or special occasions, and the best part is that it can be made ahead of time.
Tips to Make Best Ras malai
- Trust The Process - Like most traditional mithai recipes, rasmalai takes time to make and perfect. Your initial attempts might not yield the desired results, but learning the art of indian mithai is all about practice and patience. Don't rush the process, especially when reducing the milk or cooking the chenna patties in syrup.
- Make chenna from scratch - Chenna or curdled whole milk is the soul of rasmalai. We need very soft, fresh chenna for light & airy texture of the rasmalai discs. Avoid using store bought paneer as sometimes it has additives or coagulants which won't result in the right texture.
- Kneading chenna - This is the KEY step in making perfect rasmalai. Having developed this recipe over a long period of time, I can confidently say that it's more important to trust how the chenna feels under the heel of your palm than to rely solely on the timer. The chenna should feel smooth and pliable, not grainy or oily.
- Don't go overboard on flavorings - Rasmalai is supposed to be a dainty and delicate dessert. A light sprinkle of green cardamom (freshly ground is best) and a few saffron threads (optional) are all you need to evoke that classic mithai feel. Stronger flavors can overpower the dessert's signature milkiness.
- Use heavy bottomed and wide mouthed pots - The choice of cooking pots really matters! I prefer using non-stick stainless steel or anodized utensils for the best results since milk has a high tendency to stick. Heavy pots ensure the milk doesn't scorch, while wide pans make stirring easier and provide enough space for the rasmalai balls to expand.
My Learnings During Recipe Testing
- Always Use Fresh Whole Milk - While recipe testing, in a few attempts, I used skimmed milk (2% milk) for the ras just to know the difference. As anticipated, I was bit disappointed with the results. For juicy and creamy rasmalai, it's essential to use only whole milk, both for making the ras and for preparing the chenna.
- Handle Chenna Gently - I've realized that keeping chenna soft is crucial for a supple rasmalai texture. To achieve this, it's important to avoid shocking the chenna during its formation. That's why we don't add the curdling agent straightaway after turning off the heat. Instead, we dilute the vinegar with water and add it gradually. It's essential to be gentle with the chenna, both in temperature management and stirring.
- Control The Flame & Stir Regularly - Since this recipe involves a lot of milk, trust me, watching the flame and stirring regularly is crucial. In a few of my trials, I missed stirring the milk for a while, and the milk scorched at the bottom and the entire batch was spoiled.
- Use Regular Sugar (White Sugar)- I'm quite addicted to using sweetened condensed milk in desserts. However, during recipe testing, when I tried using condensed milk to sweeten the ras in one of the trials, it didn't work out well. The ras became quite thick, which prevented the chenna patties from absorbing the milk properly. Sugar will prevent this outcome.
How To Make Soft Rasmalai
Prepare The Ras (Sweet Milk)
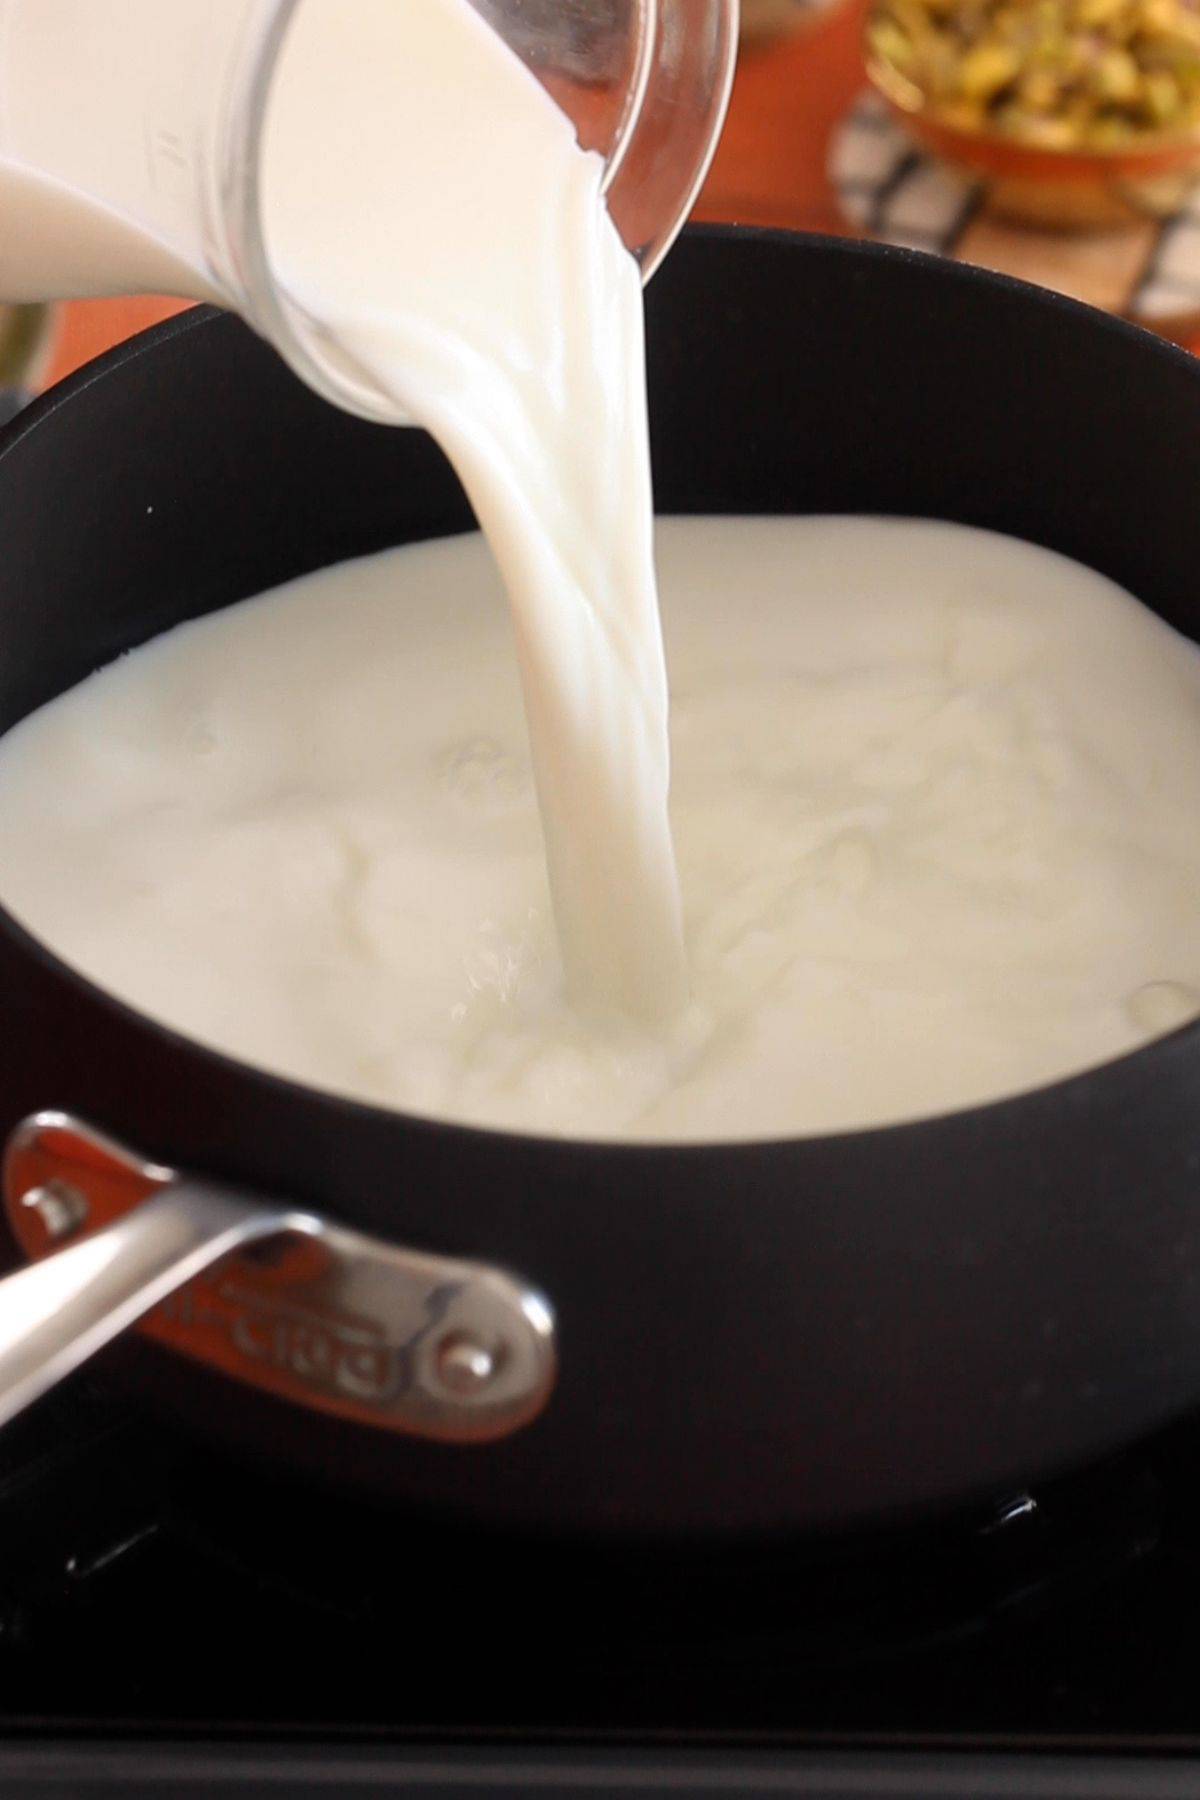
- Pour 1 litre of whole milk into a heavy bottomed deep pot(I use 4 qt pot) .
- Place the pot of milk on a low to medium flame, and while stirring regularly with a rubber spatula, bring the milk to a boil. For 1 liter of milk, this process will take about 10-12 minutes.
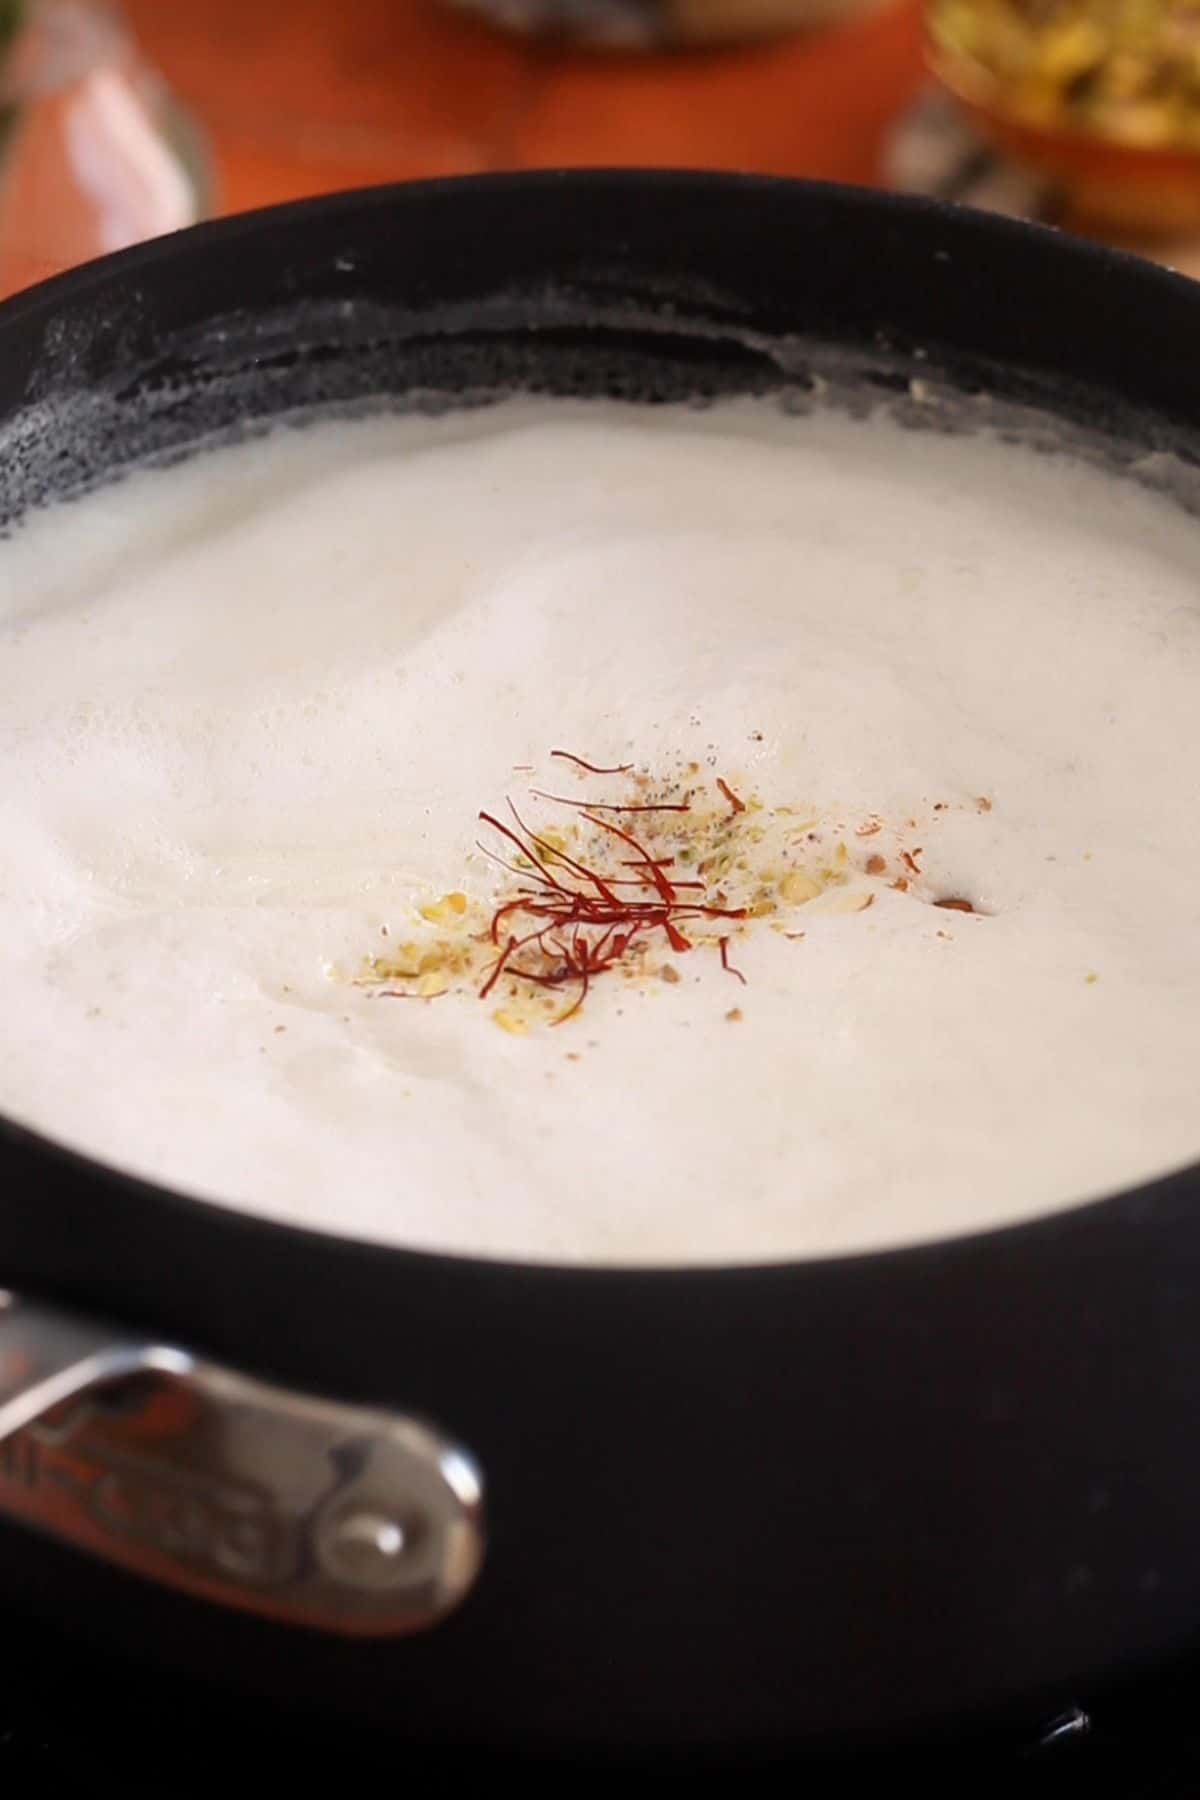
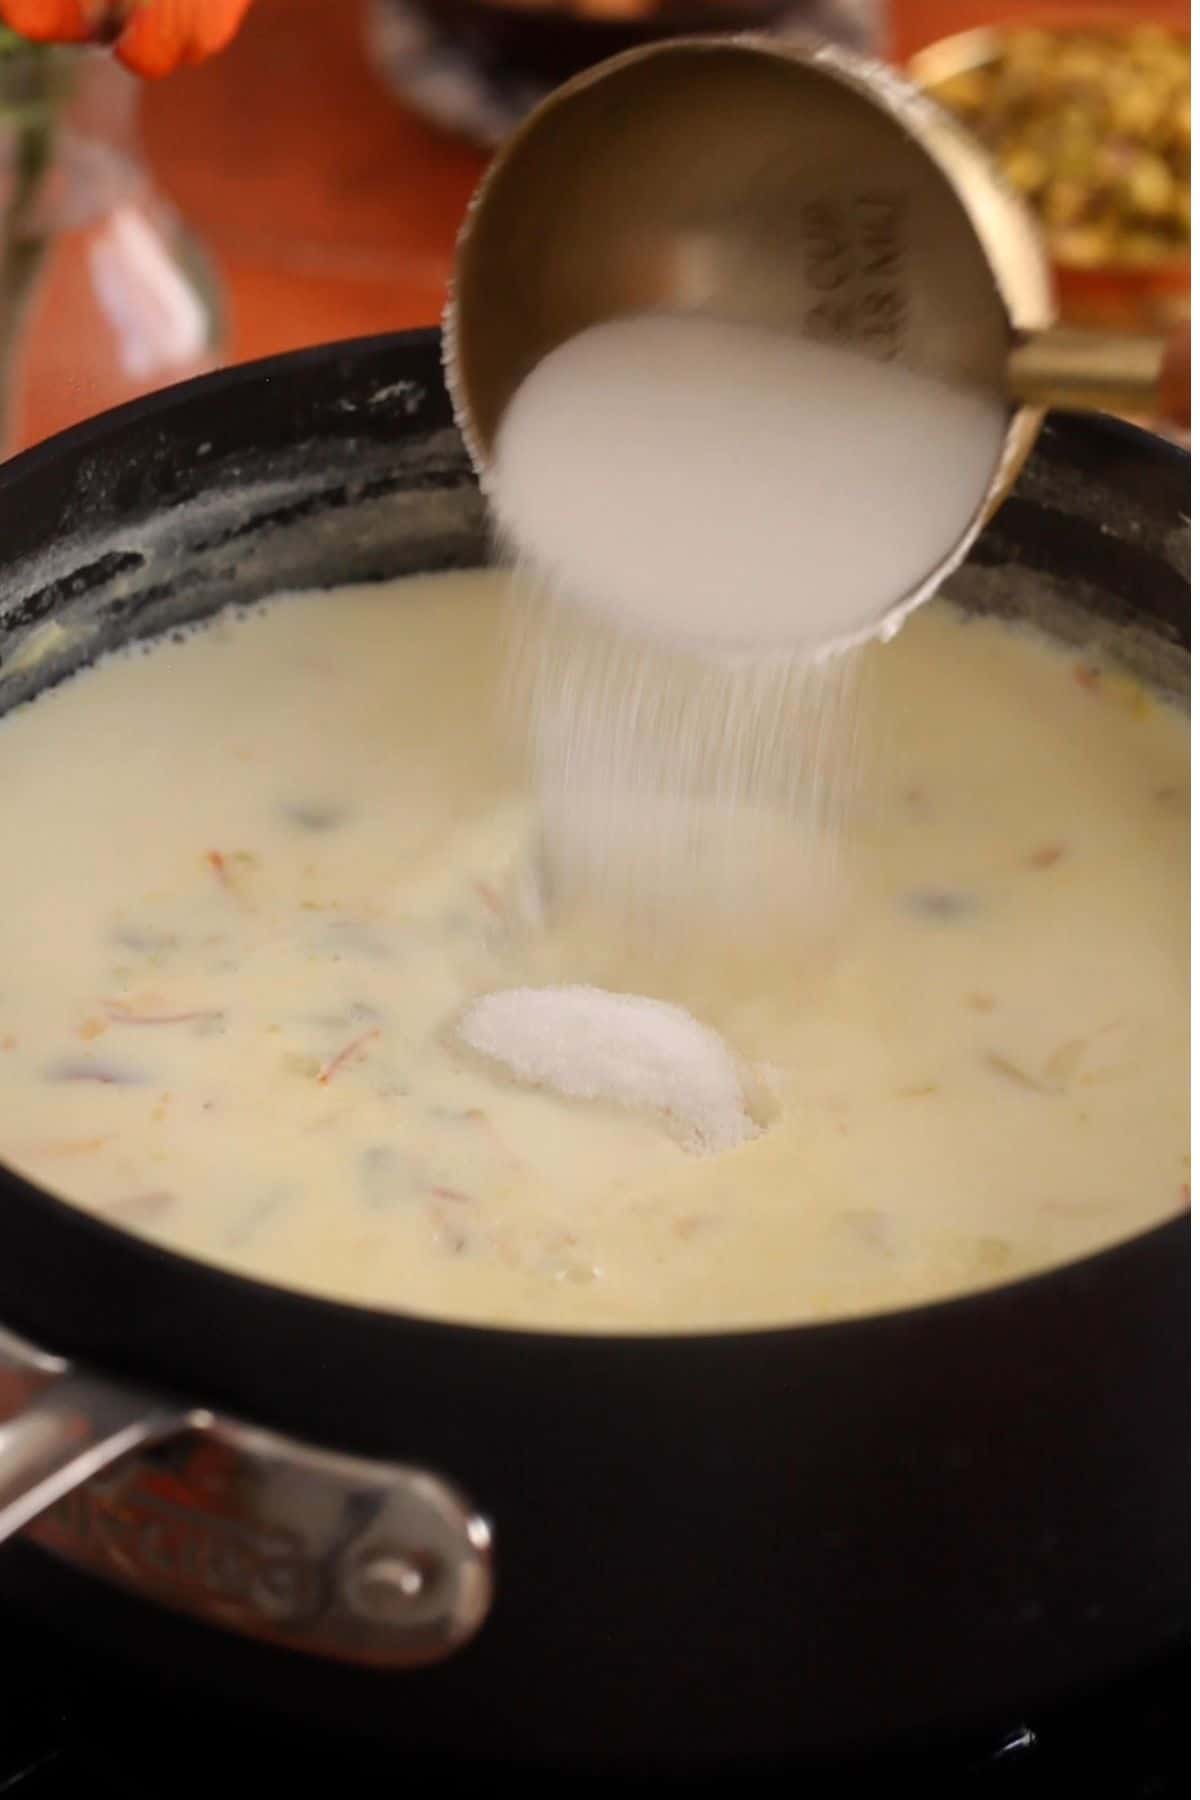
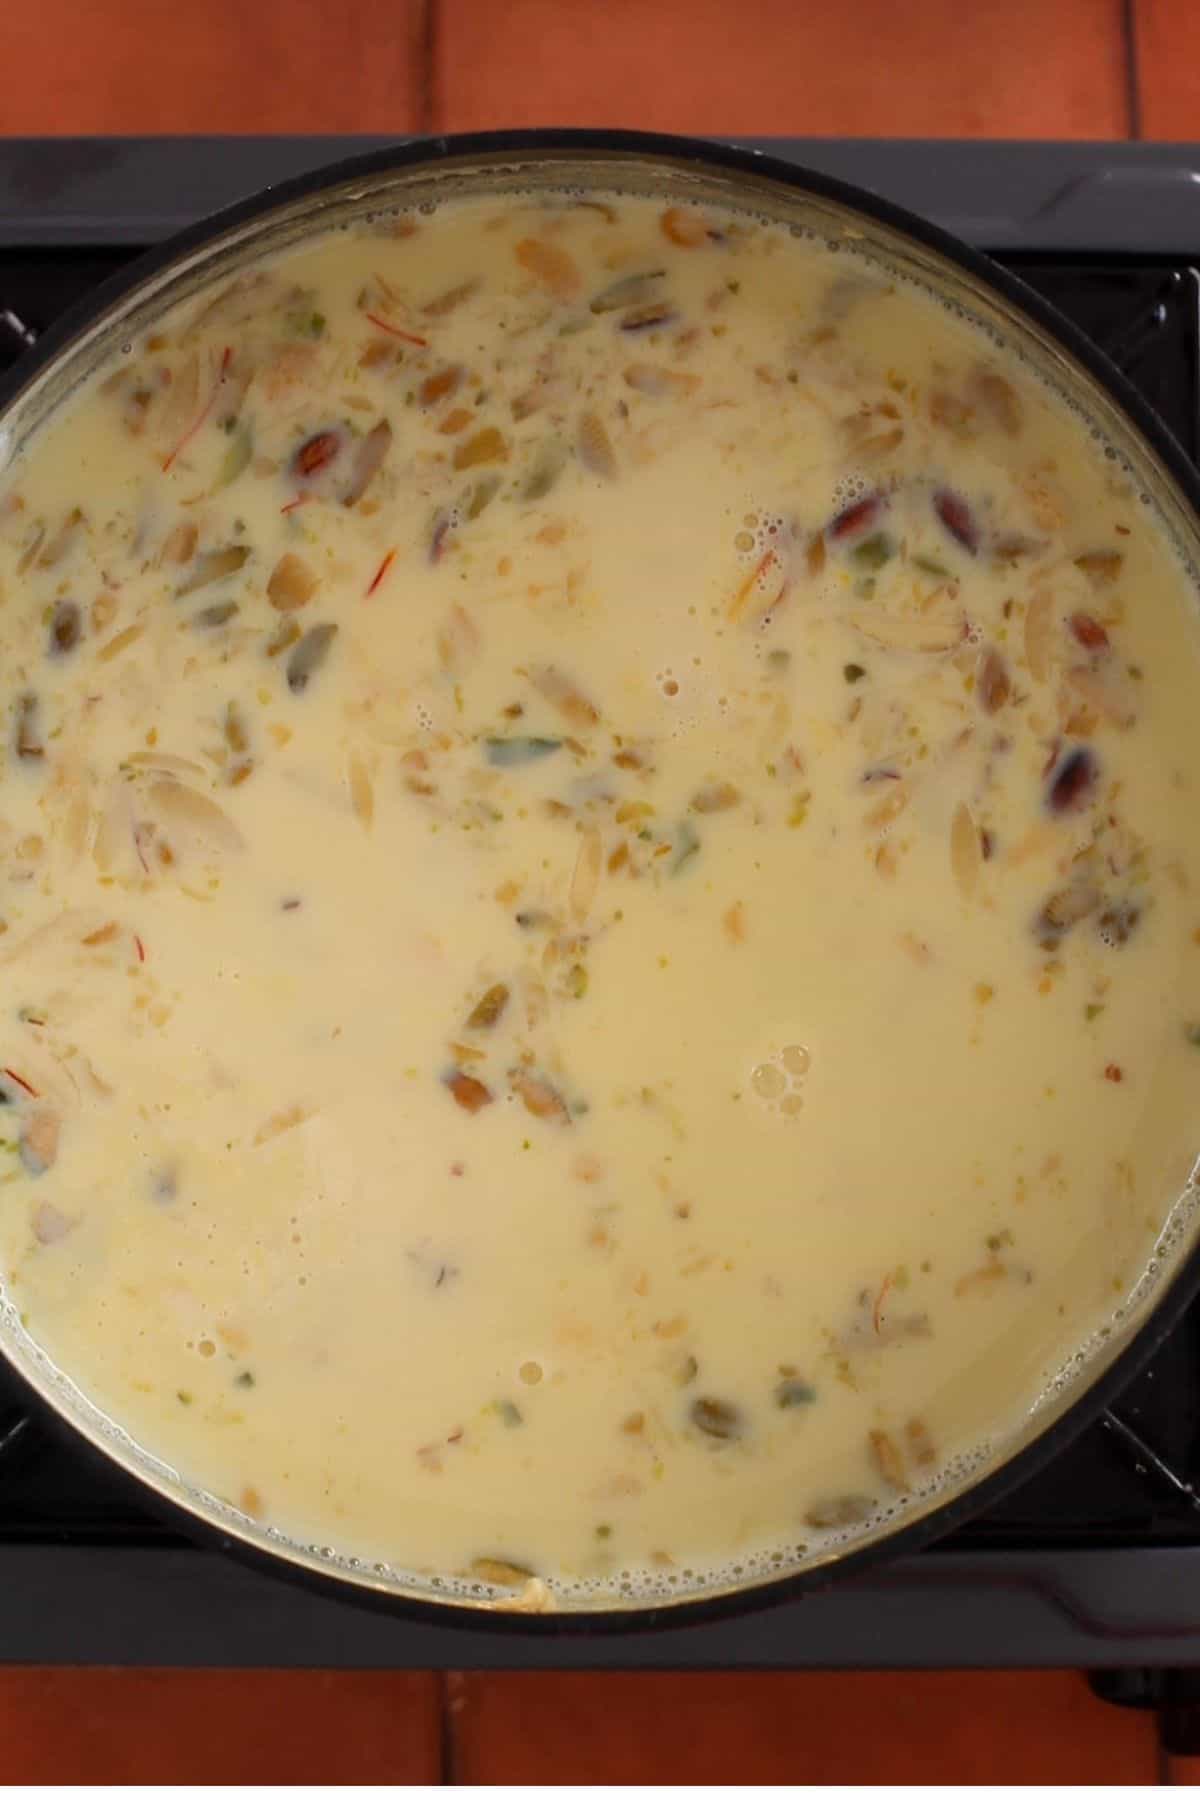
- Reduce to low heat and add the almonds, pistachios, green cardamom powder and saffron strands to the simmering milk. Let simmer for 3-5 more minutes.
- Thereafter, add the ½ cup sugar and stir with spatula until it dissolves. Stir at regular intervals and let milk cook for 3-4 minutes more. Then switch off the stove. Be careful not to thicken the milk else the chenna patties won't absorb the ras. The sweetened milk should be light and pourable.
- Pour the thickened milk into a large bowl and let cool down. Don't refrigerate. Proceed to make the chenna.
How To Make Super Soft Chenna
- Select a heavy bottomed, deep cooking pot (your pasta boiling pot or similar will work great). We have to allow for the volume increase when the milk comes to a boil.
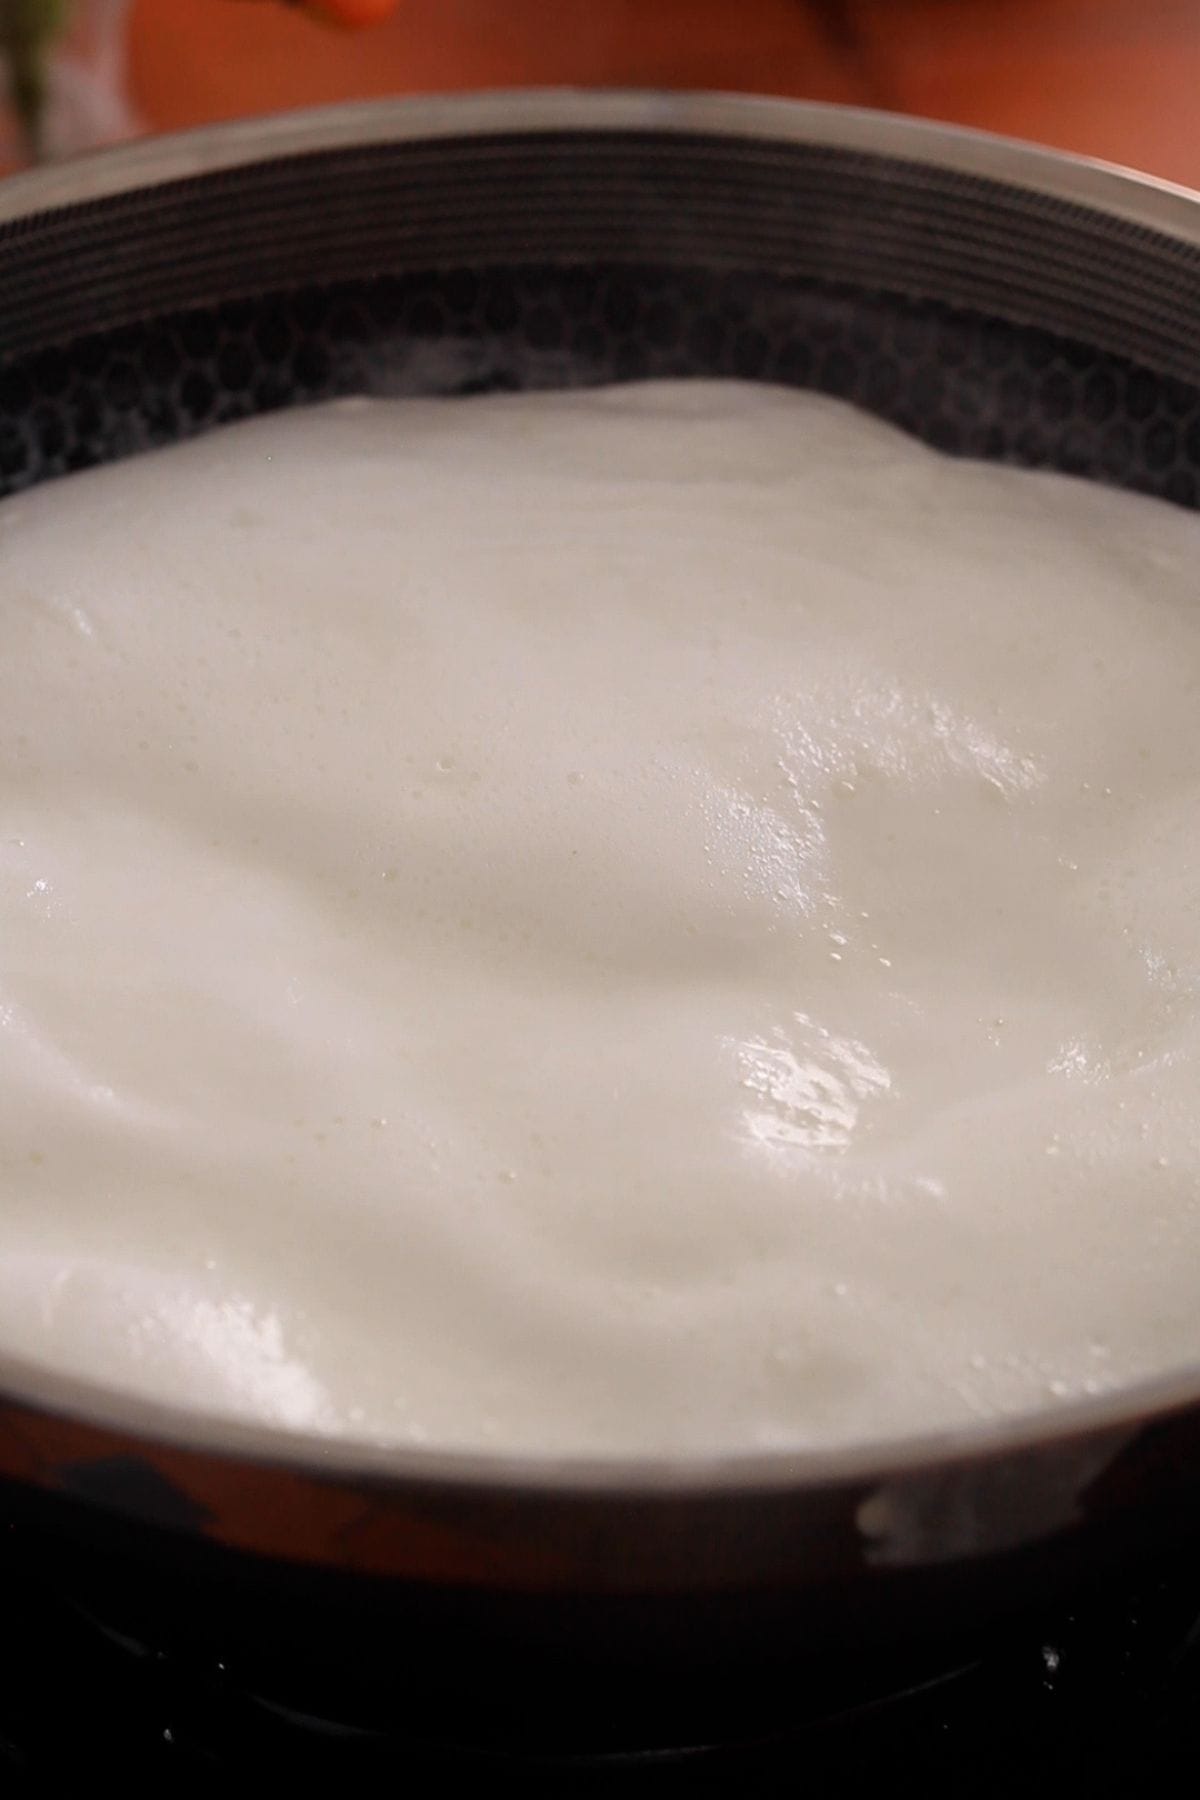
- Pour 1 litre full fat milk into the pot and on low medium heat while stirring regularly using a rubber spatula, bring the milk to a boil. For 1 litre of milk it will take 10-12 minutes.
- Switch off the stove and wait for 1 to 1:30 minutes. Meanwhile mix white vinegar and water in a small bowl or measuring cup(spout makes it easier to pour). You could use lemon juice instead of vinegar. Also, place a colander lined with a muslin cloth or cheesecloth over a large bowl (colander should not touch the bottom of bowl).
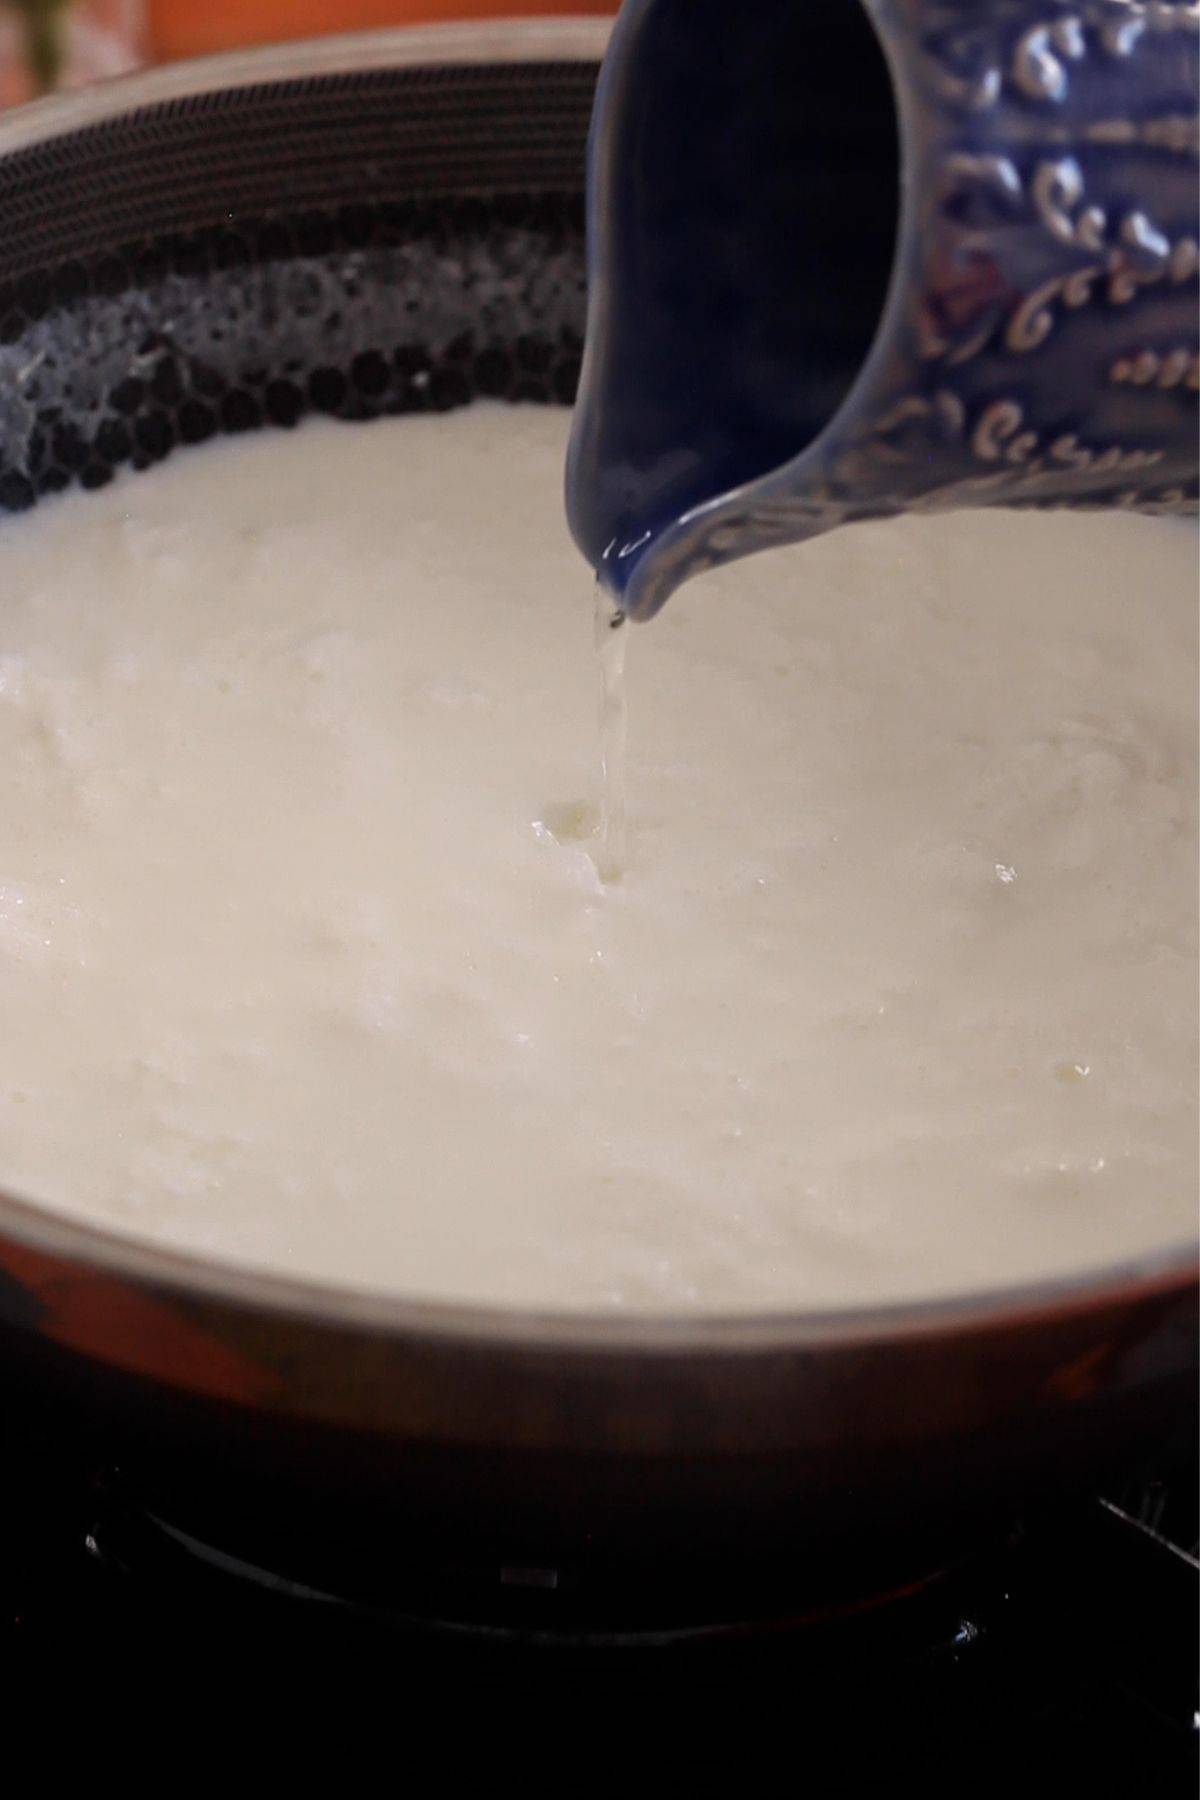
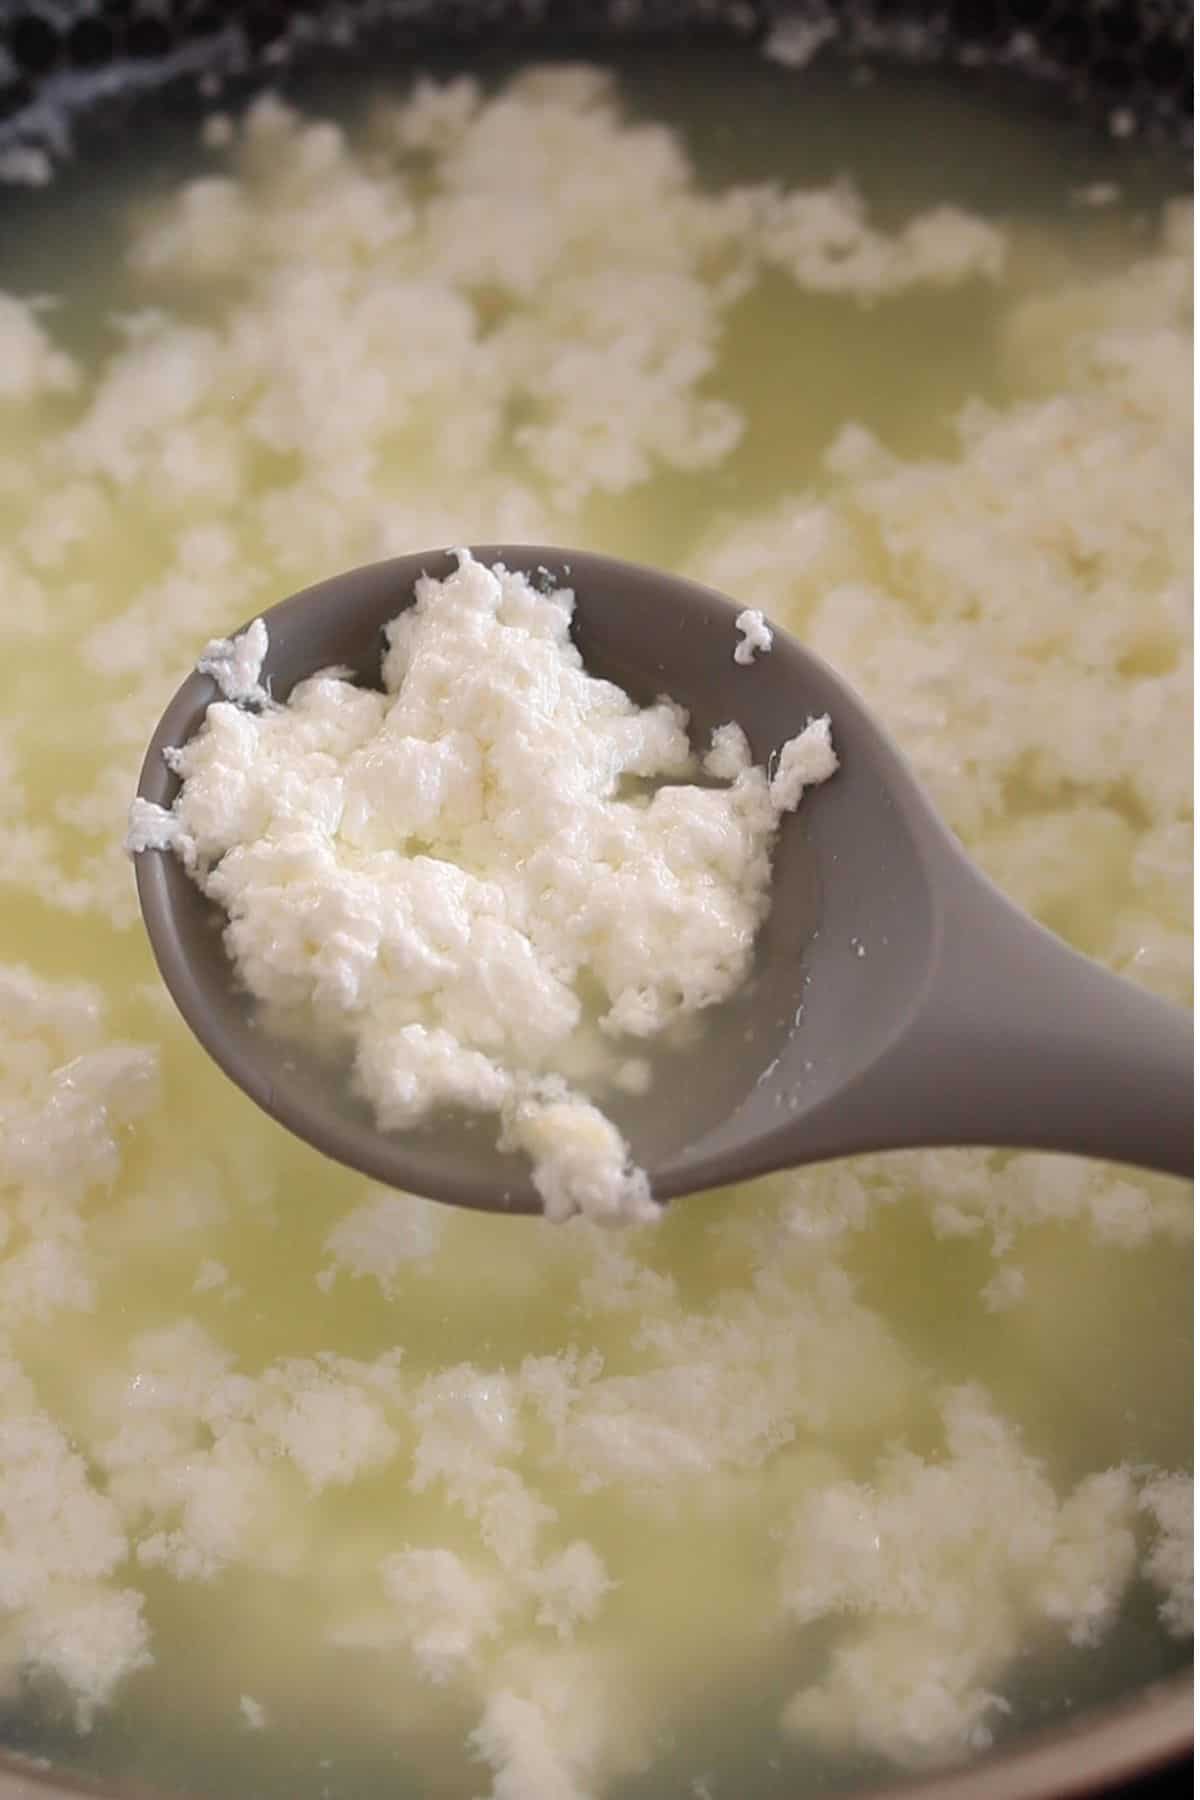
- Add the vinegar mixture to the hot milk in 3 parts. Each time you pour vinegar, very gently stir the curdled milk.
- After the third addition, you will see green whey seperating and milk solids (chenna particles). Don't let the chenna sit in the acidic environment for too long. Strain it rightaway over the colander.
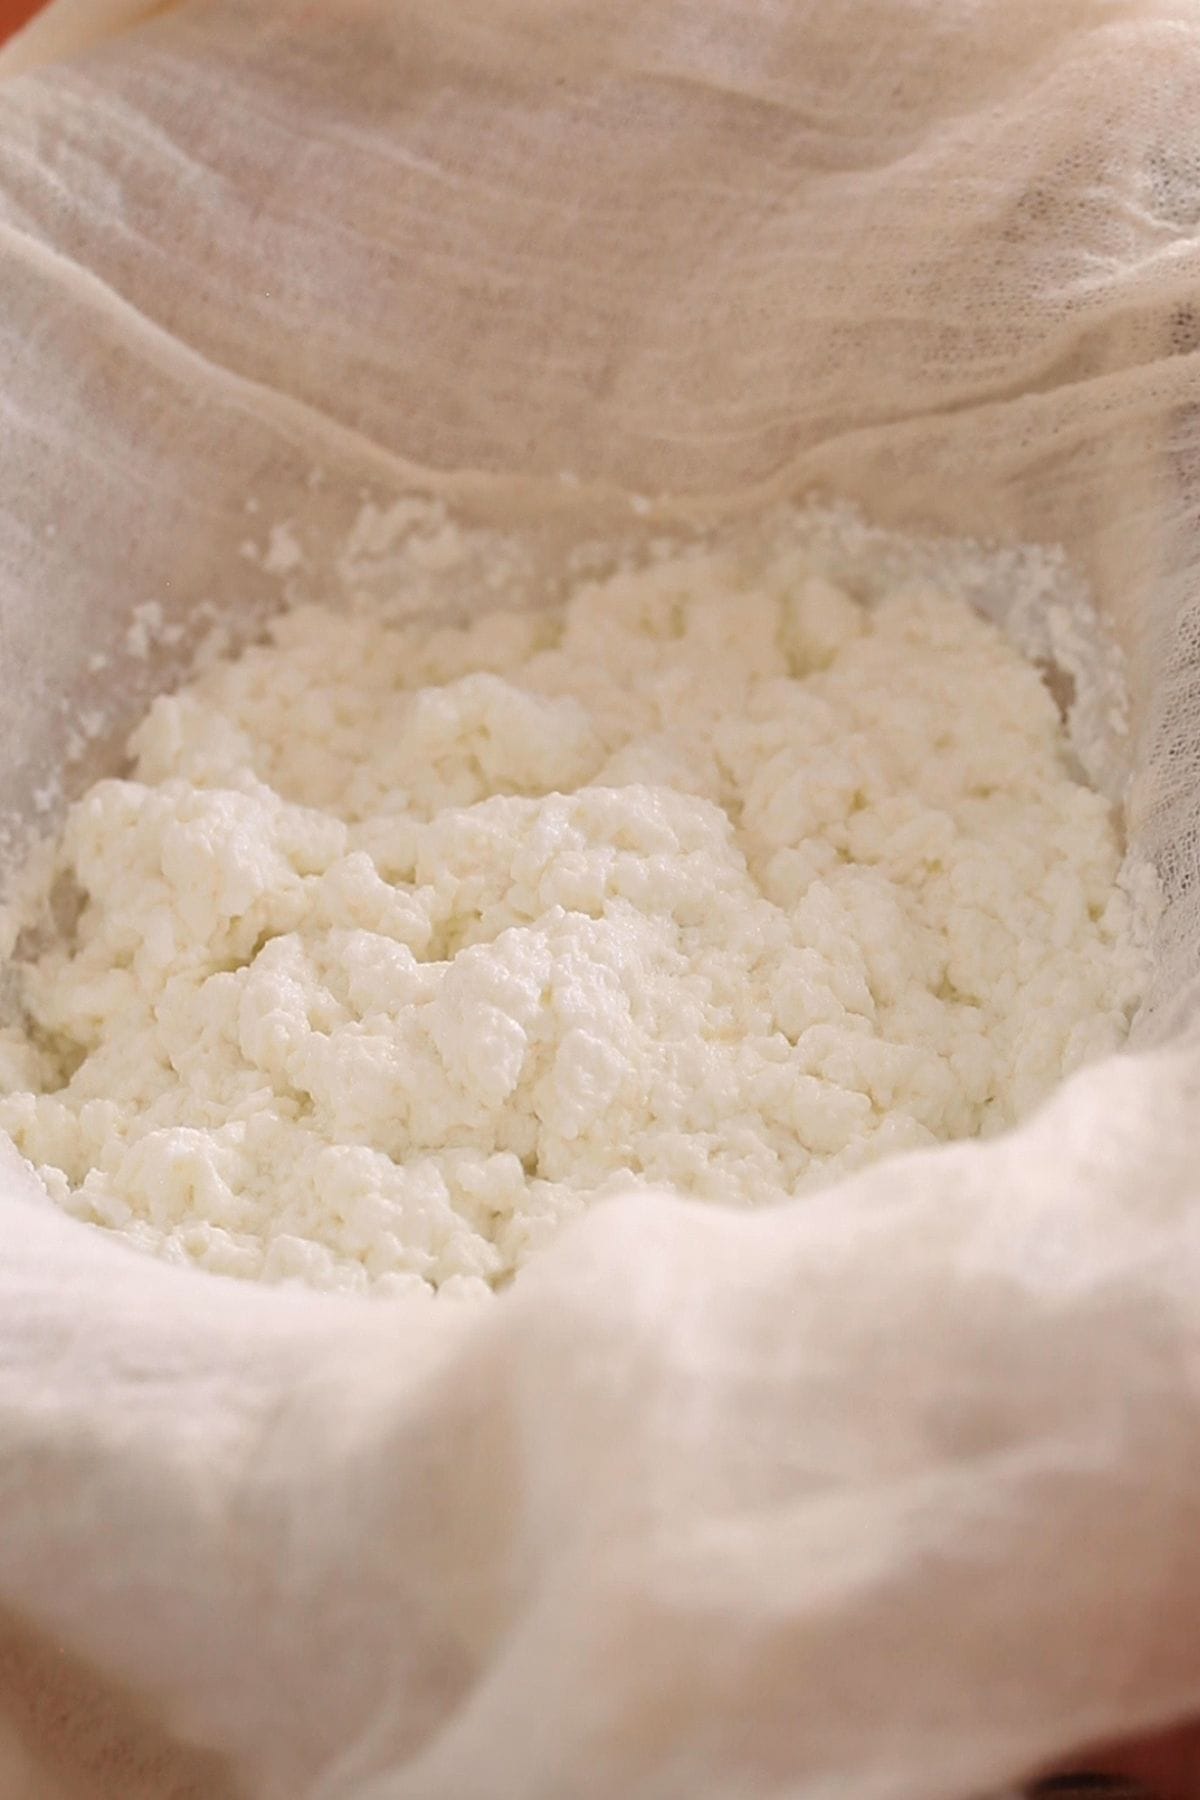
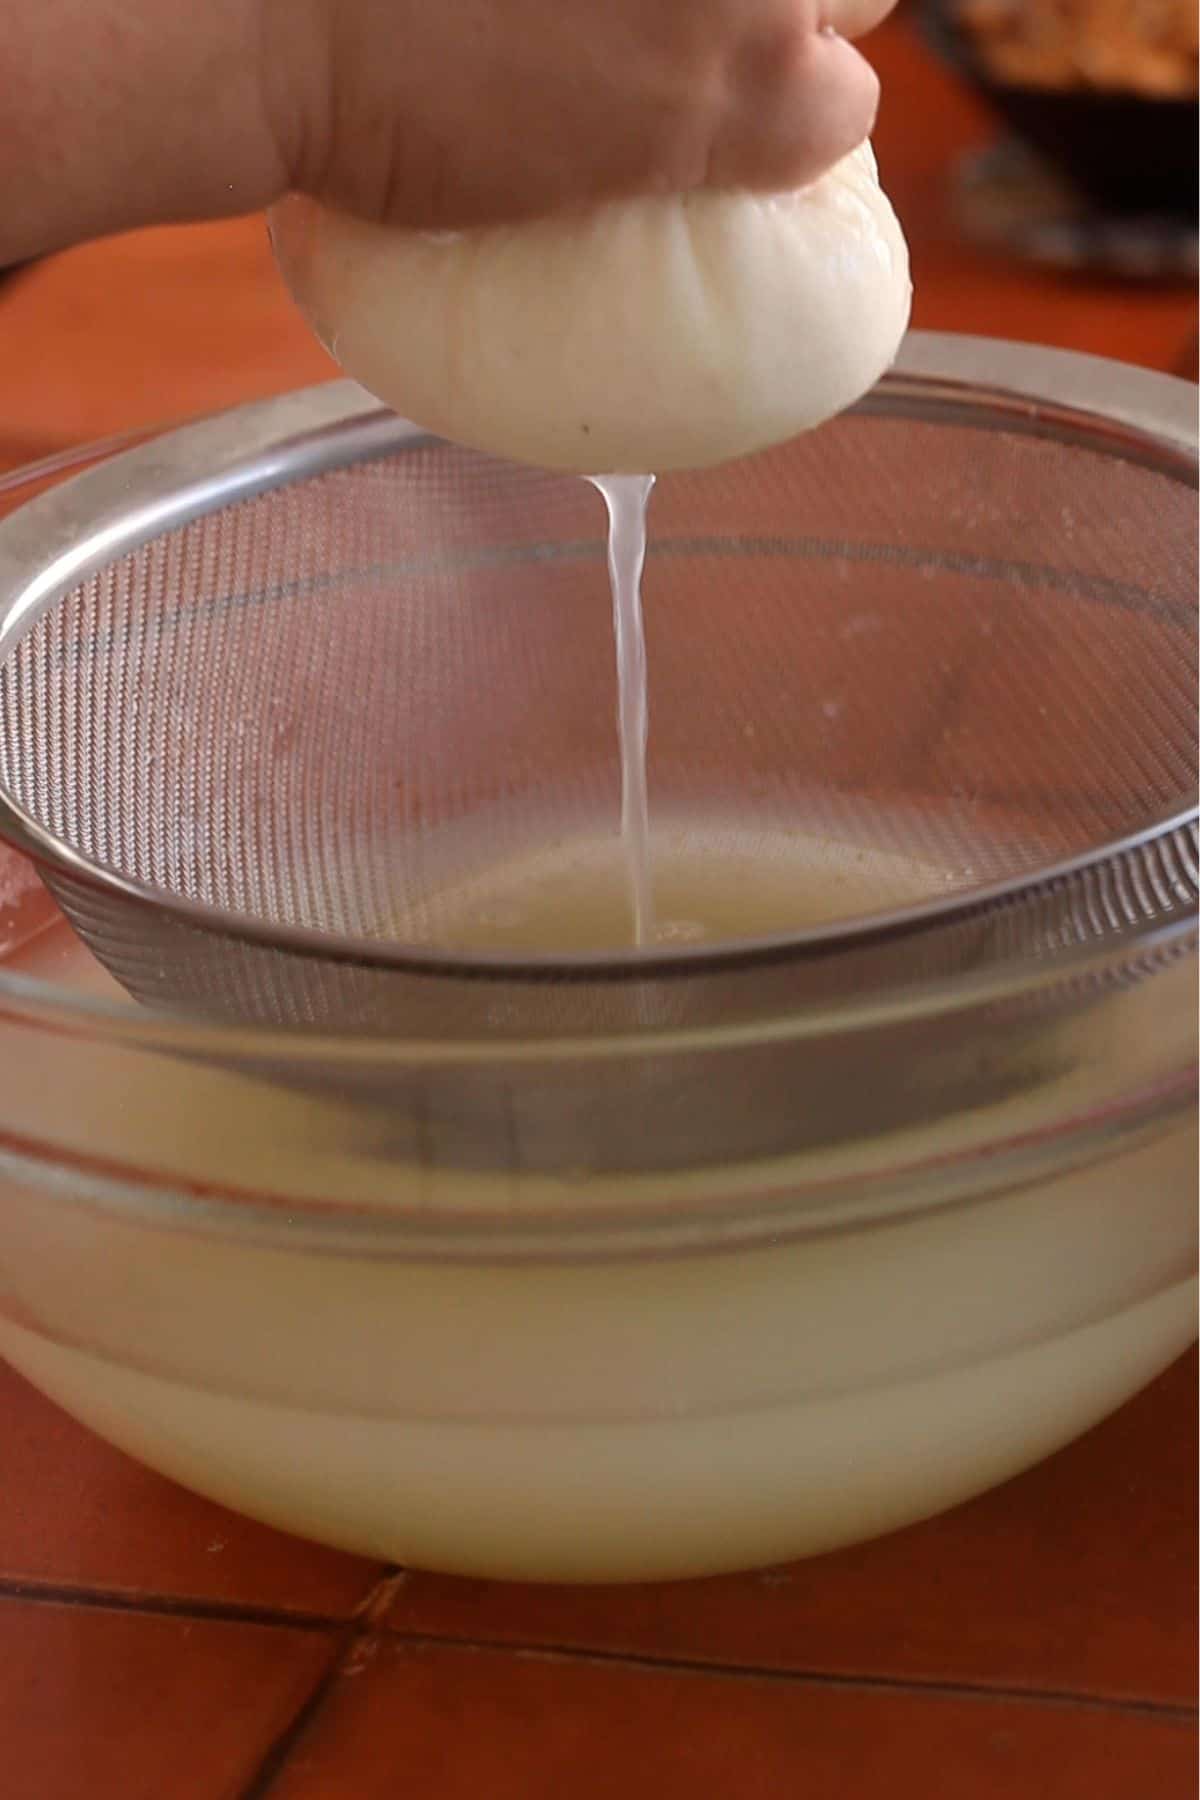
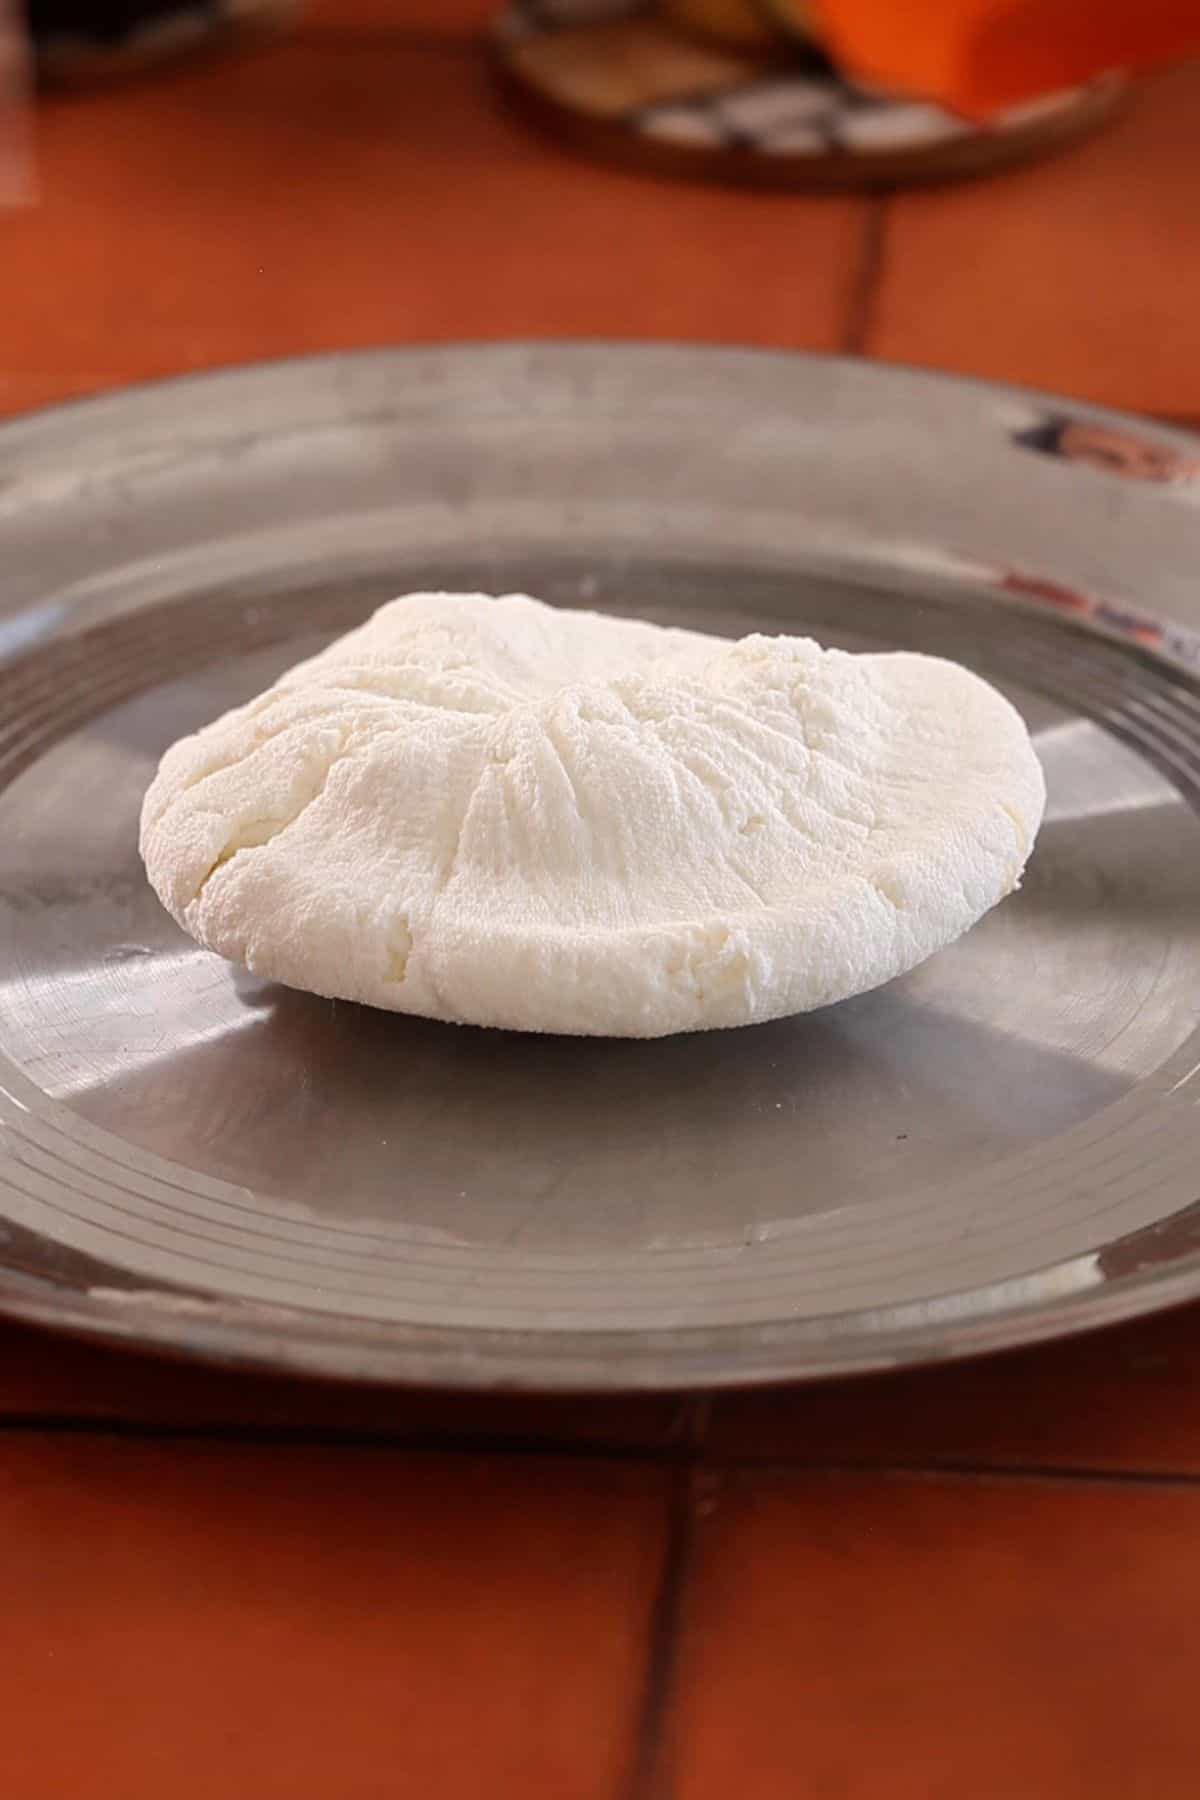
- Pour cold water to wash the chenna once, bring around the end of the cheesecloth to make a pouch. Press slightly for 5-8 seconds to squeeze out excess water.
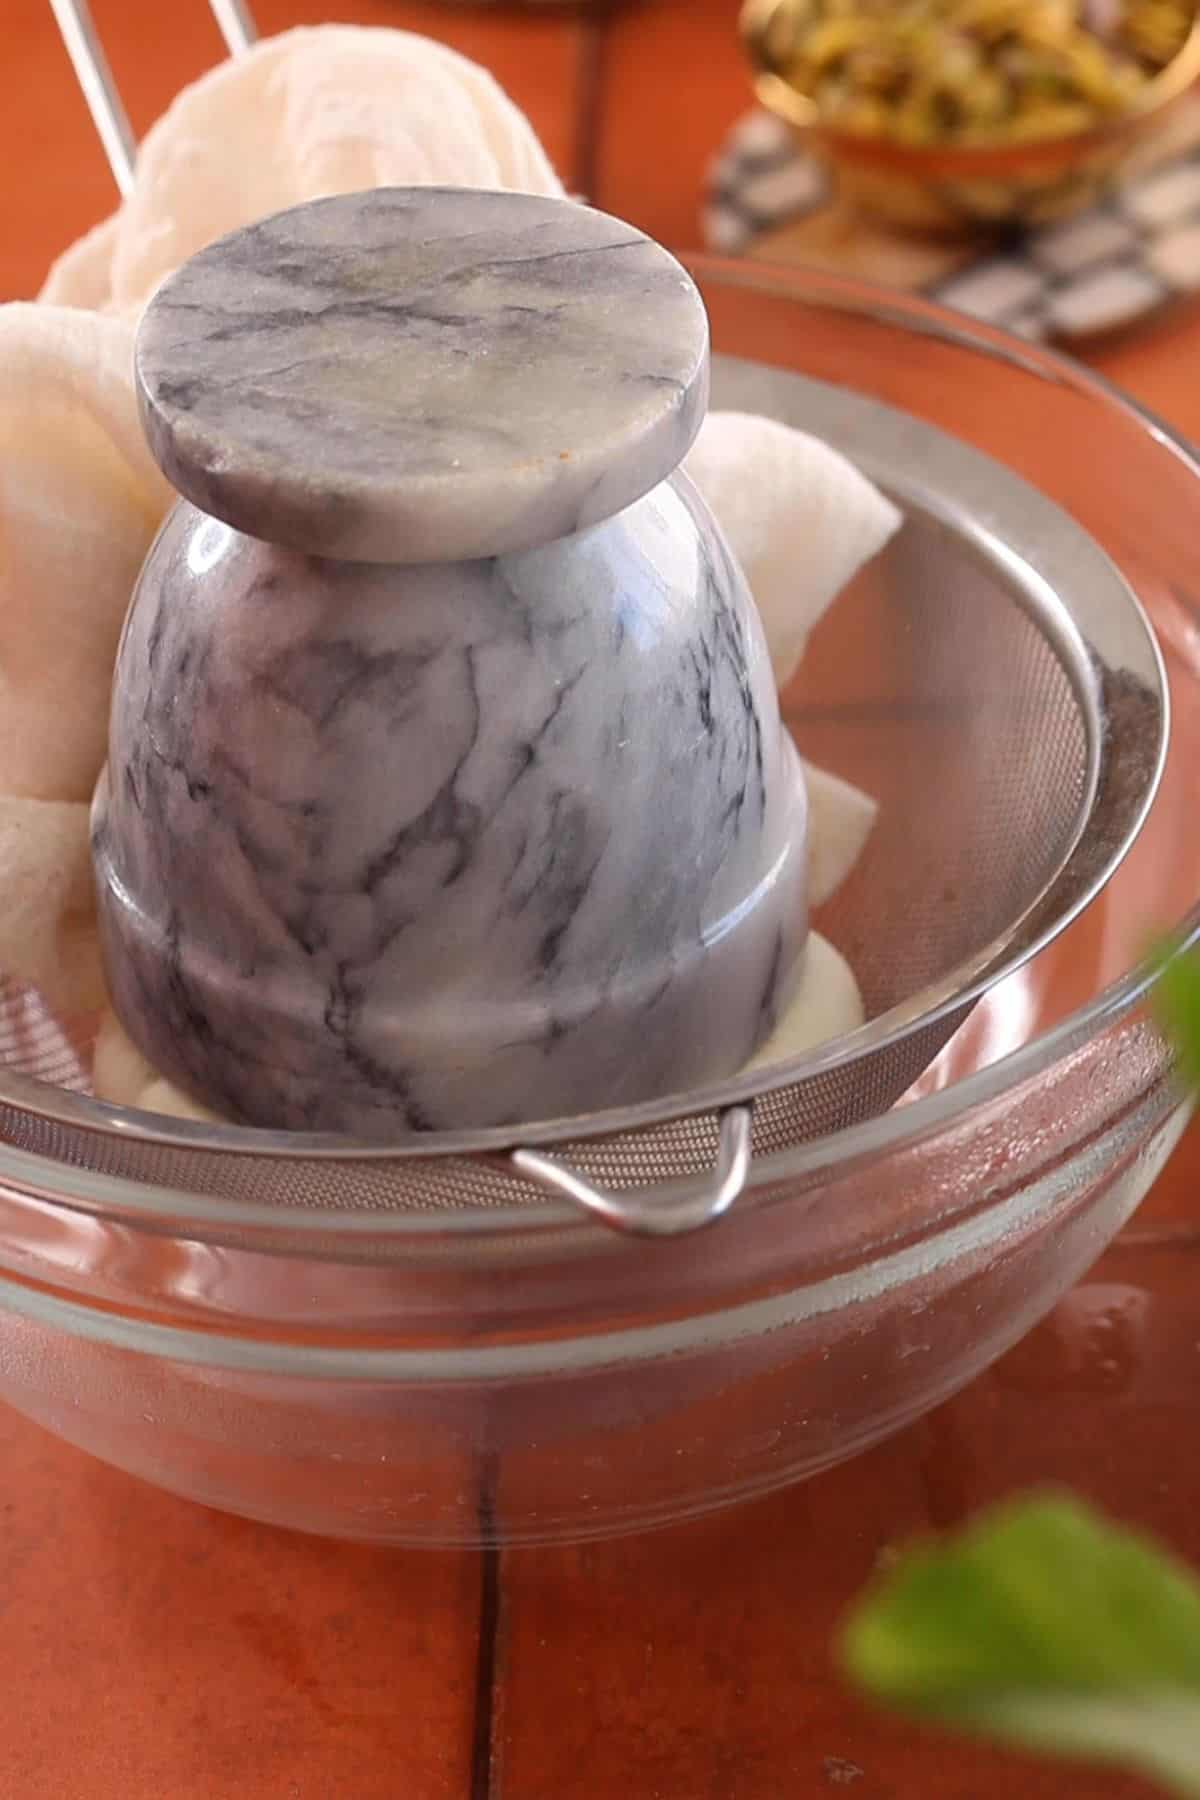
- Place the pouch over the colander and place a heavy weight (I use a heavy mortar ) over it. Let sit for not more than 8-10 minutes. We don't want to draw out lot of moisture. That will result in dry chenna and you won't be able to knead it.
Knead & Shape Chenna Patties
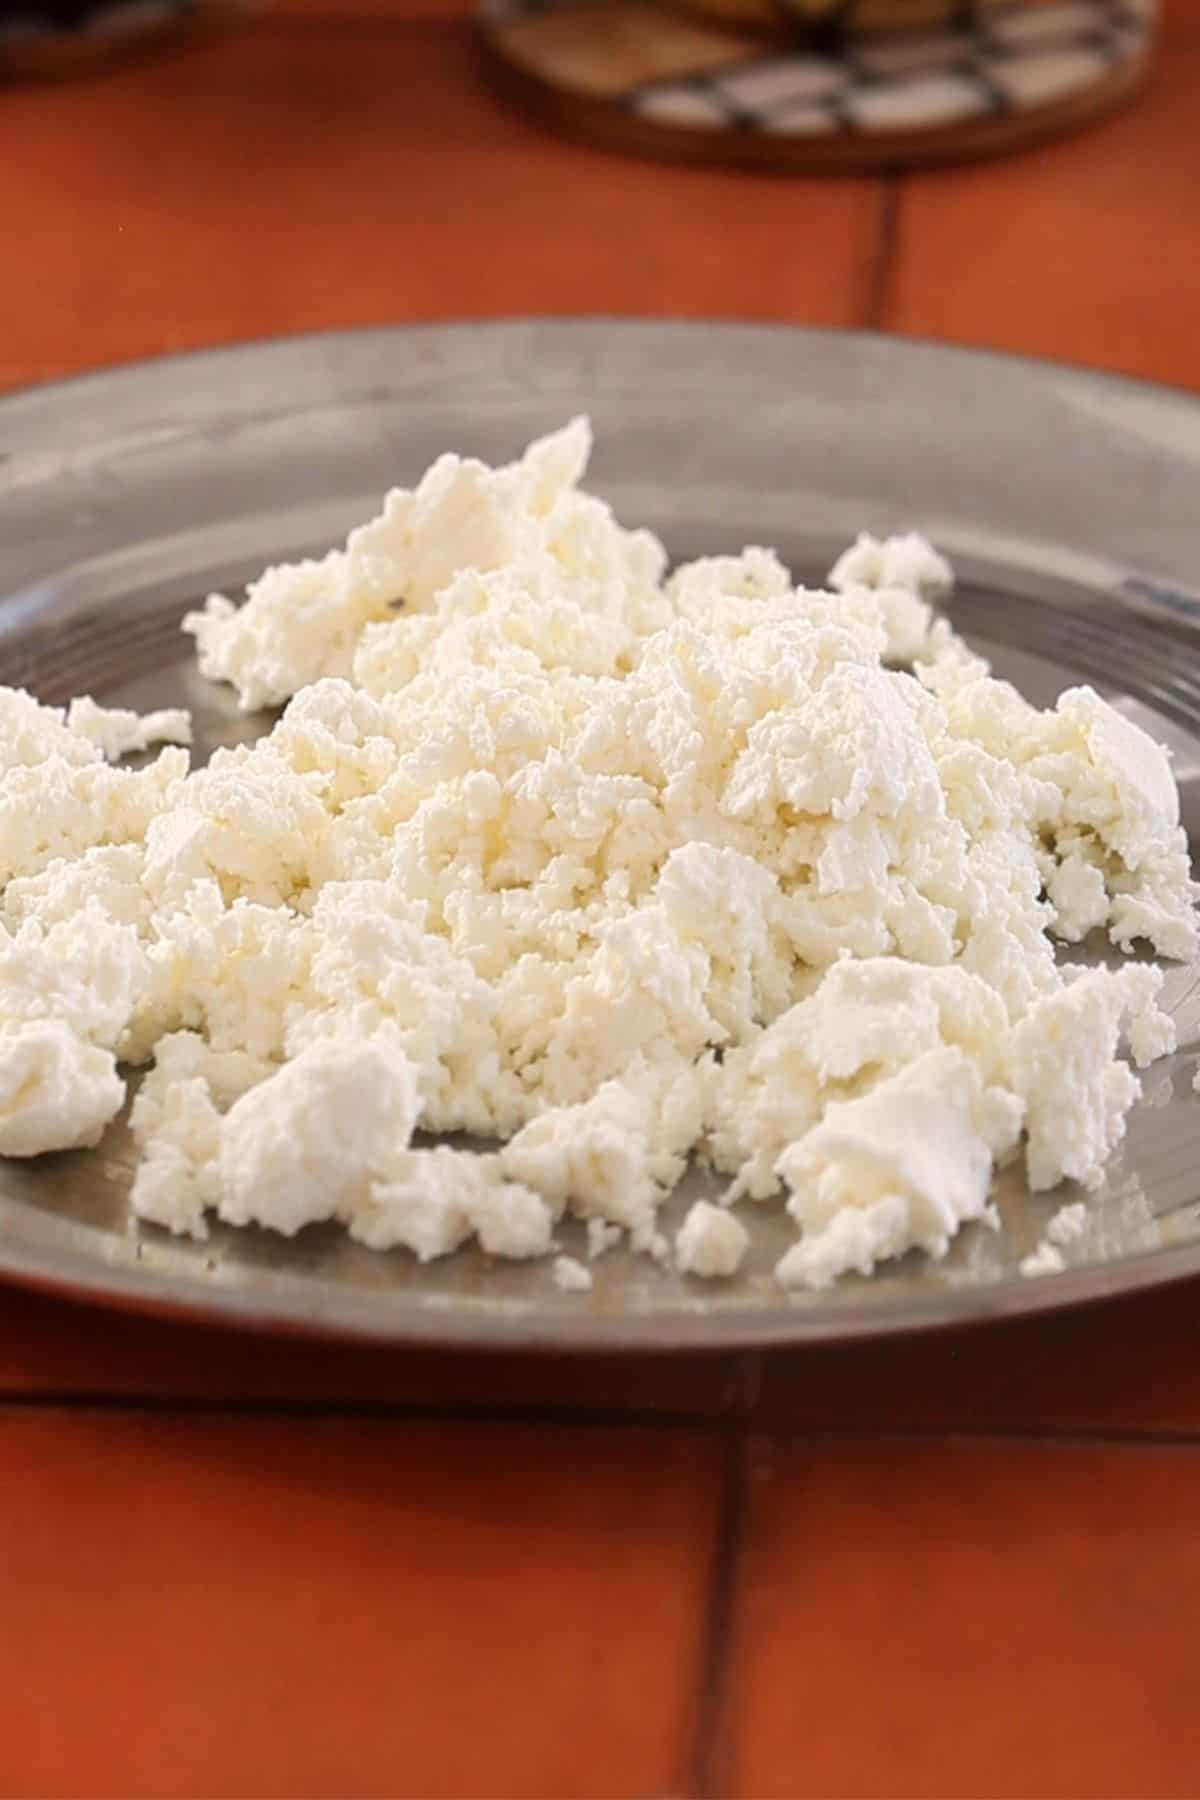
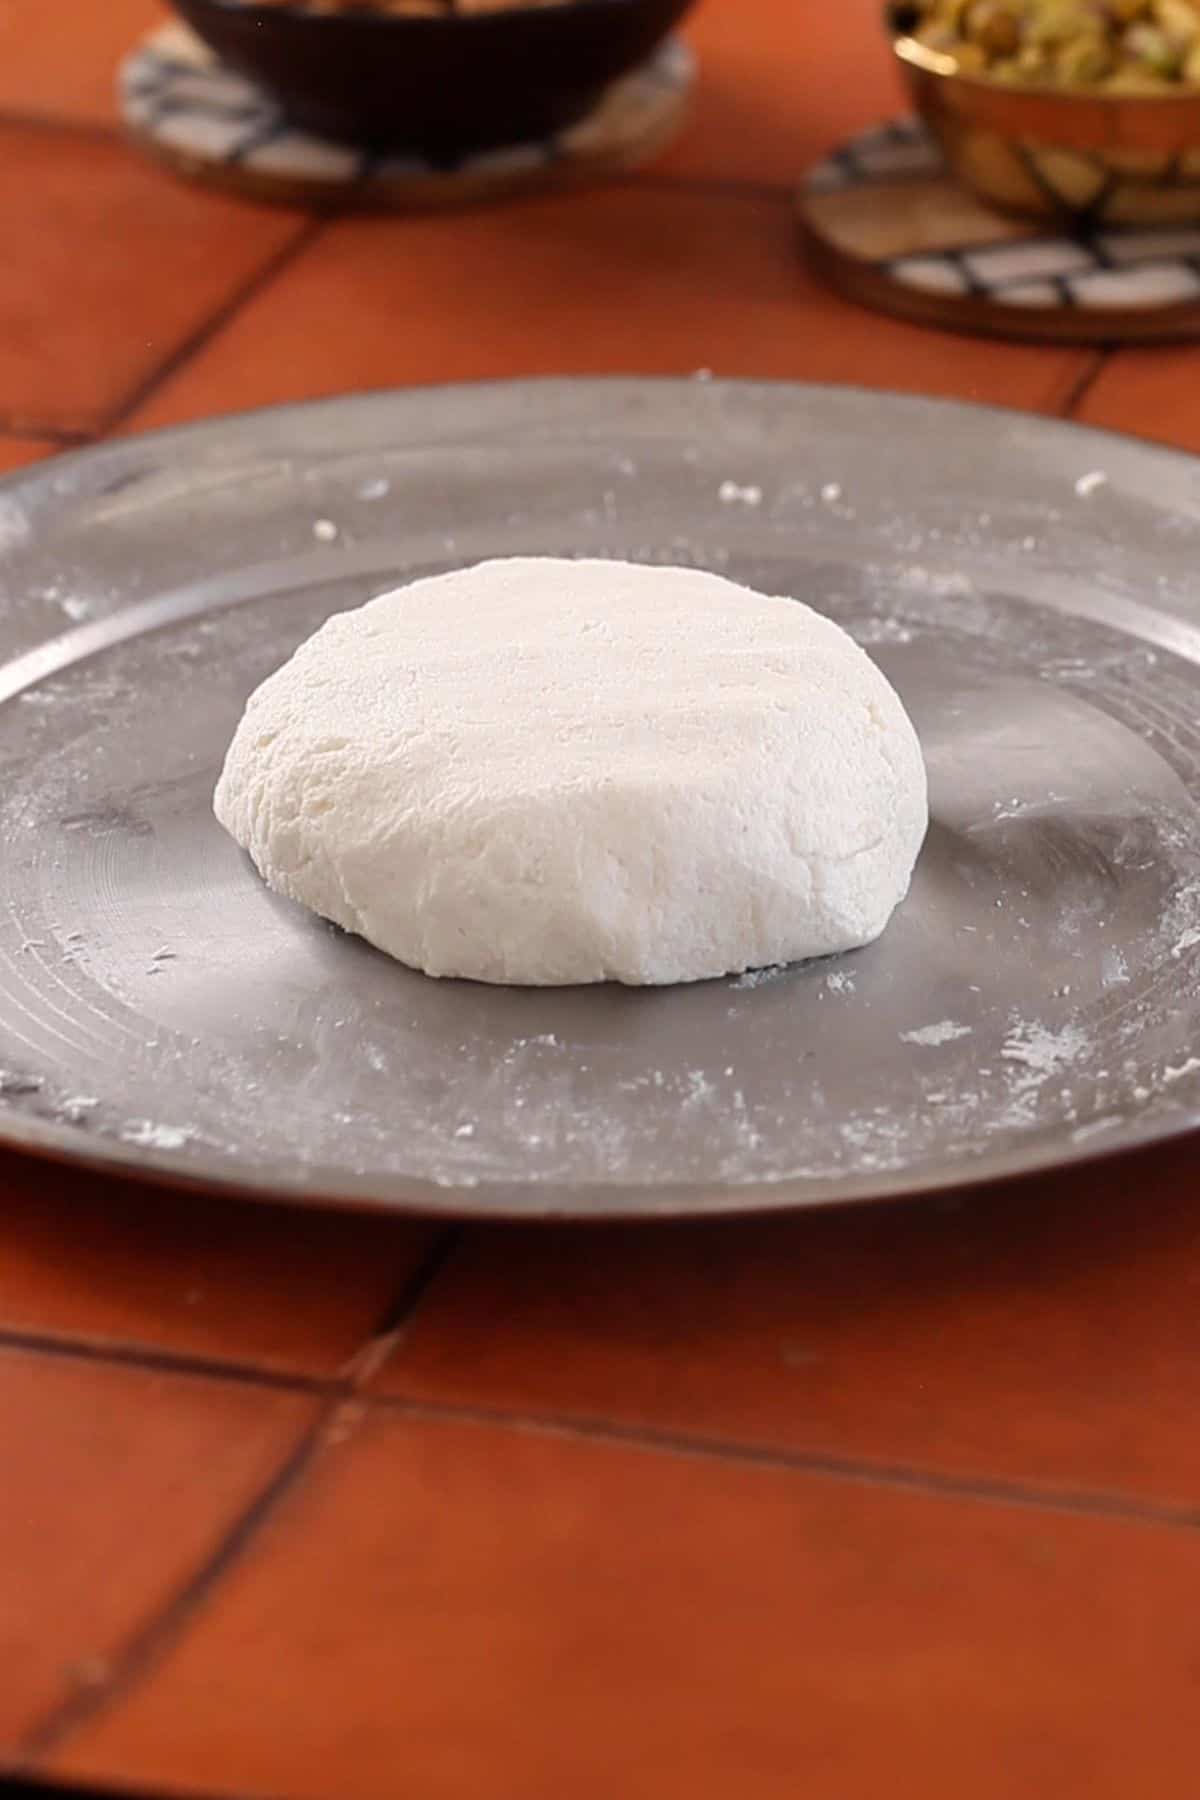
- Unwrap the chenna from cheesecloth and place it on a large (12 inch) plate. Set timer for 8 minutes.
- Start kneading the chenna using the heel of your palm. Apply gentle pressure as you push and stretch the chenna forward. Gather it back together and repeat the process, kneading for about 6-8 minutes.
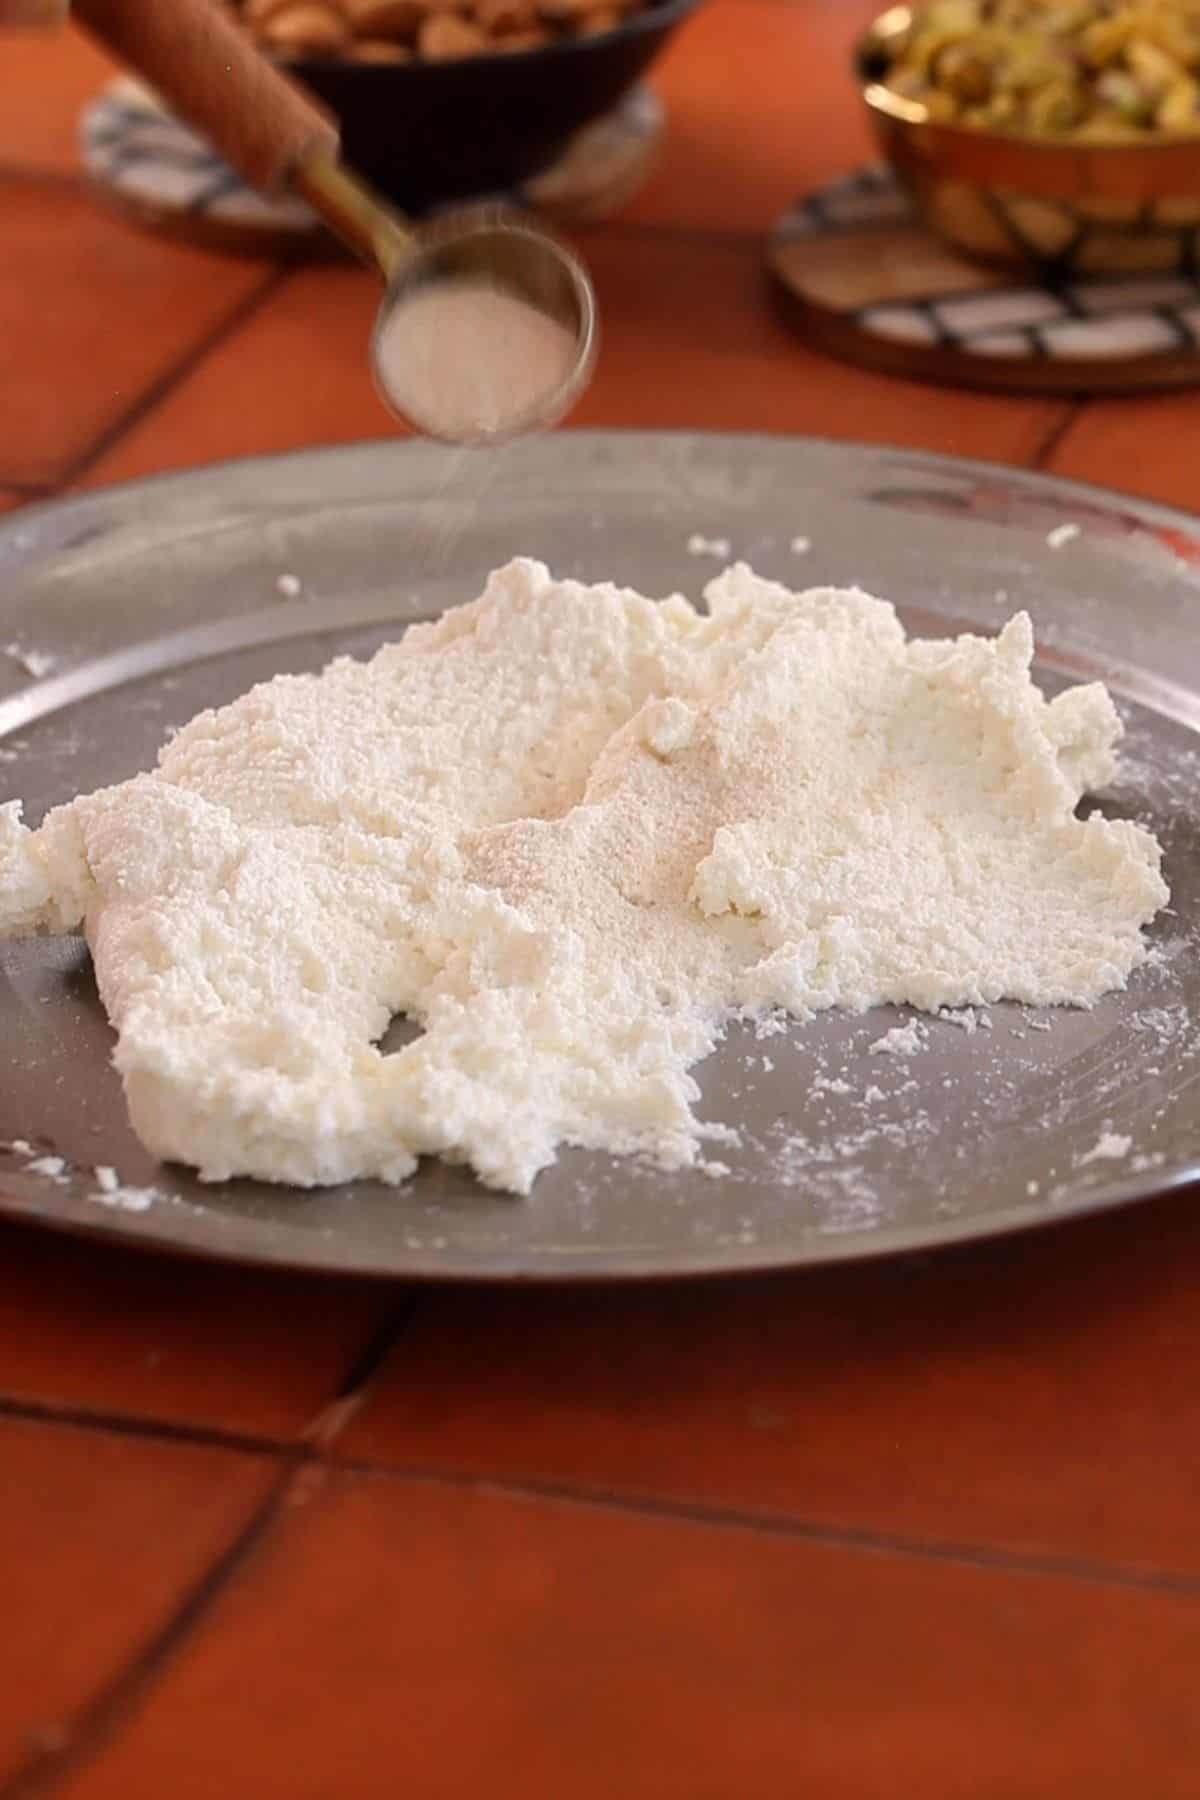
- It might be few minutes more or less, but don't under knead (pointer - chenna looks and feels grainy & dry) If the chenna starts to feel oily or releases fat, it means it has been over-kneaded.
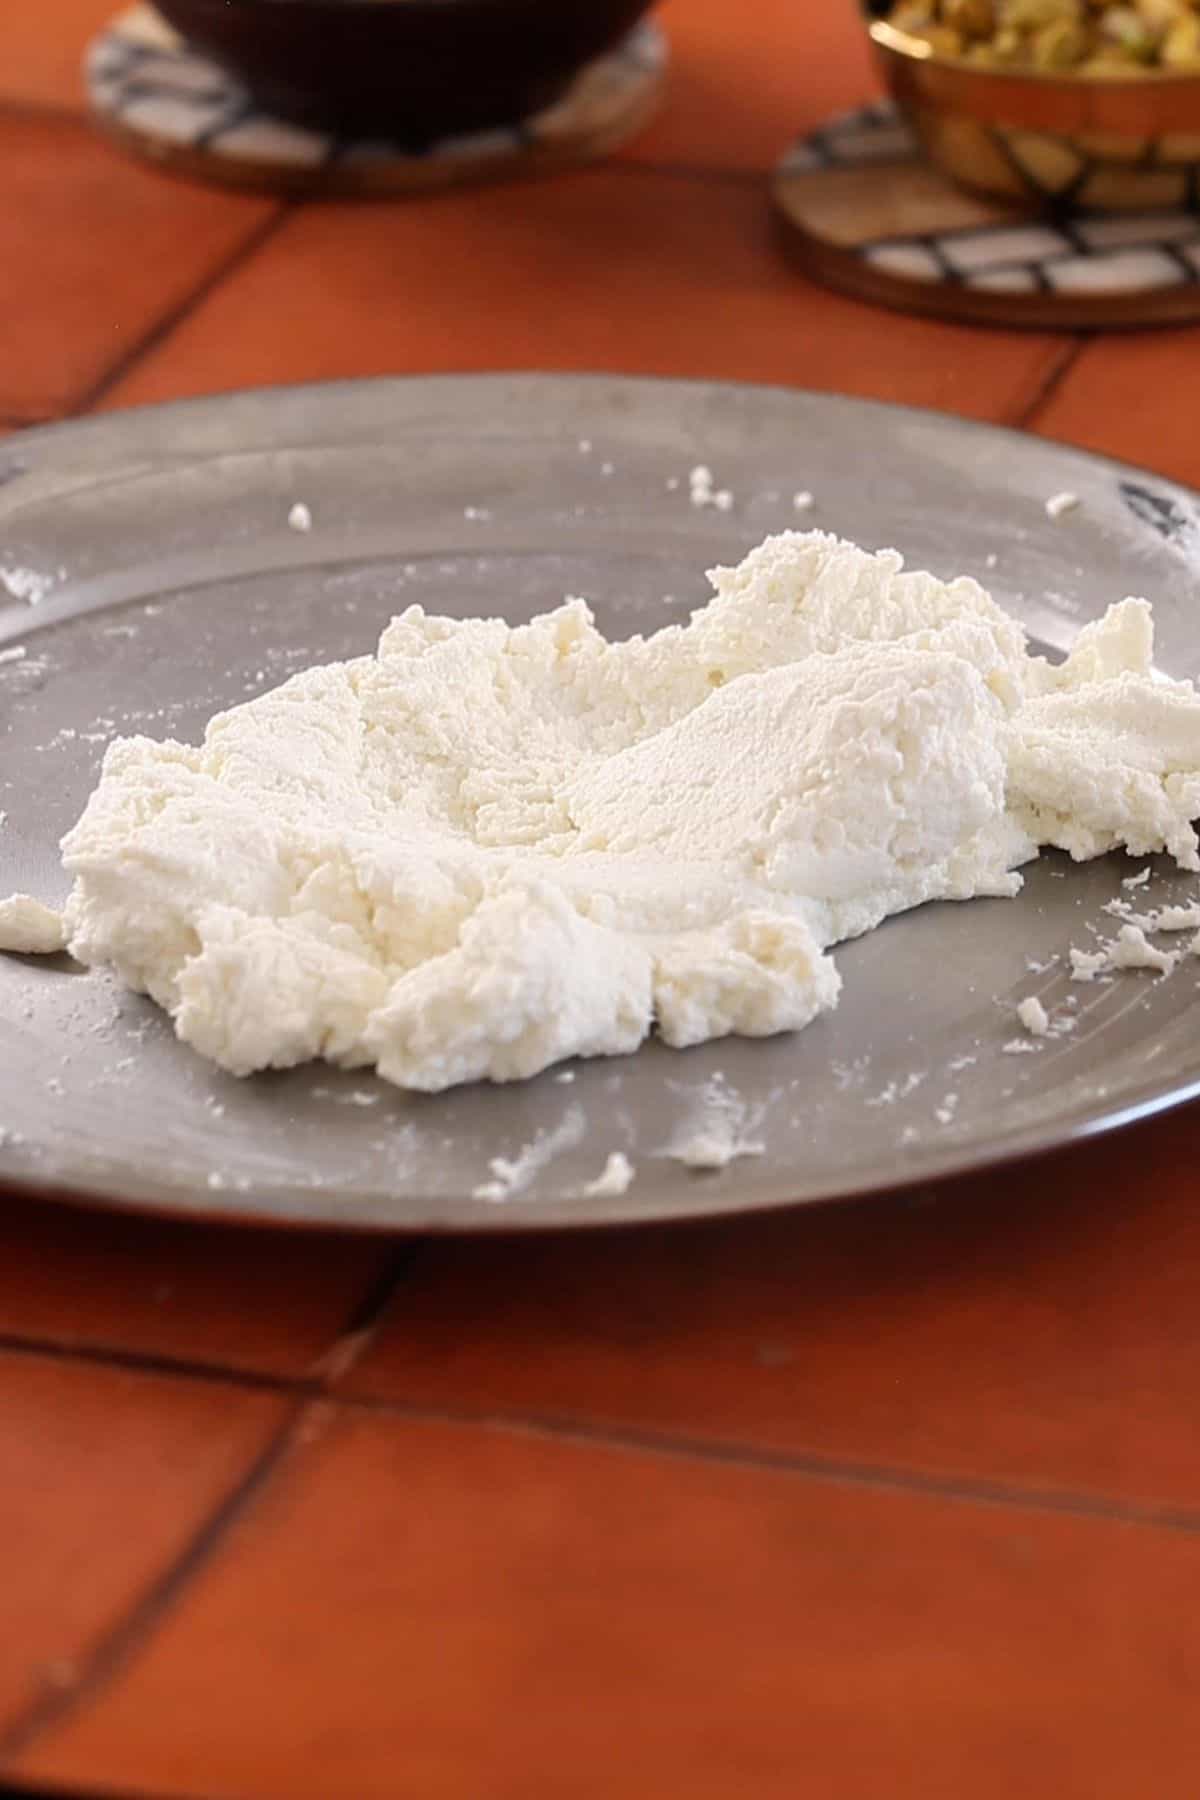
- Add the fine sooji and knead for another minute. Don't knead too much else the gluten in semolina is activated and rasmalai will become dense & chewy. Cover and let kneaded chenna rest for 5-10 minutes.
- Test by rolling a small portion into a ball. It should be smooth without cracks and hold its shape well.
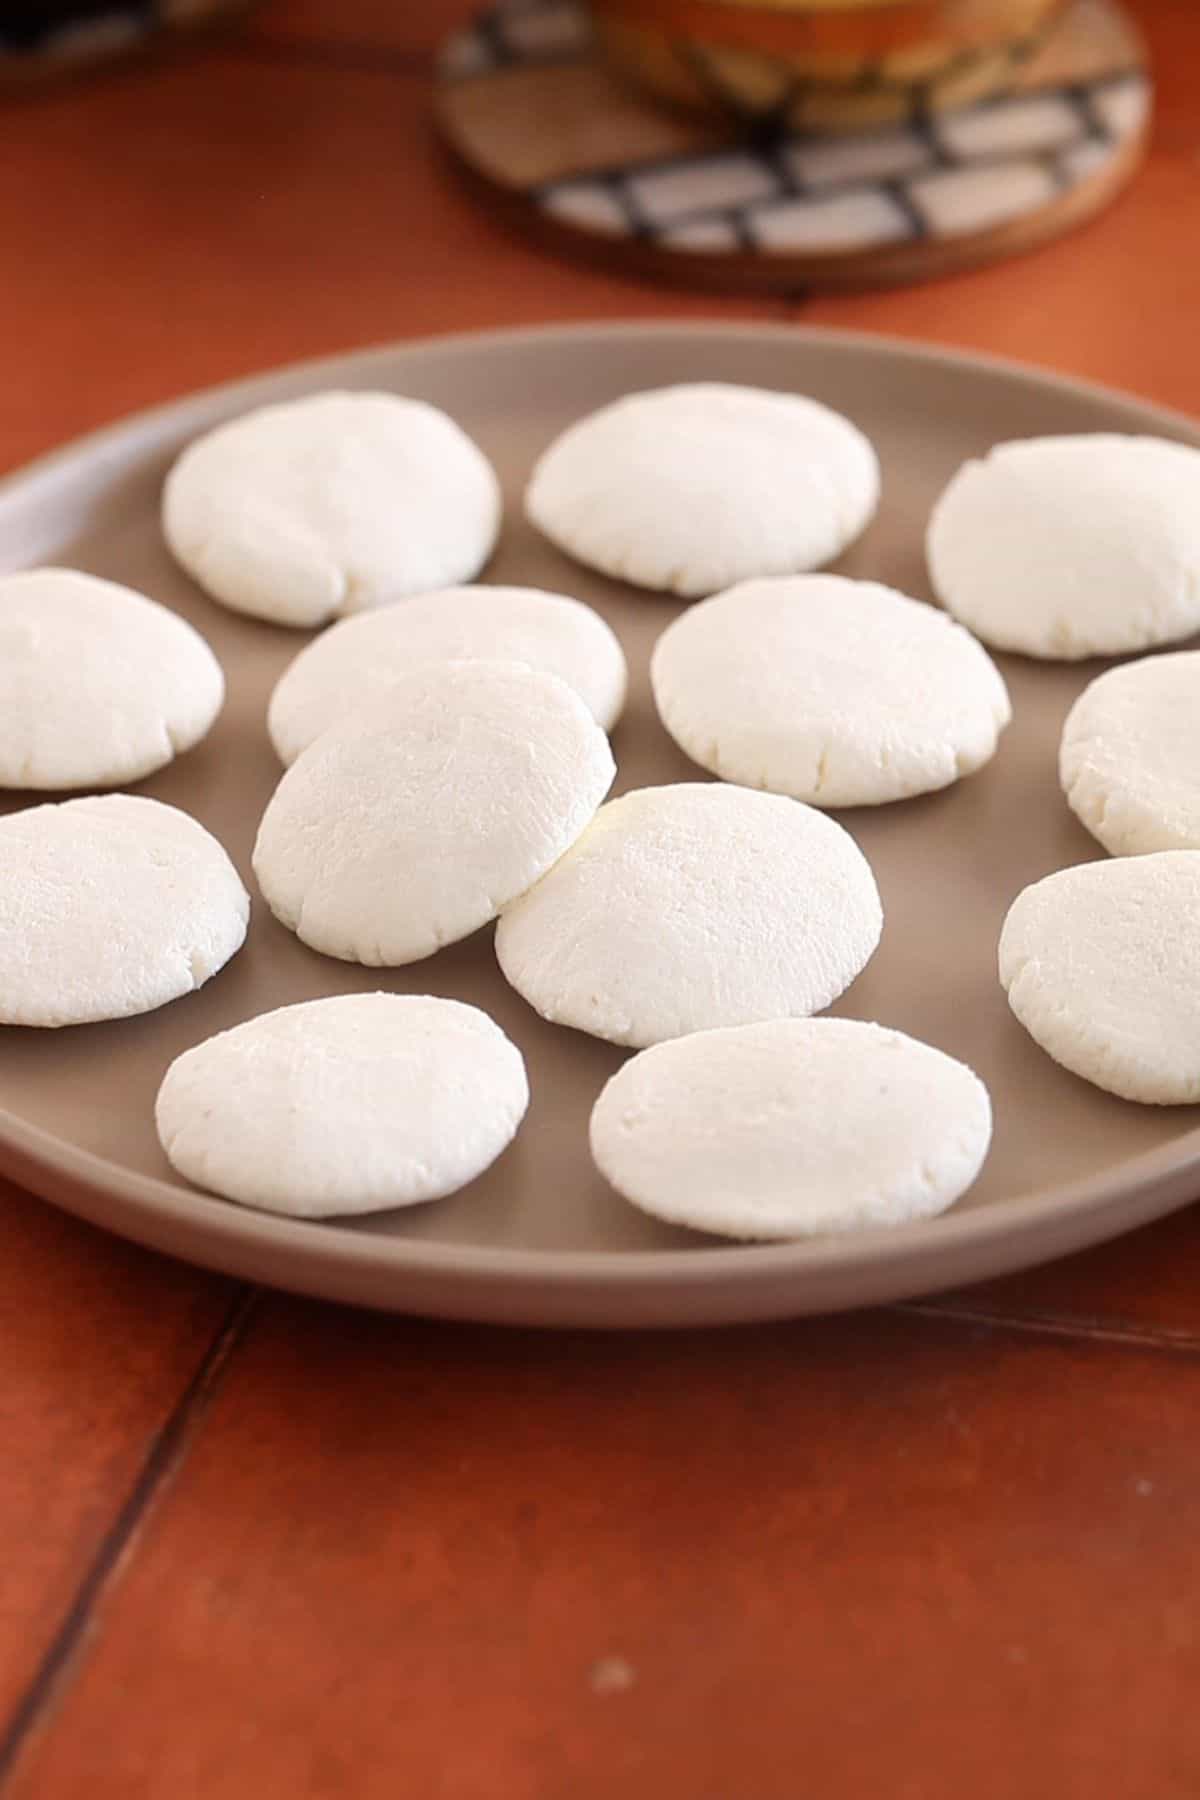
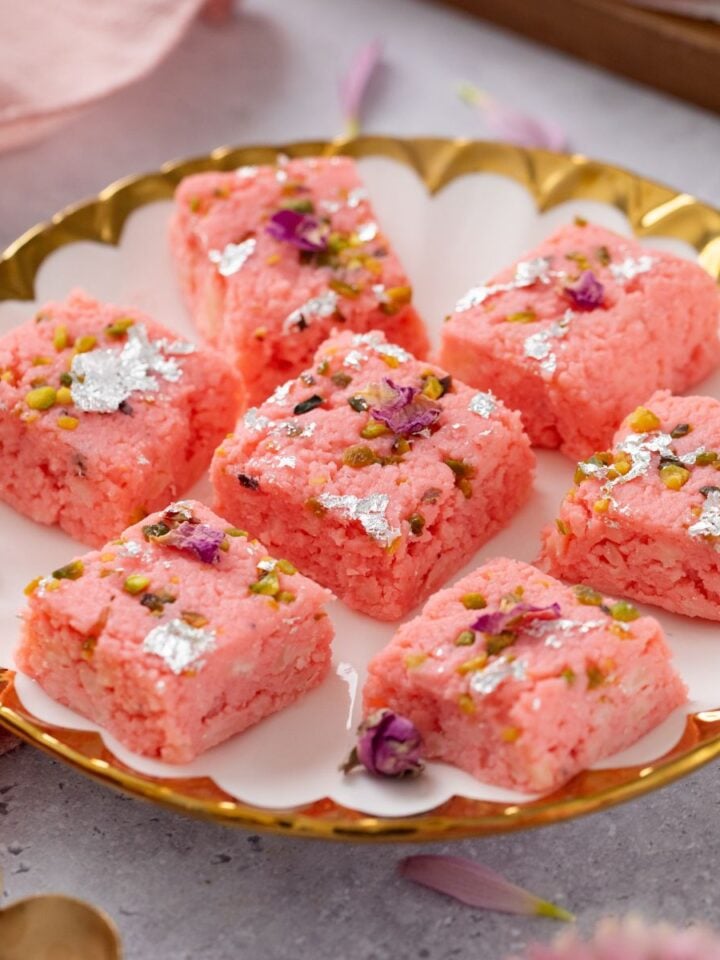
- Once the chenna has rested, divide it into 11-12 small portions (1 to 1.5 tablespoon each). Roll each one into a smooth balls without cracks. Press gently to resemble a patty. Don't make too big because they will double in size after boiling in sugar syrup.
Cook Chenna Patties & Soak in Ras
- In a large, wide pan (1 use 12 inch kadai), combine 1 cup of sugar with 5 cups water. Stir until the sugar dissolves completely.
- Place over high flame and bring the syrup to a full boil (rolling boil) over high heat.
- Without reducing flame, carefully slide the chenna patties into the boiling syrup, one by one.

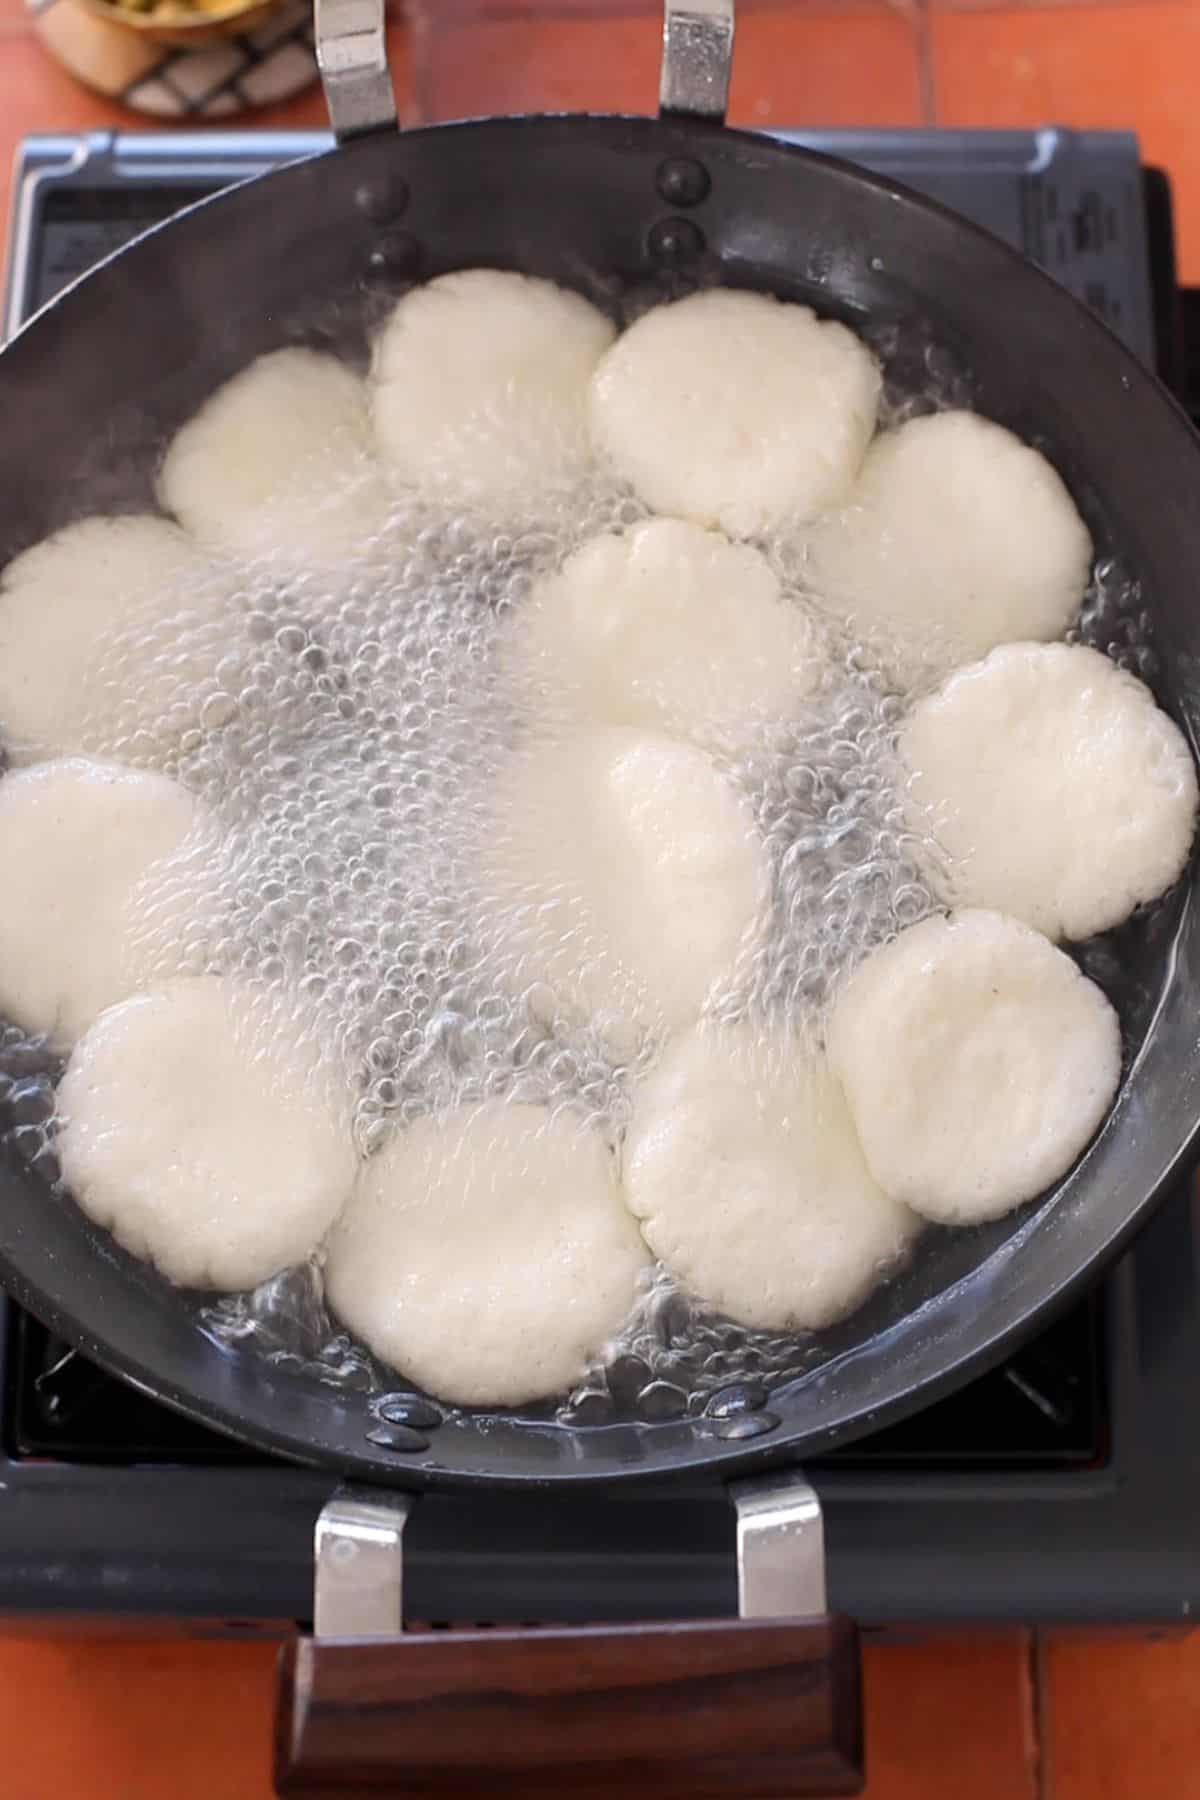
- Cover the kadai with a lid and let the rasmalai discs cook in the boiling syrup for 10-12 minutes. Keep the heat on high during this time. Don't peek. Meanwhile, in a large bowl, prepare a ice bath (water + ice cubes).
- After 10-12 minutes, the patties should have doubled in size and should be light and spongy. Switch off the stove.
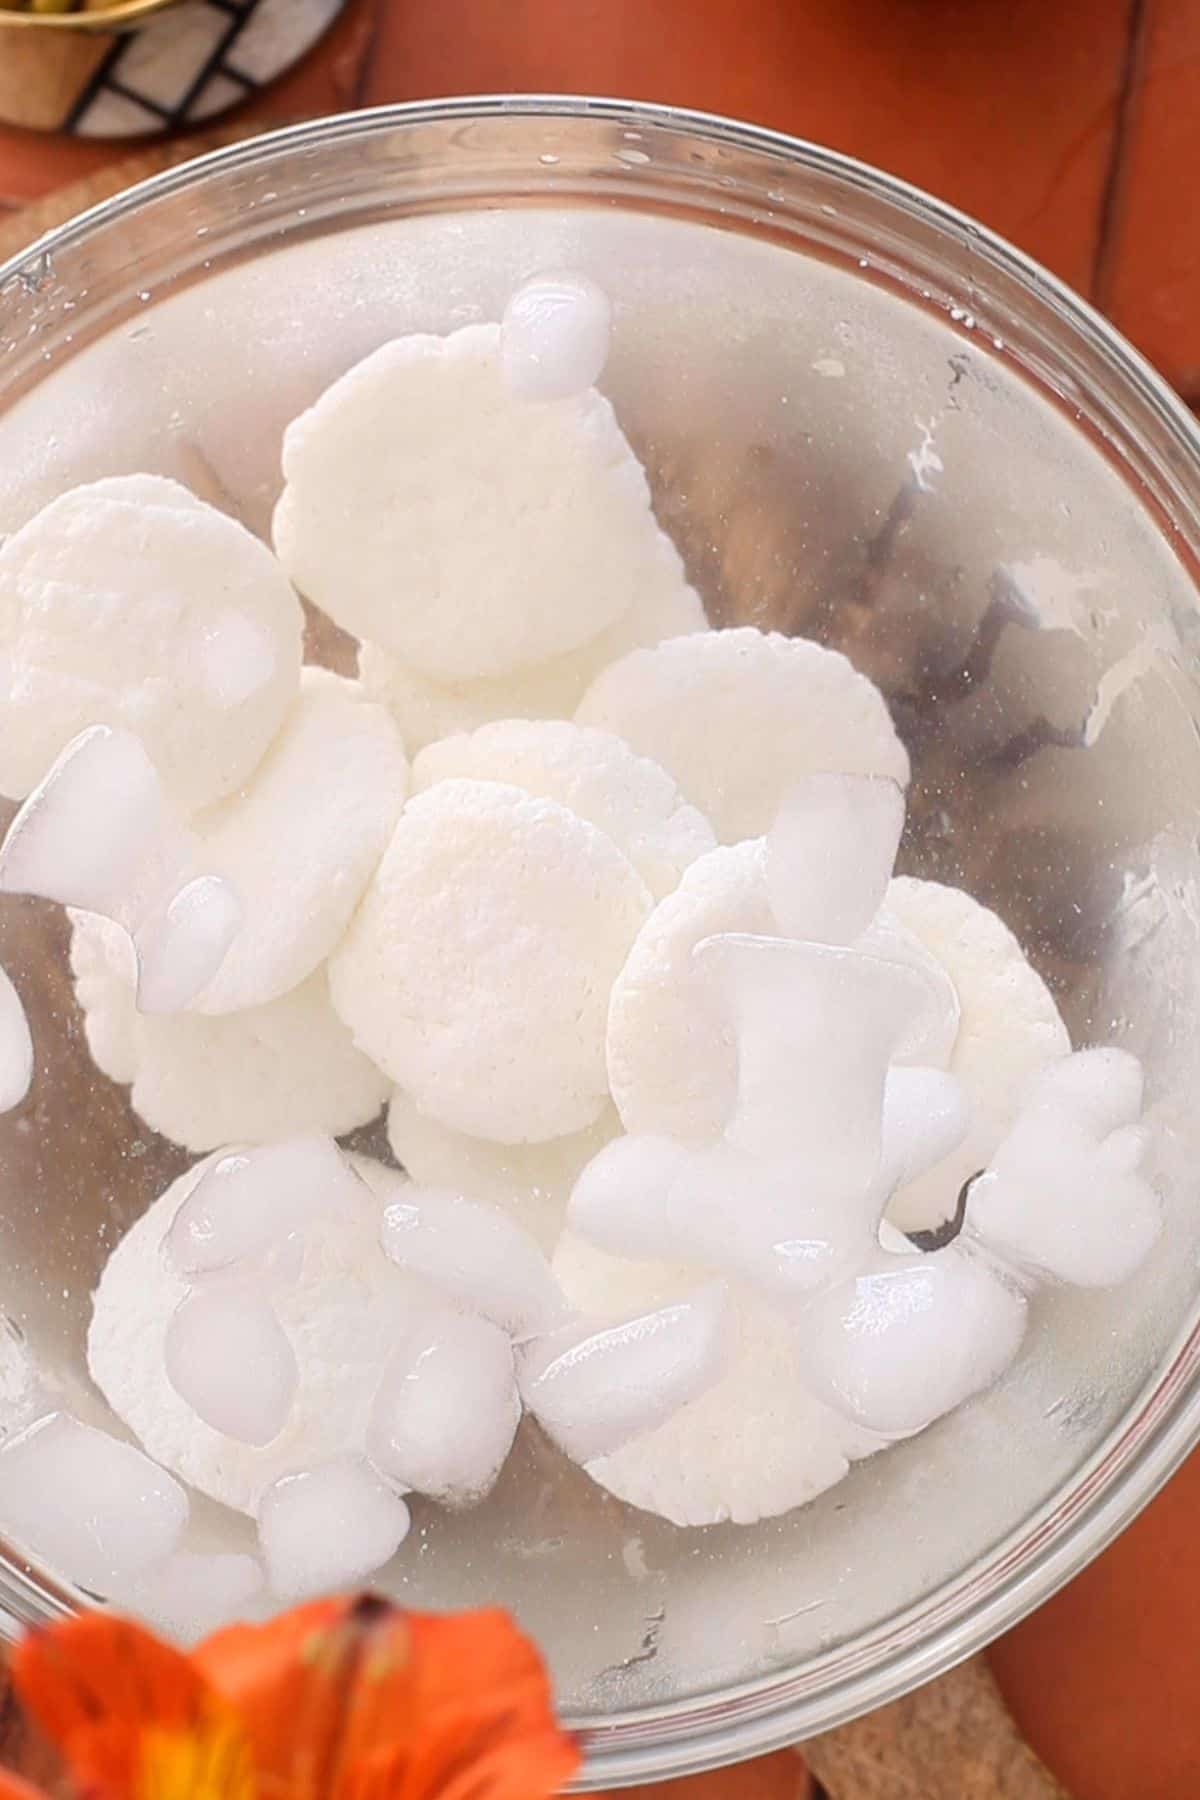
- Immediately, remove the chenna balls using a from syrup using a slotted spoon and place in ice water bath for at least 30 minutes. This allows them to stop cooking and cool down.
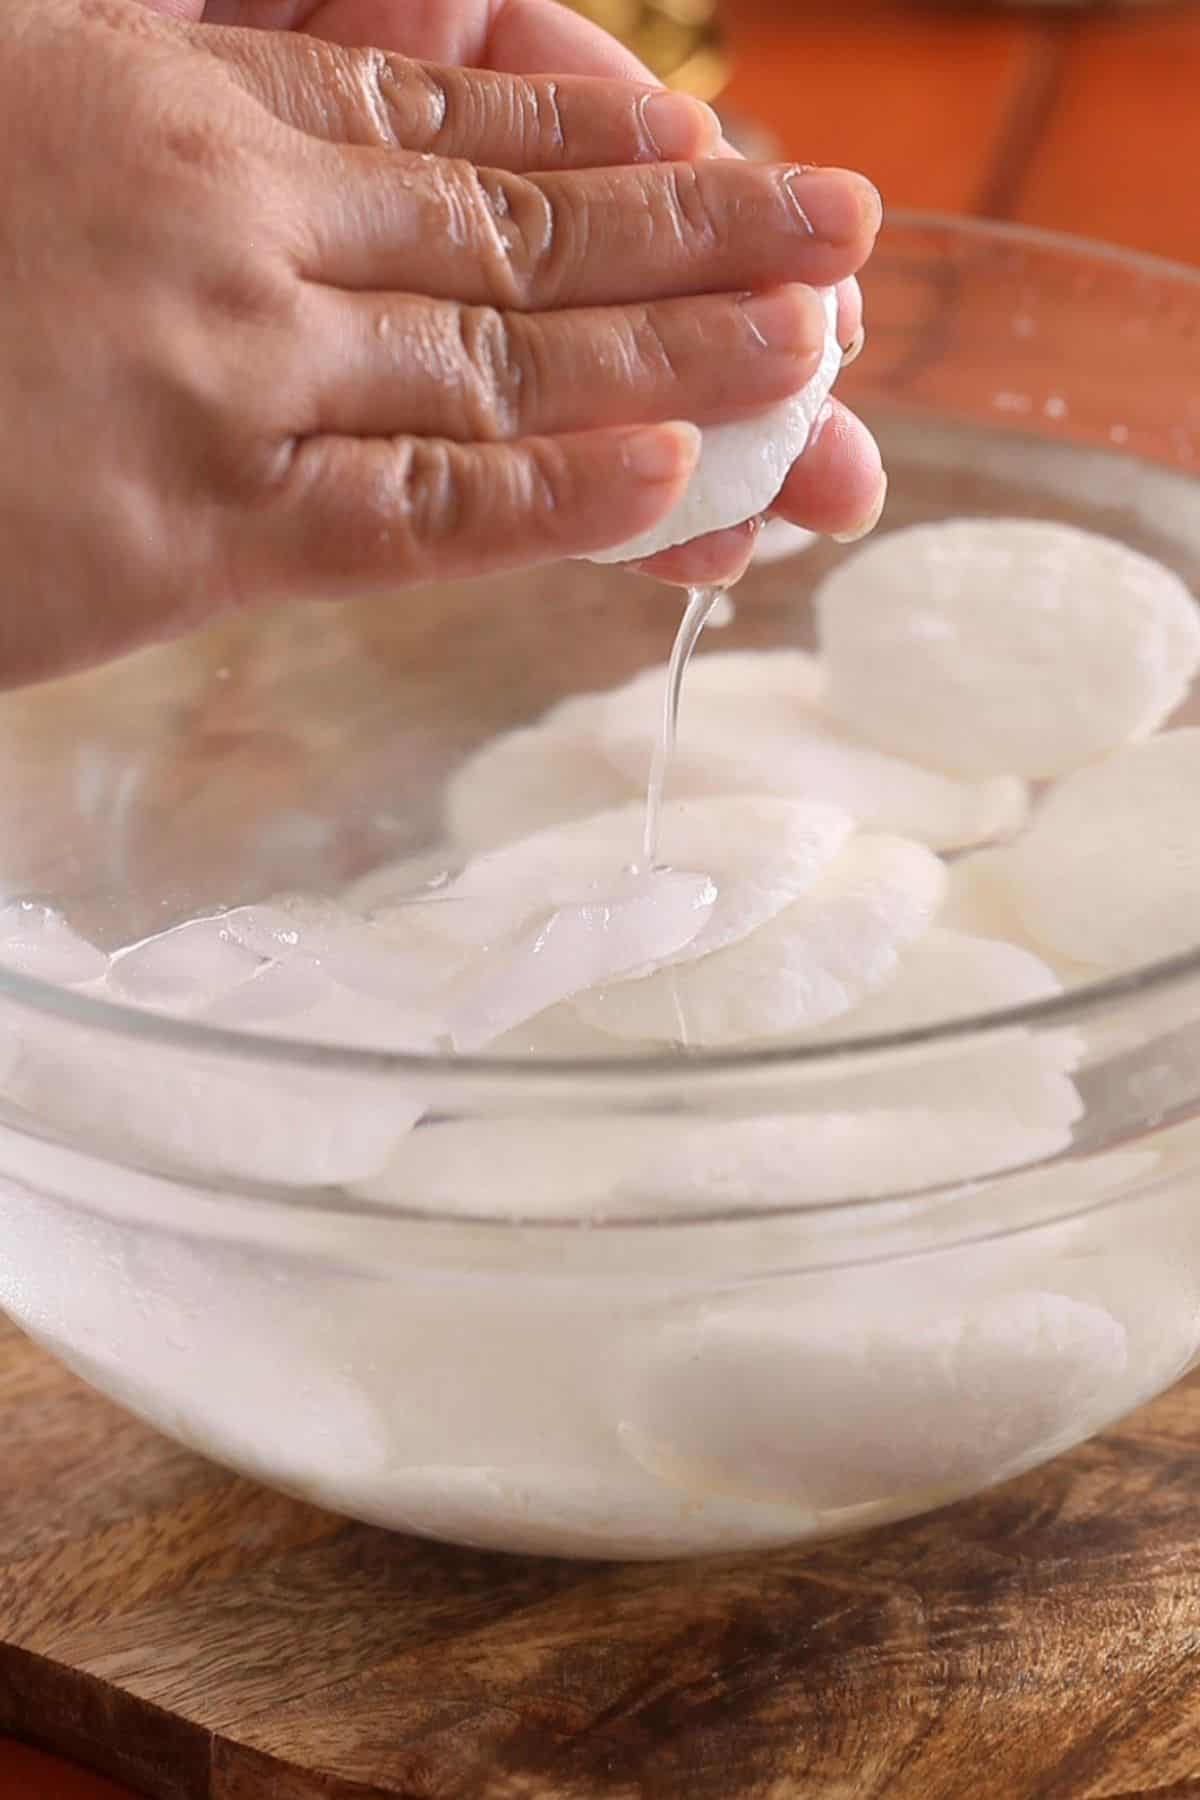
- Gently squeeze out the water from each patty by pressing it between your palms. This makes sure that they will absorb the ras. Be careful not to break them.
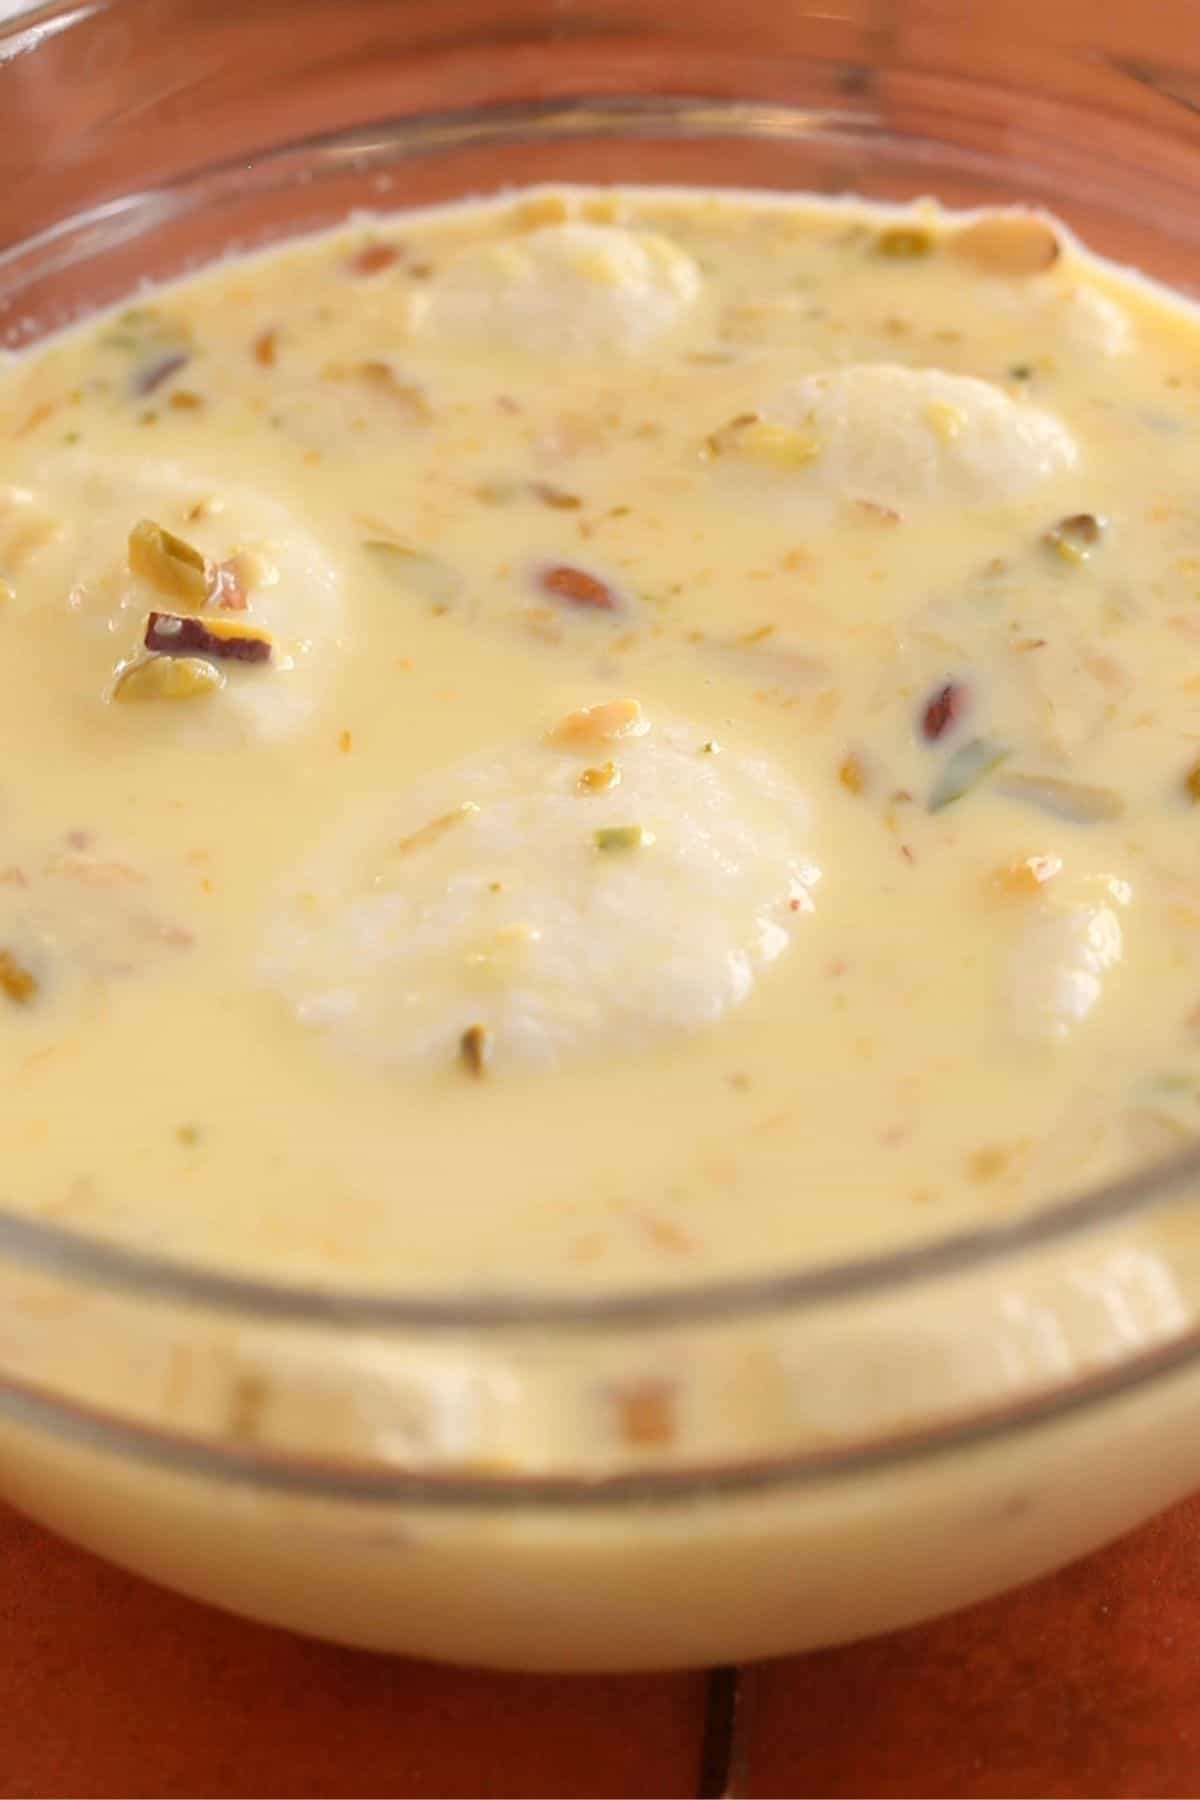
- Place the patties into the room temperature ras. Make sure that they are fully submerged in milk mixture. Allow them to soak refrigerated for at least 5-6 hours or overnight is the best.
Serving & Storing
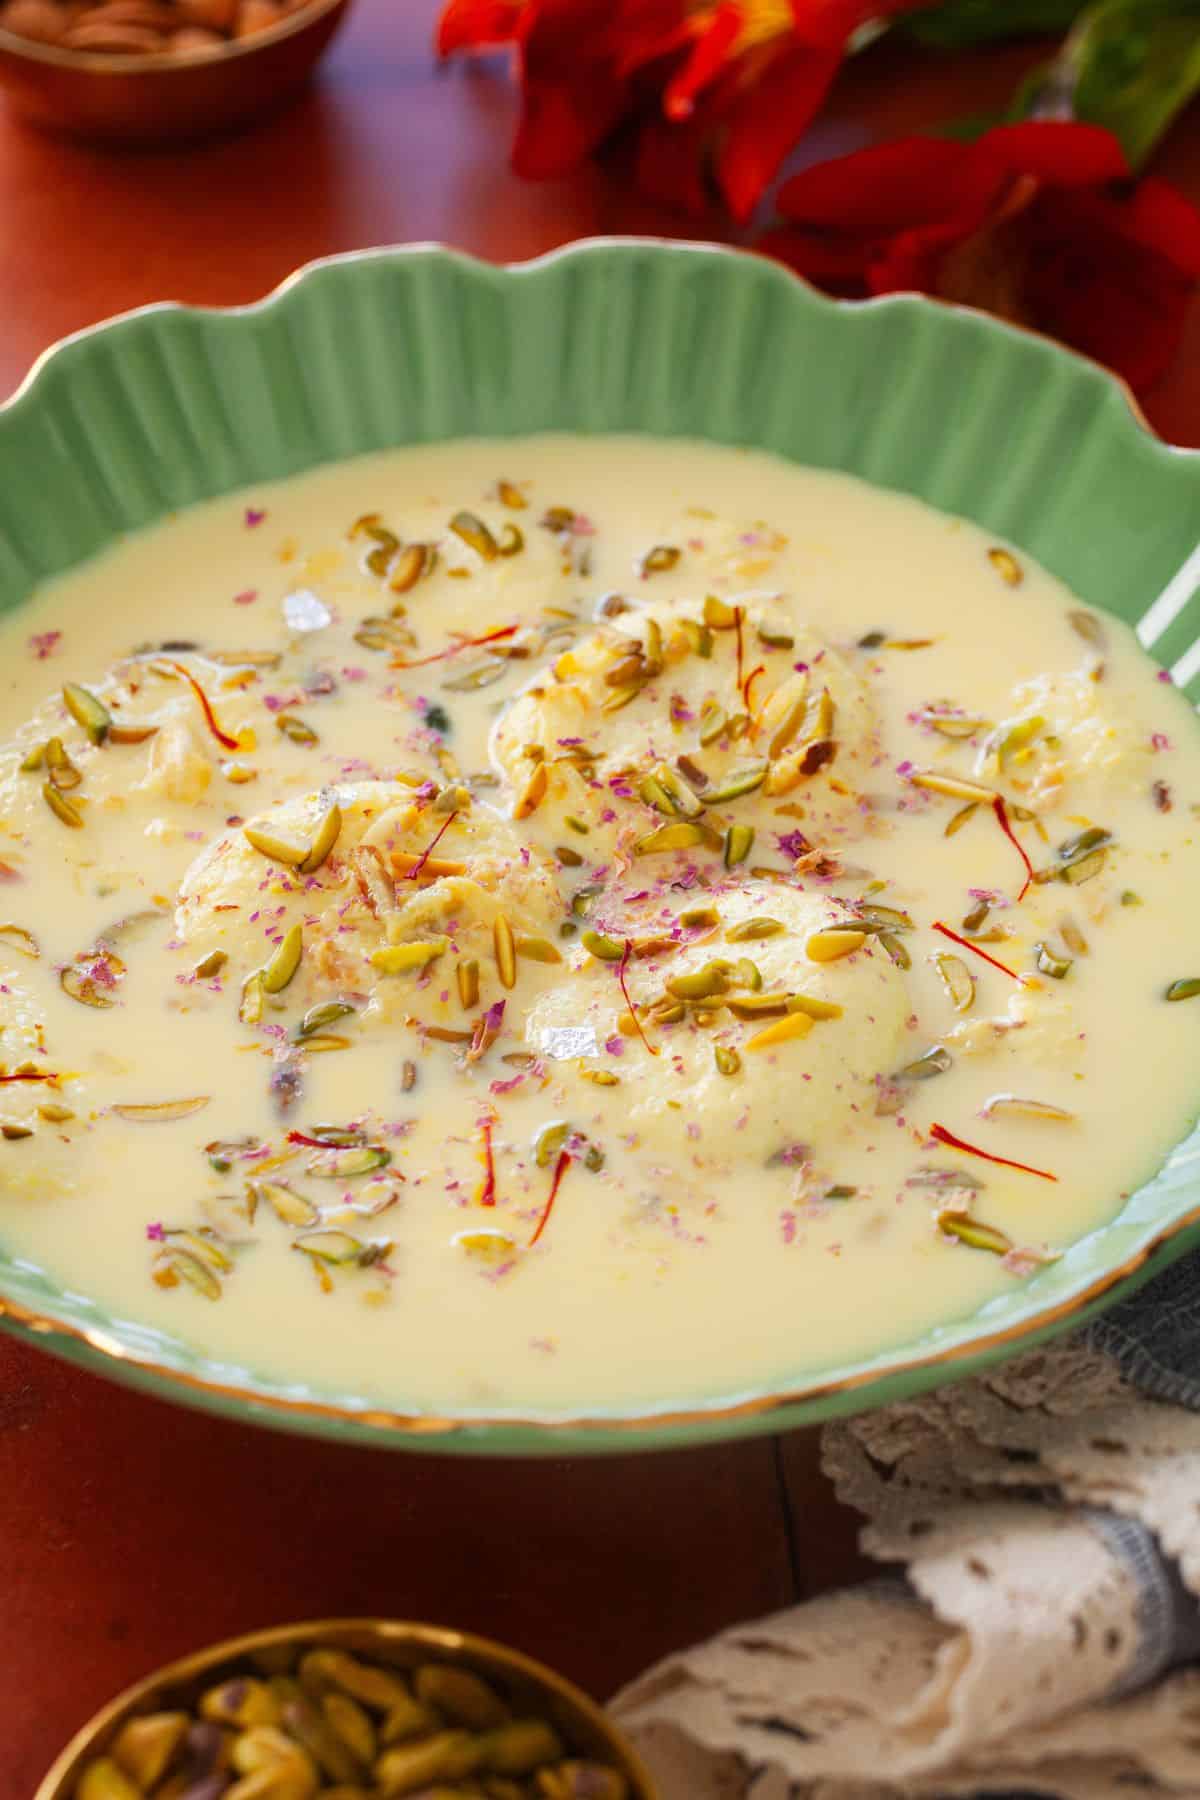
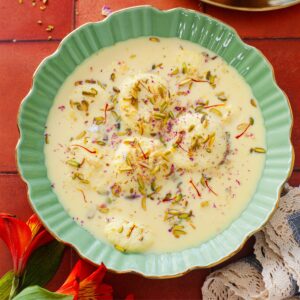
Serve rasmalai chilled garnished with extra nuts if desired. Store in an airtight container refrigerated and try to finish it in 3-4 days. I don't freeze rasmalai and don't recommend it. If you have leftover rasmalai milk, you could try making my rasmalai cake.
Soft & Spongy Rasmalai Recipe (With Chenna)
Ingredients
For The Sweetened Milk (Ras)
- 1 liter whole milk
- 2 tablespoon almonds
- 2 tablespoon pistachios
- 3-4 green cardamom pods take out the seeds and grind using a mortar pestle or use ½ teaspoon ready made green cardamom powder
- 8-10 saffron strands
- ½ cup granulated sugar or to taste
To make Chenna Discs
- 1 liter whole milk
- 2 tablespoon white vinegar
- 2 tablespoon water
- 1 teaspoon semolina fine sooji
For Sugar Syrup
- 5 cup water
- 1 cup granulated sugar
Instructions
Make The Ras (Sweetened Milk)
- Pour 1 litre of whole milk into a heavy bottomed deep pot(I use 4 qt pot).
- Place the pot of milk on a low to medium flame, and while stirring regularly with a rubber spatula, bring the milk to a boil. For 1 liter of milk, this process will take about 10-12 minutes.
- Reduce to low heat and add the almonds, pistachios, green cardamom powder and saffron strands to the simmering milk. Let simmer for 3-5 more minutes.
- Thereafter, add the ½ cup sugar and stir with spatula until it dissolves. Stir at regular intervals and let milk cook for 3-4 minutes more. Then switch off the stove. Be careful not to thicken the milk else the chenna patties won't absorb the ras. The sweetened milk should be light and pourable.
- Pour the thickened milk into a large bowl and let cool down. Don't refrigerate. Proceed to make the chenna.
Prepare Fresh Chenna
- Select a heavy bottomed, deep cooking pot (your pasta boiling pot or similar will work great). We have to allow for the volume increase when the milk comes to a boil.
- Pour 1 litre full fat milk into the pot and on low medium heat while stirring regularly using a rubber spatula, bring the milk to a boil. For 1 litre of milk it will take 10-12 minutes.
- Switch off the stove and wait for 1 to 1:30 minutes. Meanwhile mix white vinegar and water in a small bowl or measuring cup(spout makes it easier to pour). You could use lemon juice instead of vinegar. Also, place a colander lined with a muslin cloth or cheesecloth over a large bowl (colander should not touch the bottom of bowl).
- Add the vinegar mixture to the hot milk in 3 parts. Each time you pour vinegar, very gently stir the curdled milk.
- After the third addition, you will see green whey seperating and milk solids (chenna particles). Don't let the chenna sit in the acidic environment for too long. Strain it rightaway over the colander.
- Pour cold water to wash the chenna once, bring around the end of the cheesecloth to make a pouch. Press slightly for 5-8 seconds to squeeze out excess water.
- Place the pouch over the colander and place a heavy weight (I use a heavy mortar ) over it. Let sit for not more than 8-10 minutes. We don't want to draw out lot of moisture. That will result in dry chenna and you won't be able to knead it.
Shape Chenna Discs
- Unwrap the chenna from cheesecloth and place it on a large (12 inch) plate. Set timer for 8 minutes.
- Start kneading the chenna using the heel of your palm. Apply gentle pressure as you push and stretch the chenna forward. Gather it back together and repeat the process, kneading for about 6-8 minutes.
- It might be few minutes more or less, but don't under knead (pointer - chenna looks and feels grainy & dry) If the chenna starts to feel oily or releases fat, it means it has been over-kneaded.
- Add the fine sooji and knead for another minute. Don't knead too much else the gluten in semolina is activated and rasmalai will become dense & chewy. Cover and let kneaded chenna rest for 5-10 minutes.
- Test by rolling a small portion into a ball. It should be smooth without cracks and hold its shape well.
- Once the chenna has rested, divide it into 11-12 small portions (1 to 1.5 tablespoon each). Roll each one into a smooth balls without cracks. Press gently to resemble a patty. Don't make too big because they will double in size after boiling in sugar syrup.
Cook And Soak Rasmalai Discs in Ras
- In a large, wide pan (1 use 12 inch kadai), combine 1 cup of sugar with 5 cups water. Stir until the sugar dissolves completely.
- Place over high flame and bring the syrup to a full boil (rolling boil) over high heat.
- Without reducing flame, carefully slide the chenna patties into the boiling syrup, one by one.
- Cover the kadai with a lid and let the rasmalai discs cook in the boiling syrup for 10-12 minutes. Keep the heat on high during this time. Don't peek. Meanwhile, in a large bowl, prepare a ice bath (water + ice cubes).
- After 10-12 minutes, the patties should have doubled in size and should be light and spongy. Switch off the stove.
- Immediately, remove the chenna balls using a from syrup using a slotted spoon and place in ice water bath for at least 30 minutes. This allows them to stop cooking and cool down.
- Gently squeeze out the water from each patty by pressing it between your palms. This makes sure that they will absorb the ras. Be careful not to break them.
- Place the patties into the room temperature ras. Make sure that they are fully submerged in milk mixture. Allow them to soak refrigerated for at least 5-6 hours or overnight is the best.
- Serve rasmalai chilled garnished with extra nuts if desired. Store in an airtight container refrigerated and try to finish it in 3-4 days.
Notes
- Trust The Process - Like most traditional mithai recipes, rasmalai takes time to make and perfect. Your initial attempts might not yield the desired results, but learning the art of indian mithai is all about practice and patience. Don't rush the process, especially when reducing the milk or cooking the chenna patties in syrup.
- Make chenna from scratch - Chenna or curdled whole milk is the soul of rasmalai. We need very soft, fresh chenna for light & airy texture of the rasmalai discs. Avoid using store bought paneer as sometimes it has additives or coagulants which won't result in the right texture.
- Kneading chenna - This is the KEY step in making perfect rasmalai. Having developed this recipe over a long period of time, I can confidently say that it's more important to trust how the chenna feels under the heel of your palm than to rely solely on the timer. The chenna should feel smooth and pliable, not grainy or oily.
- Don't go overboard on flavorings - Rasmalai is supposed to be a dainty and delicate dessert. A light sprinkle of green cardamom (freshly ground is best) and a few saffron threads (optional) are all you need to evoke that classic mithai feel. Stronger flavors can overpower and detract from the dessert's signature milkiness.
- Use heavy bottomed and wide mouthed pots - The choice of cooking pots really matters! I prefer using non-stick stainless steel or anodized utensils for the best results since milk has a high tendency to stick. Heavy pots ensure the milk doesn't scorch, while wide pans make stirring easier and provide enough space for the rasmalai balls to expand.
Shipra jhunjhunwala says
I tried making Ras malai for the first time using this recipe and it was a super hit. I used these for making a Ras malai cake and every one loved it. Your tips on how to cook the patties was very helpful, and I had to resist the urge to peek :))
It was a last minute try, and I didn’t have all ingredients from your recipe so I had to use maida instead of suji. That worked well, and I could use this substitute only because you had explained the need for gluten for the patties.
The patties were very fluffy and more than doubled in size. I would highly recommend this recipe even to a novice cook.
Tanvi Srivastava says
Hi Shilpa, Thank you so much for such an awesome review. Truly appreciate you taking the time!!
Asafa Chaudhary says
thank you so much for your recipe.. I have tried it today and it came so delicious ?? keep going ?
Tanvi Srivastava says
I am so happy to hear that. Thank you for taking the time to write your feedback.