

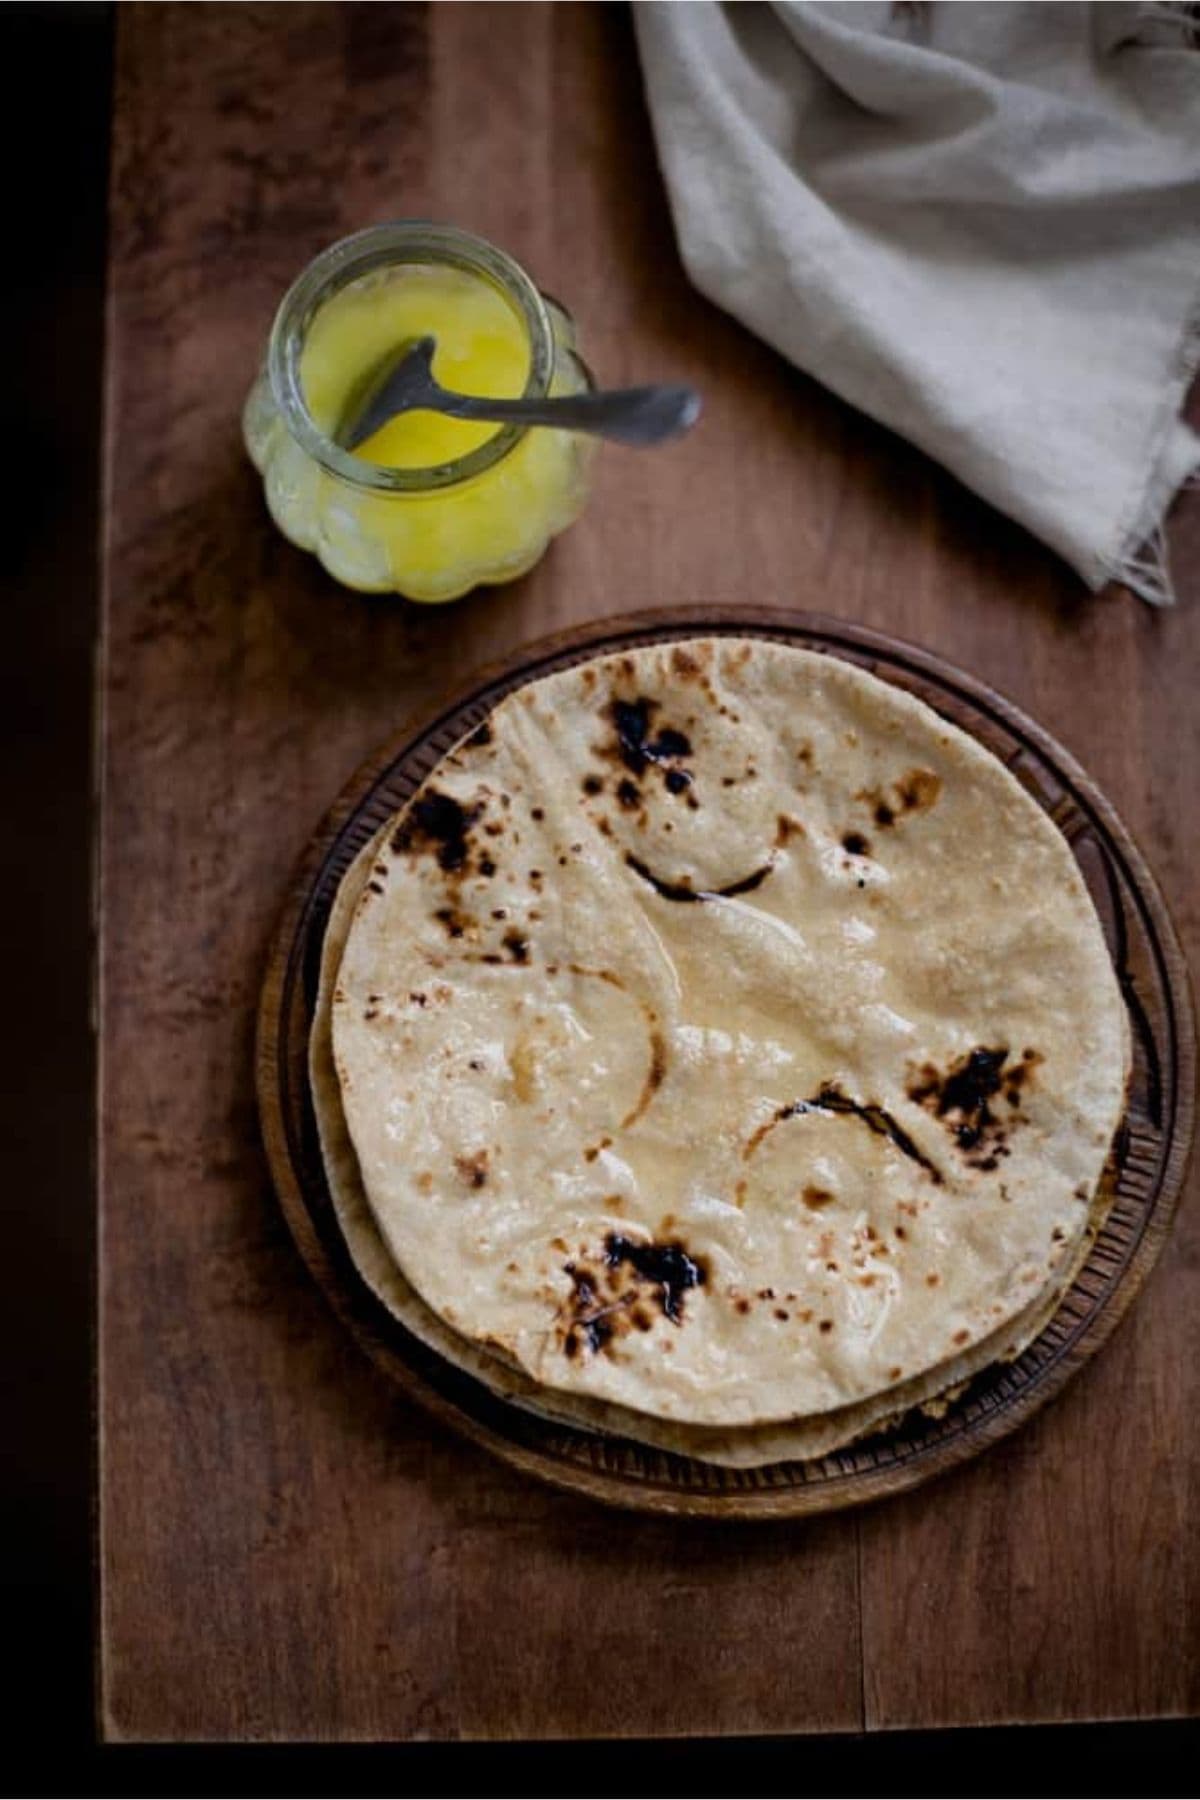
Roti is everyday indian flatbread made with only 2 ingredients - atta (stone milled whole wheat flour) & water. In our homes, it symbolizes simplicity, nourishment and community. In this post, I am sharing step by step photos, the traditional technique of making roti at home with hands as well as lot of tips to help you make soft and puffy indian roti at home every single time!
Growing up in a north indian household, I can't remember a single meal when there weren't homemade soft & puffy rotis. They were warm and essential. When we ate out, crispy tandoori roti or pillowy naan took over but at home, my mom or grandmother served fresh roti straight off the tawa (griddle)for (almost) every meal.
My grandmother used to be desi flatbreads expert- be it roti or paratha. Her rounds were evenly rolled, and rotis turned out perfectly soft and charred just right on both sides. My mom's rotis come a close second. I might be sounding a little obsessive with these descriptions but trust me in our home, roti making is a serious business.
I learnt from the best, so modesty aside, it didn't take me long to start the ritual in my own home. Now, I make roti several times a week. I believe that making roti is not just technique, its part feel, part skill and part intuition. You slowly learn as you go, as to how the dough feels right under the knuckles and its softness as you press it to allow puffing.
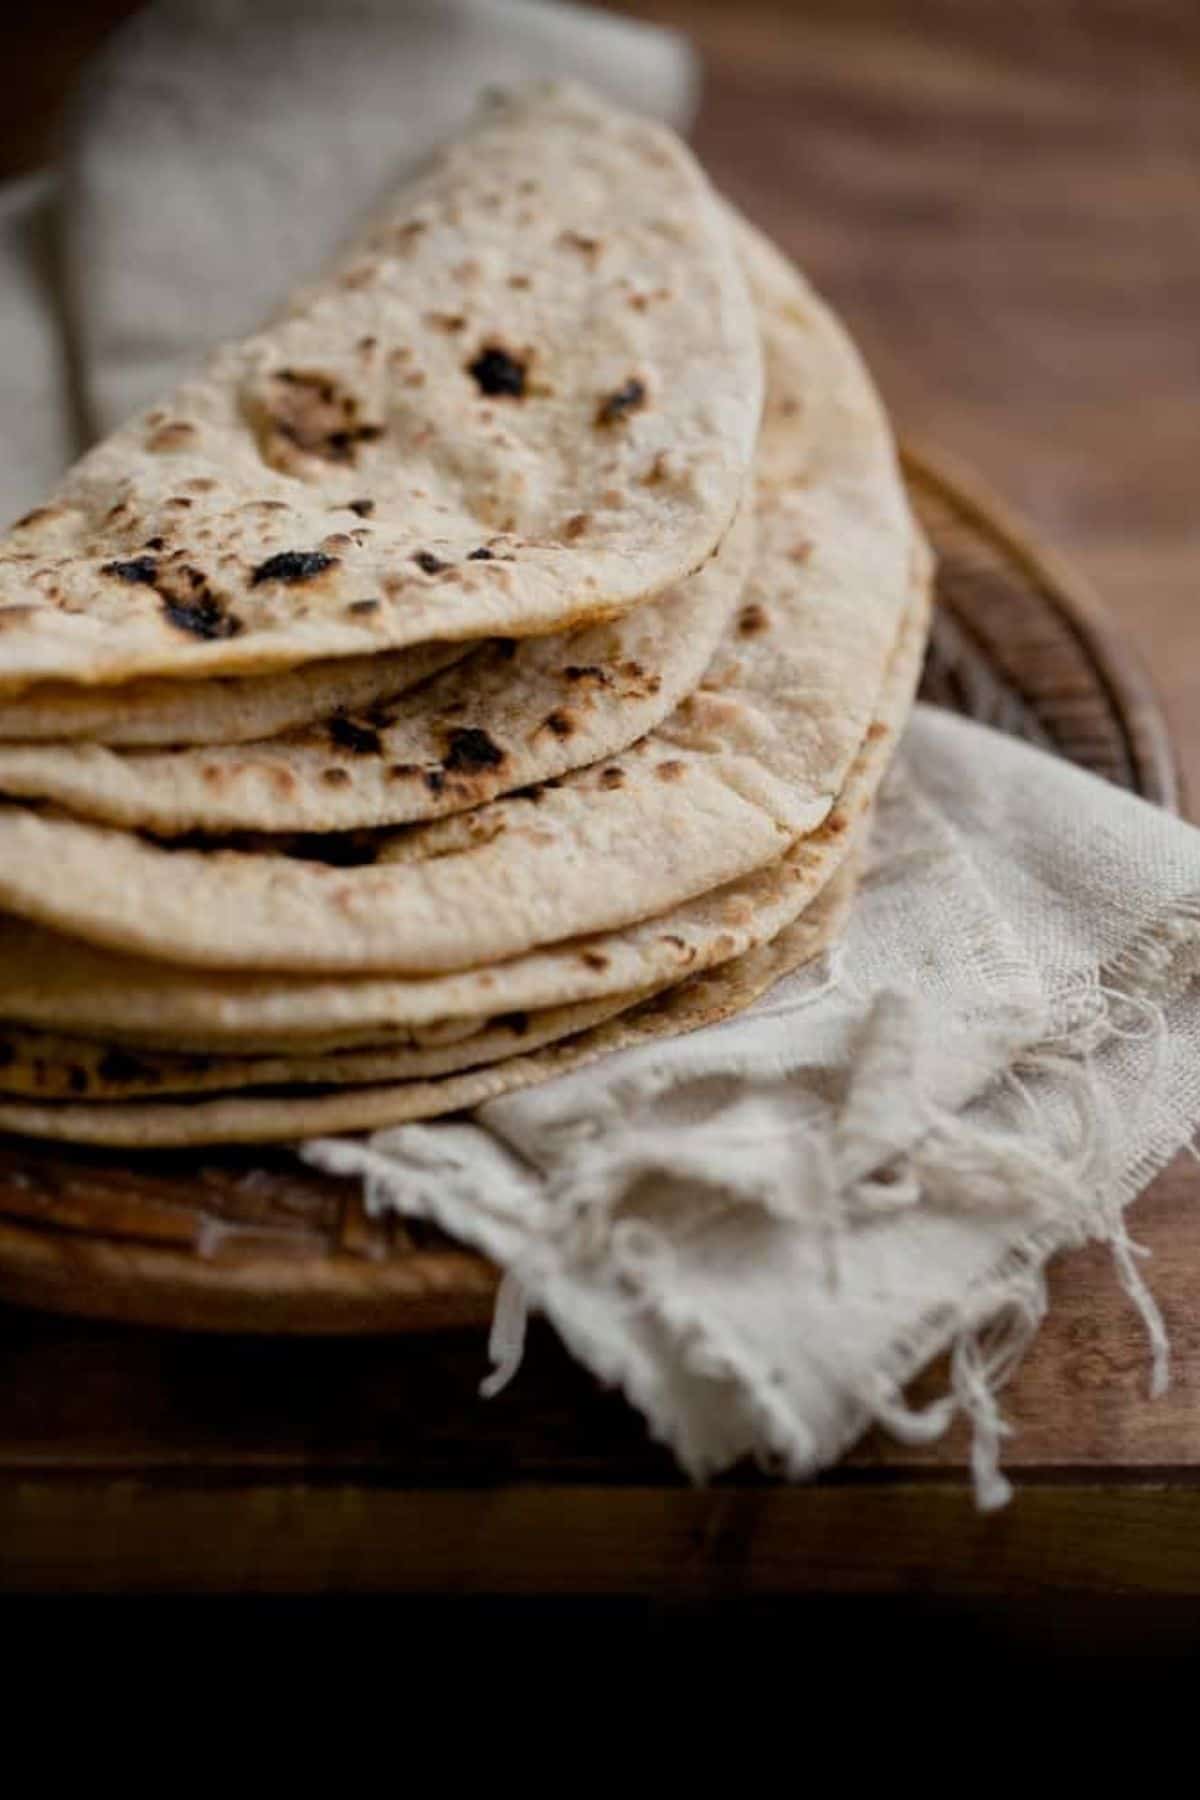
Like any other bread, it takes time to perfect. The more you make, the better you get. If you're a beginner, don't worry about round shape too much, rather focus on rolling the dough evenly. Because, rotis with uniform thickness, whether rolled thick or thinly , are the ones that puff beautifully.
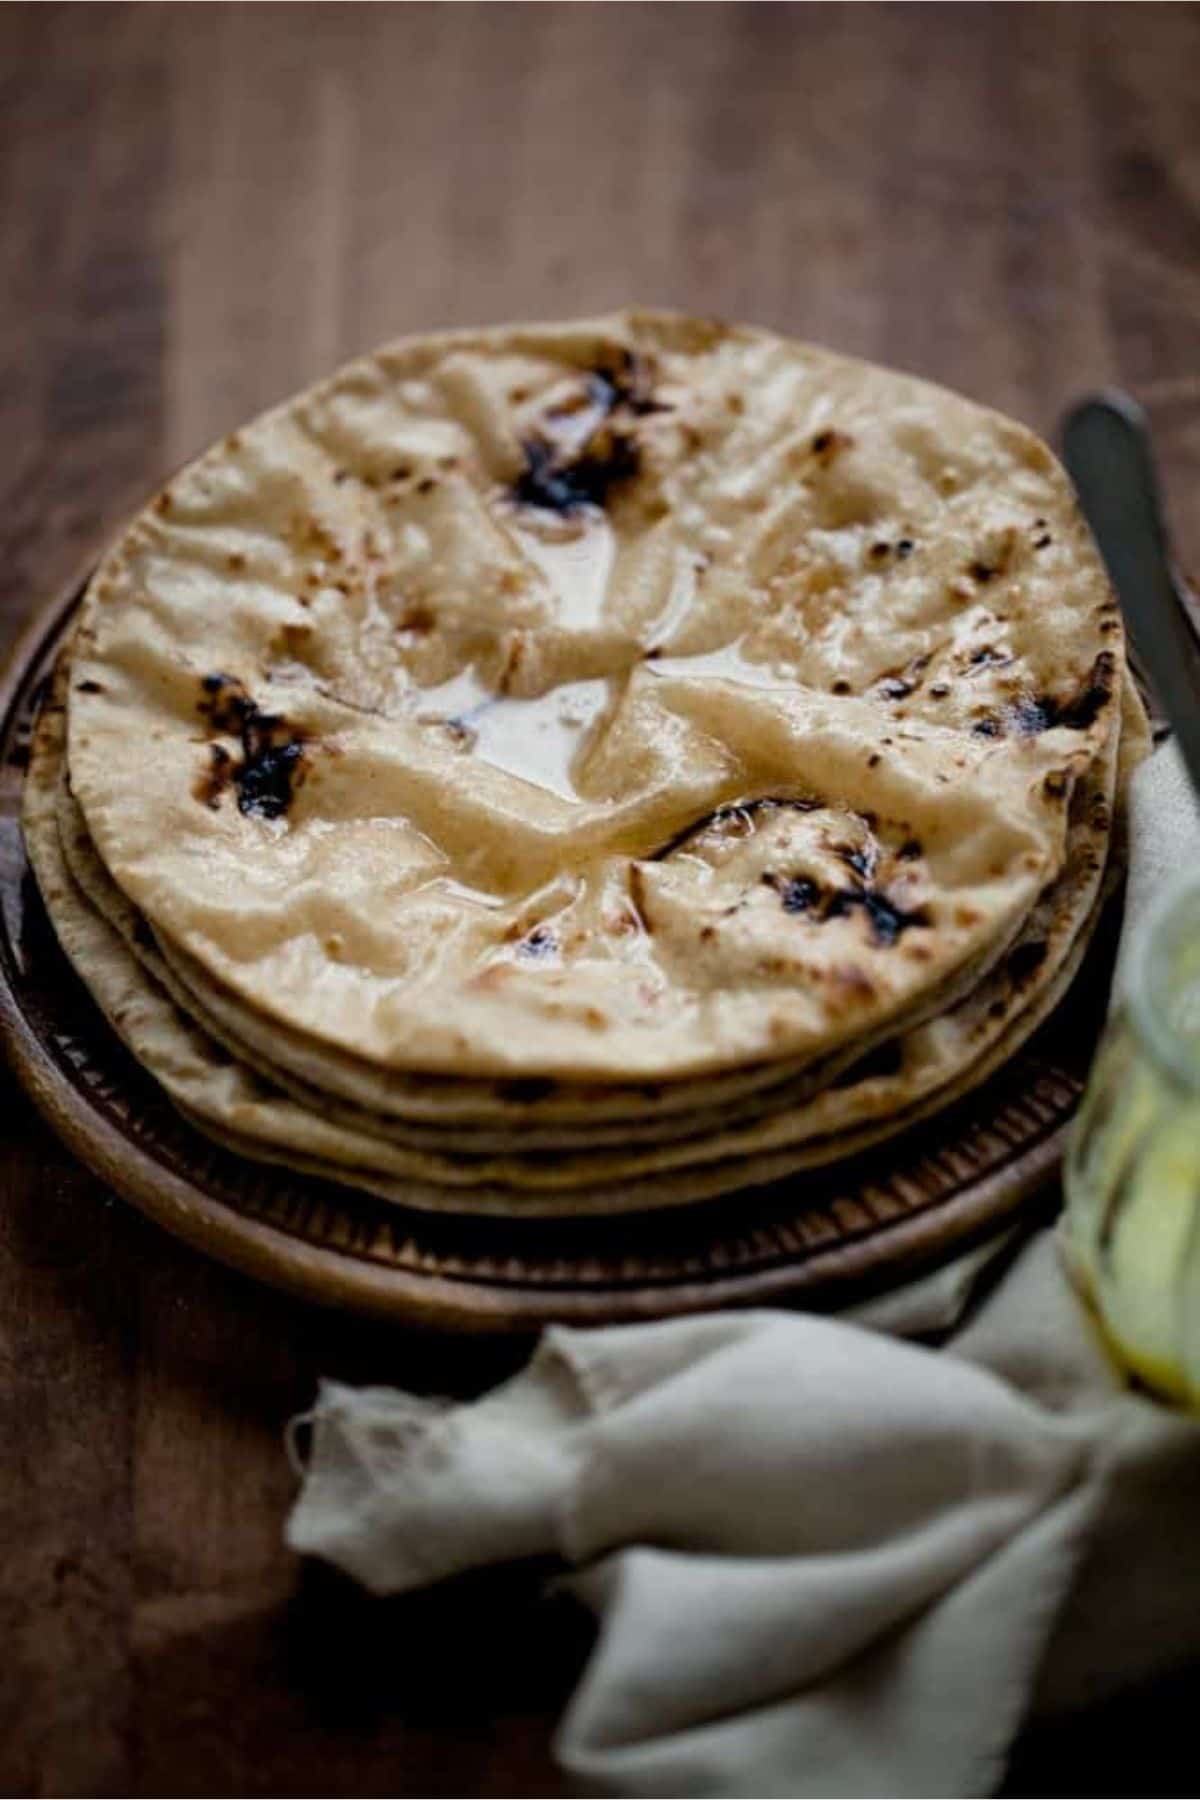
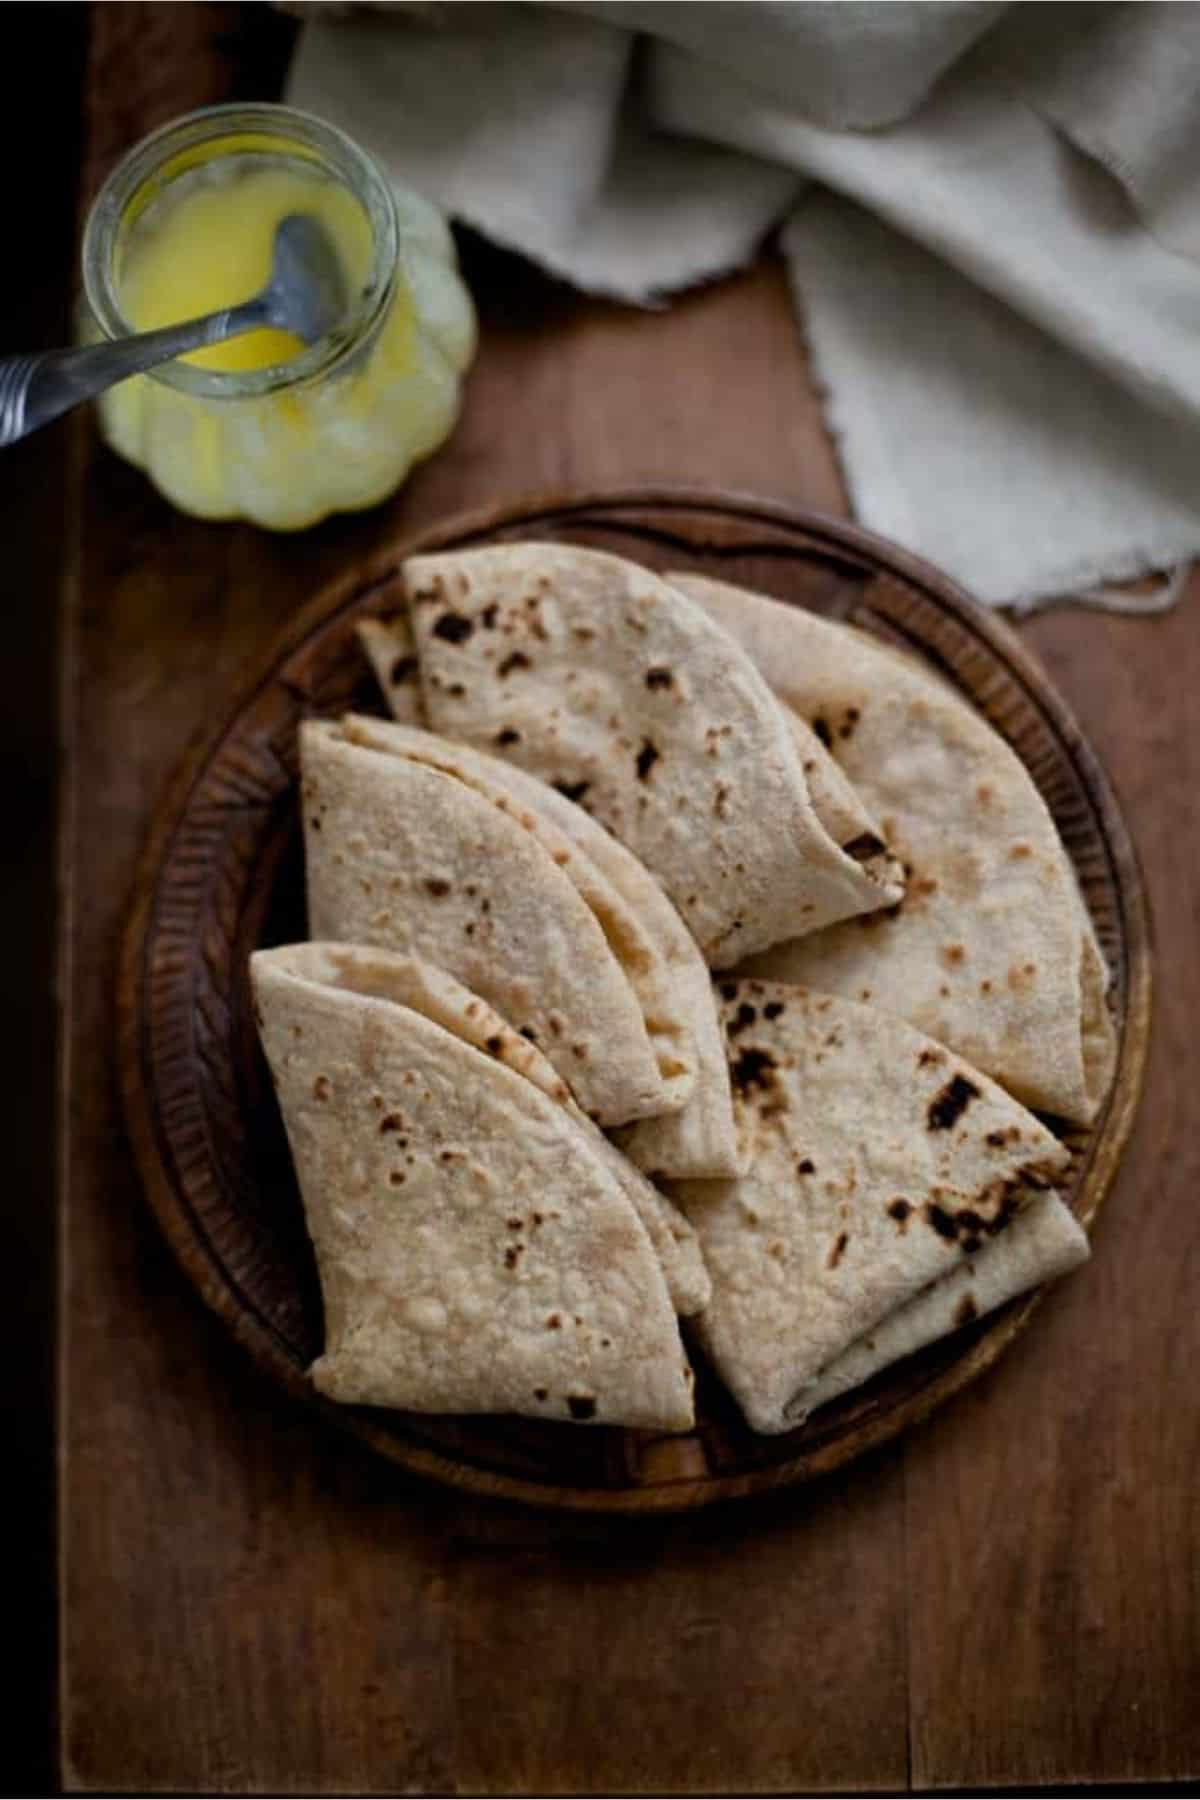
In many homes, salt is commonly added to roti dough. But in our home, we make it plain. As kids, we always had rotis smeared with ghee smeared. Ghee is optional, but it adds wonderful flavor. Skip it, and your roti is automatically vegan.
Ingredients
You just need 2 main ingredients to make roti.
- Atta (Whole Wheat Flour) - In india, we use stone ground or chakki atta which is much finer. You can purchase it at any indian grocery store. Avoid using whole wheat flour available in baking aisle. It is coarse and rotis turn out dark in color and are tough. If you must use use wheat flour, use it in combination with all purpose flour in 1:1 ratio for softer rotis. You can also use multigrain atta.
- Water-Lightly warm water is easier to incorporate and hydrates the dough better to deliver soft rotis.
- Ghee & Salt - As I mentioned above, these two are optional ingredients. Ghee adds richness and keeps rotis soft for longer. Salt enhances flavor so if you wish, you can use.
How To Make Soft Puffy Roti (Step By Step Pictures)
Make The Dough
1) Measure the atta and place it in a large mixing bowl or parat. Parat is a shallow and wide south asian dish made of brass or copper or stainless stessl which is specifically used for kneading flatbread dough. The one you see in pictures, is a 40 year old treasure from my grandmother and is still going strong.
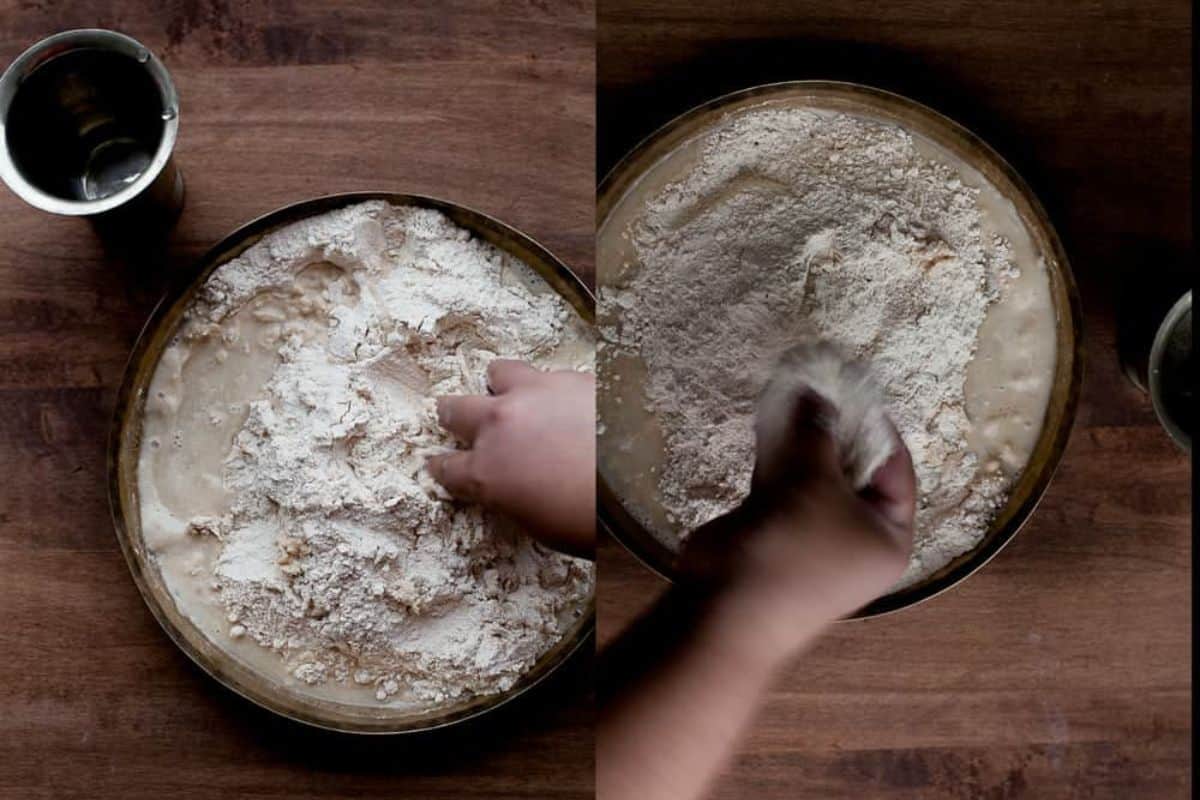
2) Slowly, start adding warm water to the atta.Incorporate water in a circular motion into the atta with your fingers and start moistening the flour.

3) As the atta absorbs water,it will start clumping up. Continue to add water till all of the dry flour becomes wet. Your hands will be mighty messy at this stage but you will see a rough dough starting to come together.
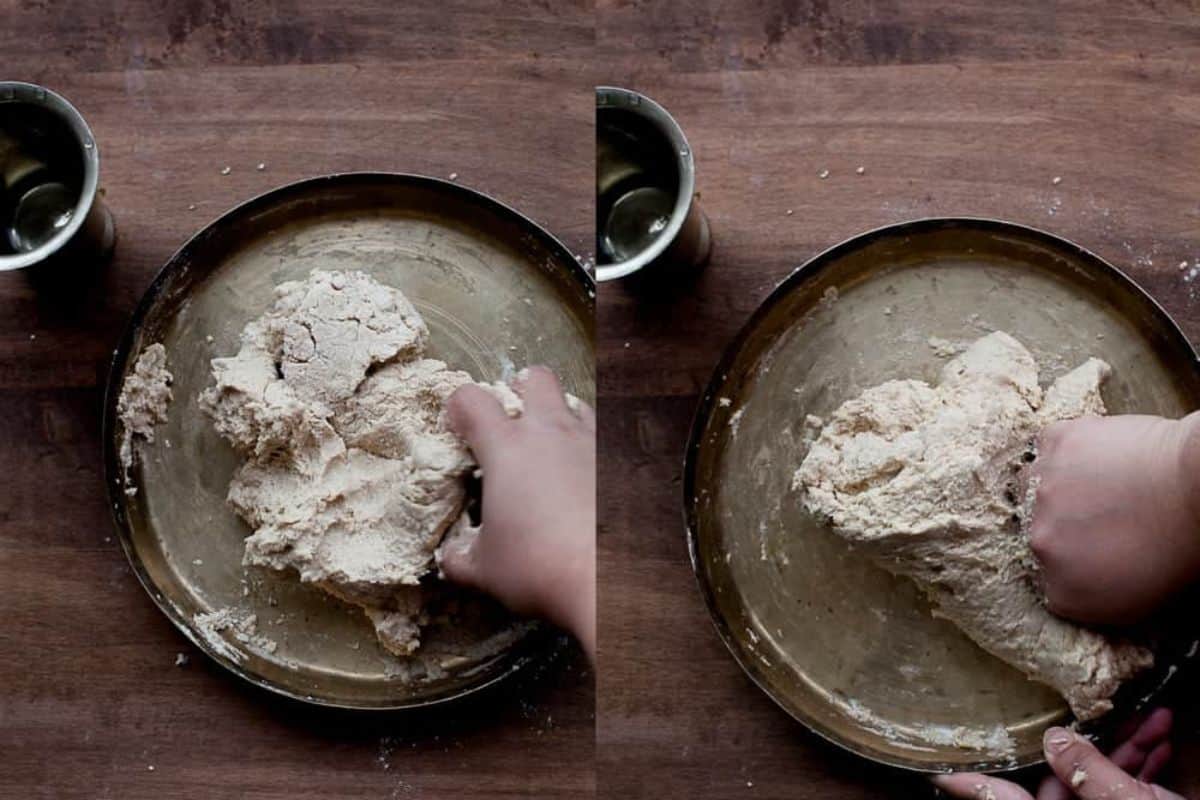
4) At this point, ensure that the atta is not very dry. To check so, try to squeeze it between your palms as if making a fist and it should feel soft and slightly sticky (but not wet). If not, add a small splash of water and let it absorb into the flour.
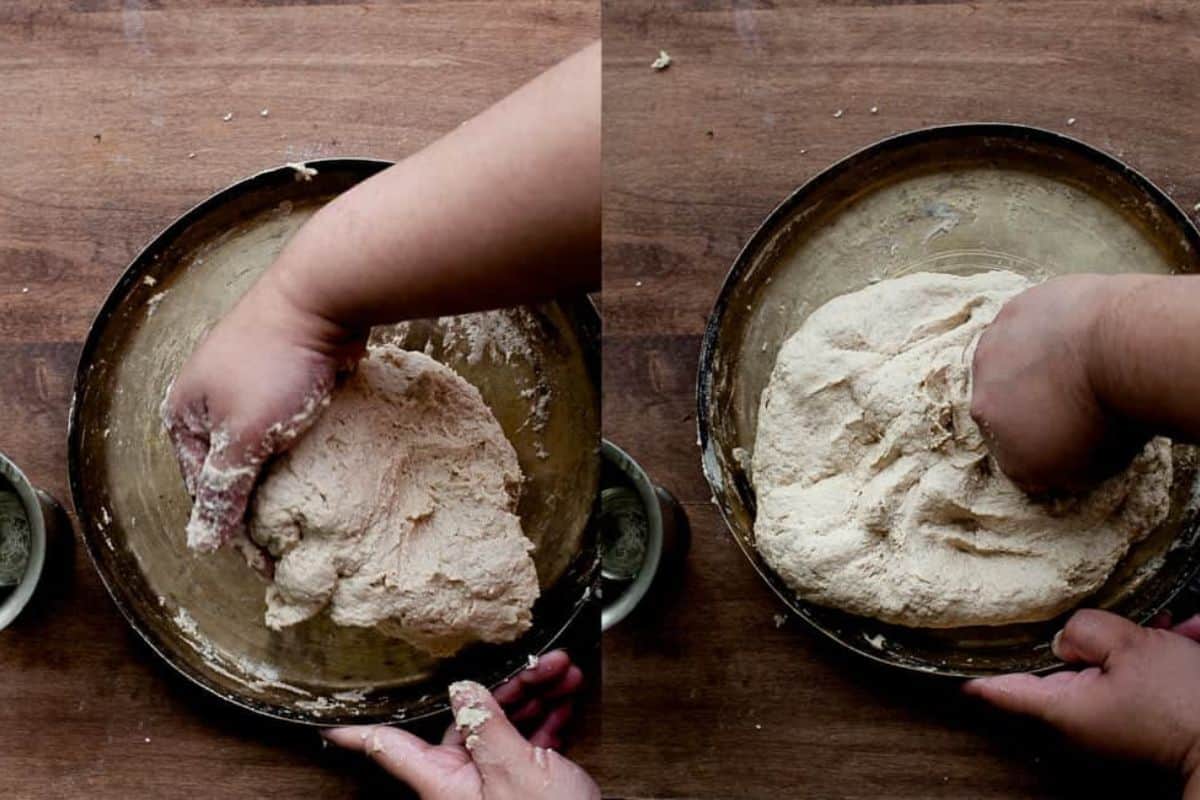
5) Next, start using your knuckles to knead. Use your knuckles to flatten it out and then pull it all together towards yourself using your palm & fingers,then knead again with knuckles to flatten out. Knead the roti dough this way (flatten and bring together) repeatedly for 8-10 minutes(setting a timer helps!). At any point you feel that the dough is feeling tight or drying out, add a light splash of warm water.
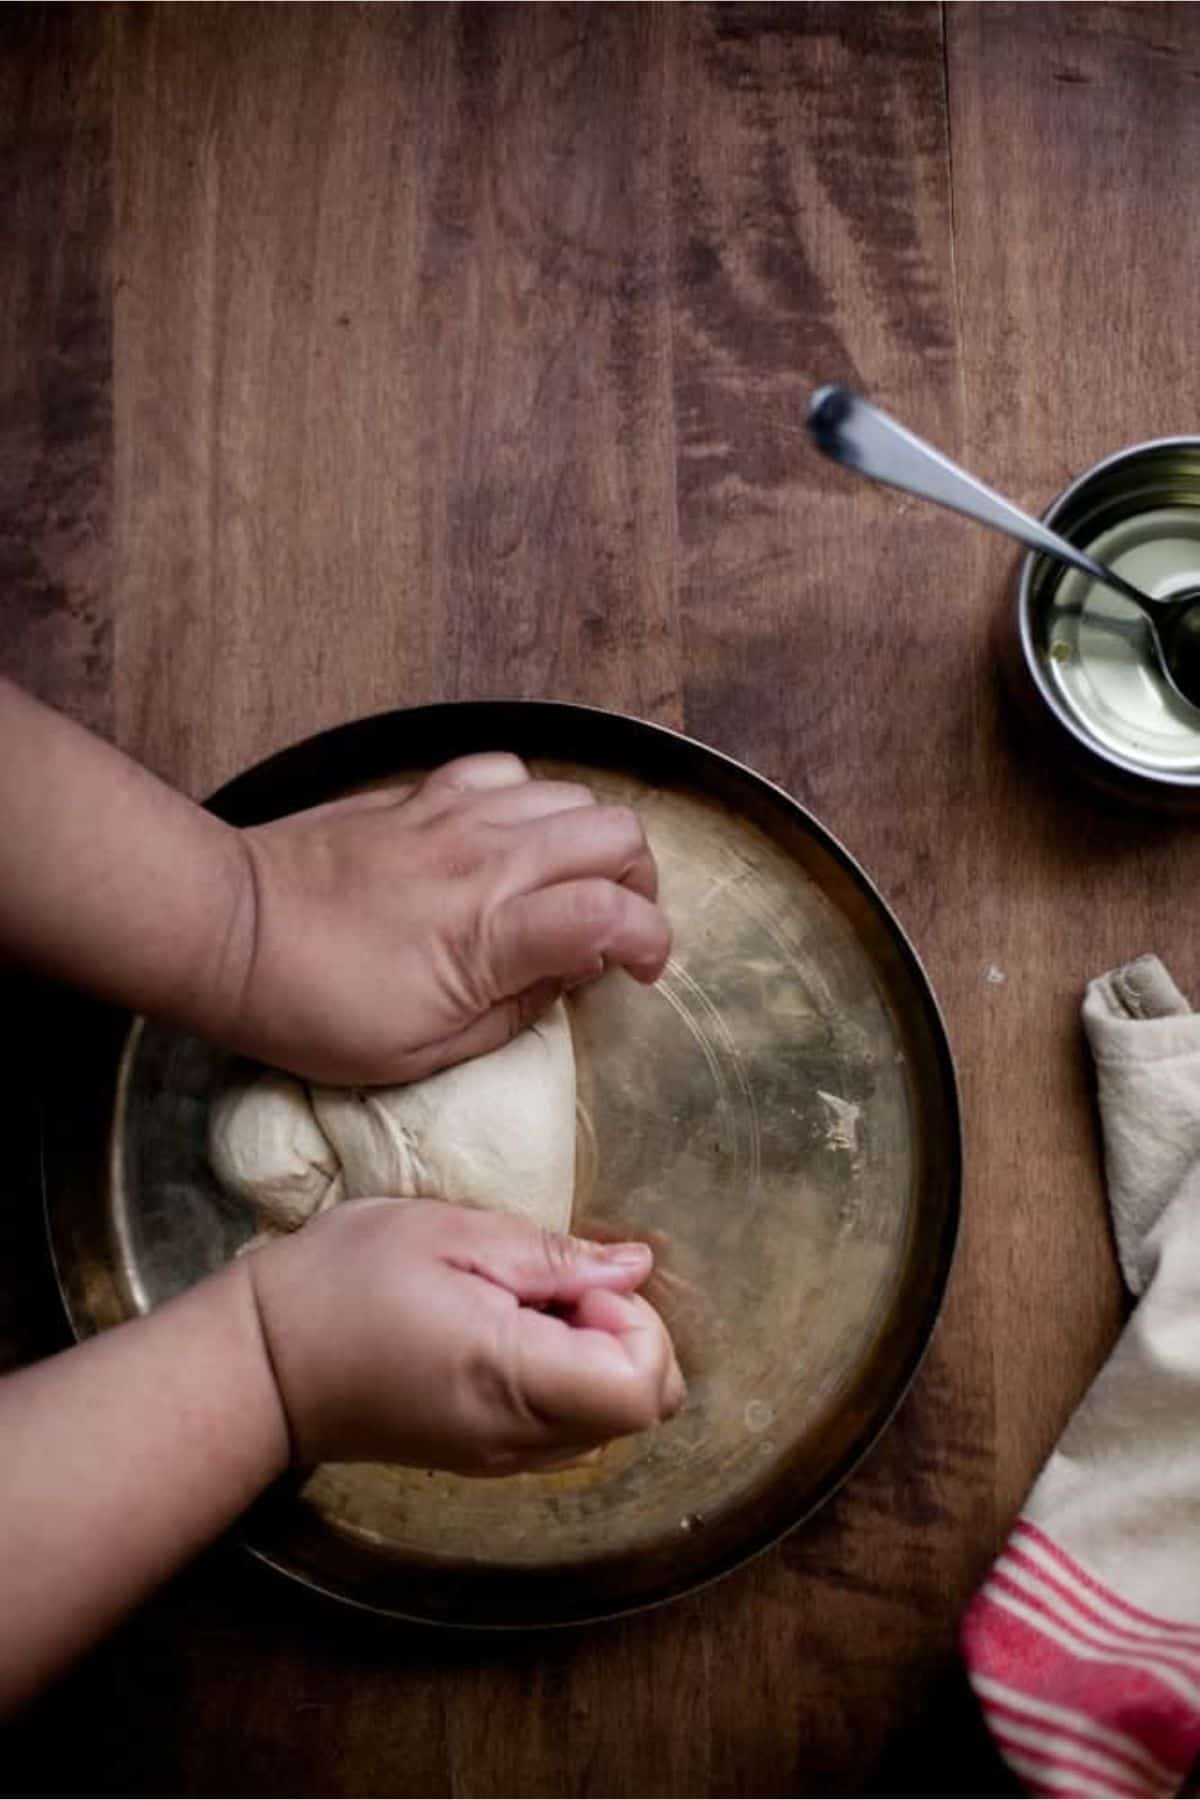
6) Towards the last 1-2 minutes of kneading, use both hands to knead for a very smooth & elastic dough (this will work up the gluten really fast!).You could add a bit to oil while kneading at this stage to make it even smoother. Form a even, smooth dough ball.
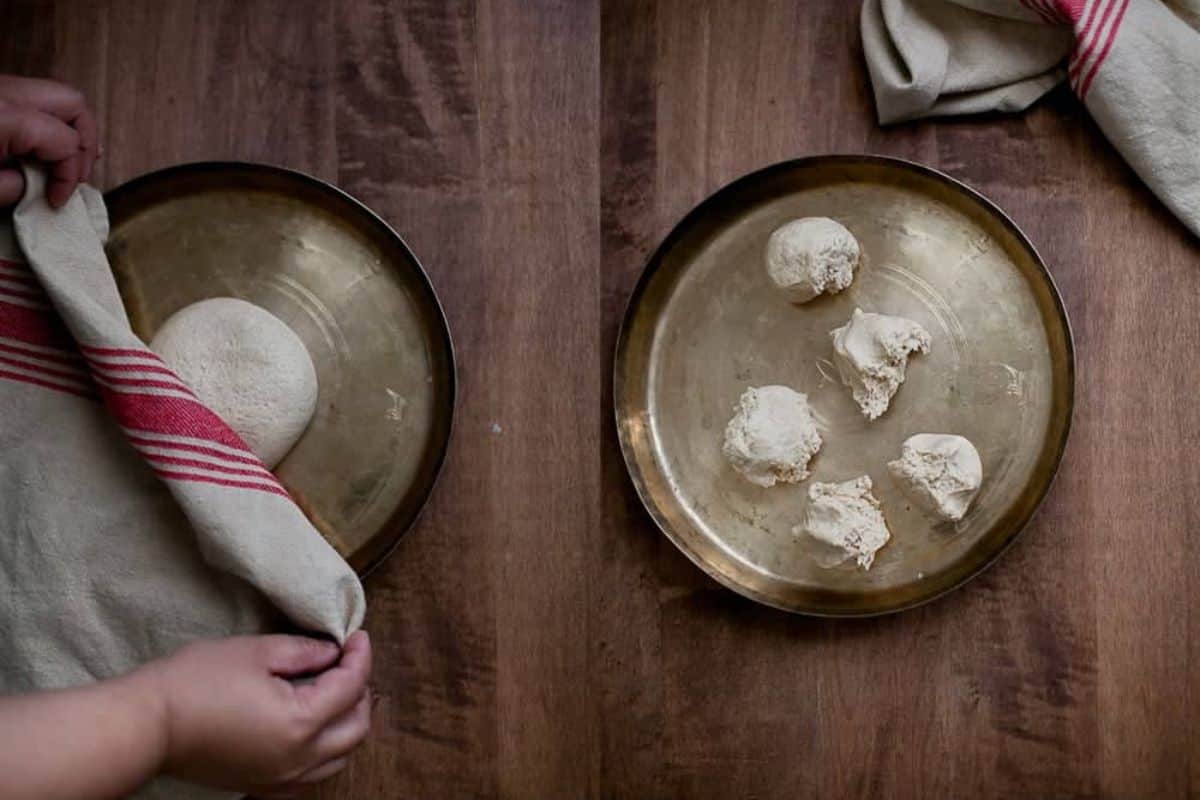
7) Time to rest those gluten now! Cover the dough ball with a kitchen towel and let rest for 15-20 minutes. You could smear a layer of melted ghee or oil on top but you really do not need it if the proportion of water is correct and you made sure that the dough didn't feel or look dry when kneading. Dough will stay moist during rest time but starts losing moisture after 20 minutes. If you are not planning to make rotis right away, place the dough into an air tight container with lid and refrigerate.
Many people complain that if they make roti dough in advance, it darkens as it sits in the refrigerator. This is normal to some extent because wheat flour contains iron, which can cause slight darkening over time. But, over time I've learned a small trick to reduce the blackening. Make sure that the container you store the dough in should be just big enough to fit the dough without extra space around or above. If the container is too large, more air gets in, and that extra air causes oxidation and drying, which makes the dough darken faster.
8)If you refrigerated the dough, take it out 10-15 minutes before and let sit on kitchen counter to bring it closer to room temperature. The colder the dough, its difficult to roll and rotis cooked from cold dough are bit harder. Uncover and divide the dough into 50-55g equal portions (makes about 10-11 rotis).
Roll the Rotis
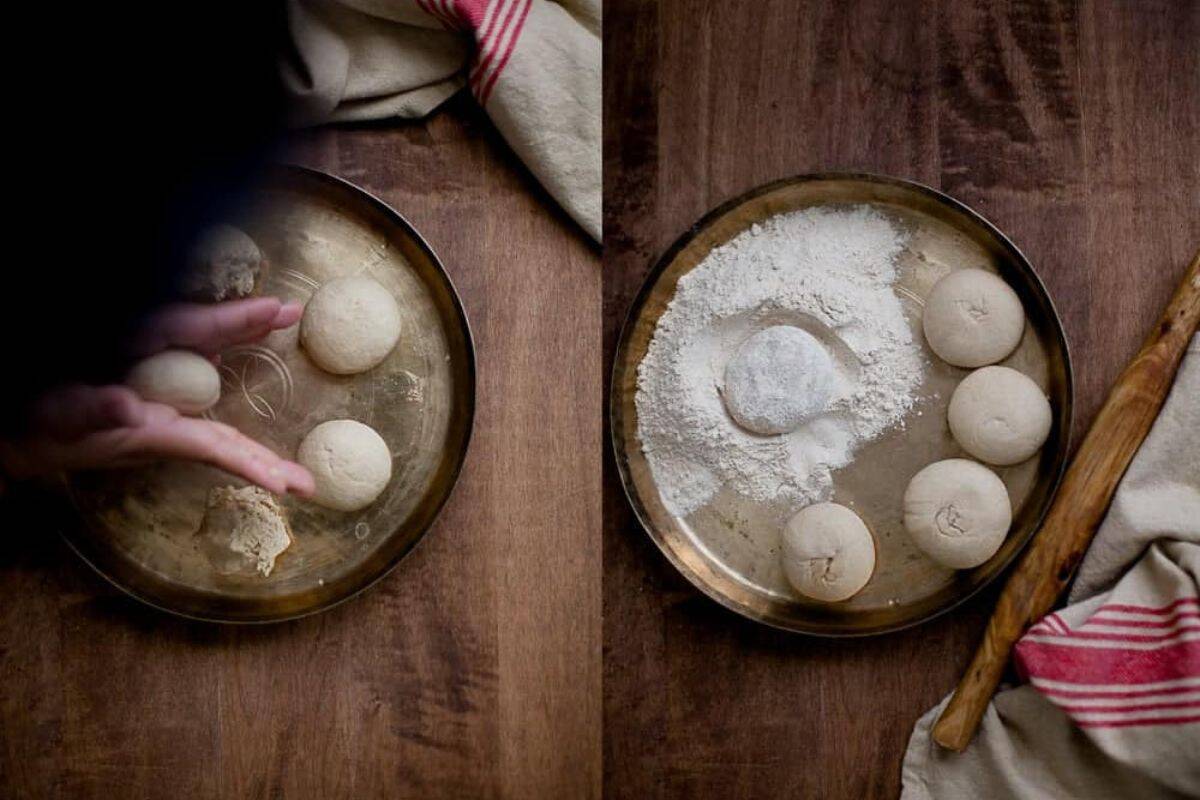
9) Take each dough portion between palms of your hands and roll to make as smooth round balls as possible. Place some loose atta on a dish. Its time to roll rotis!
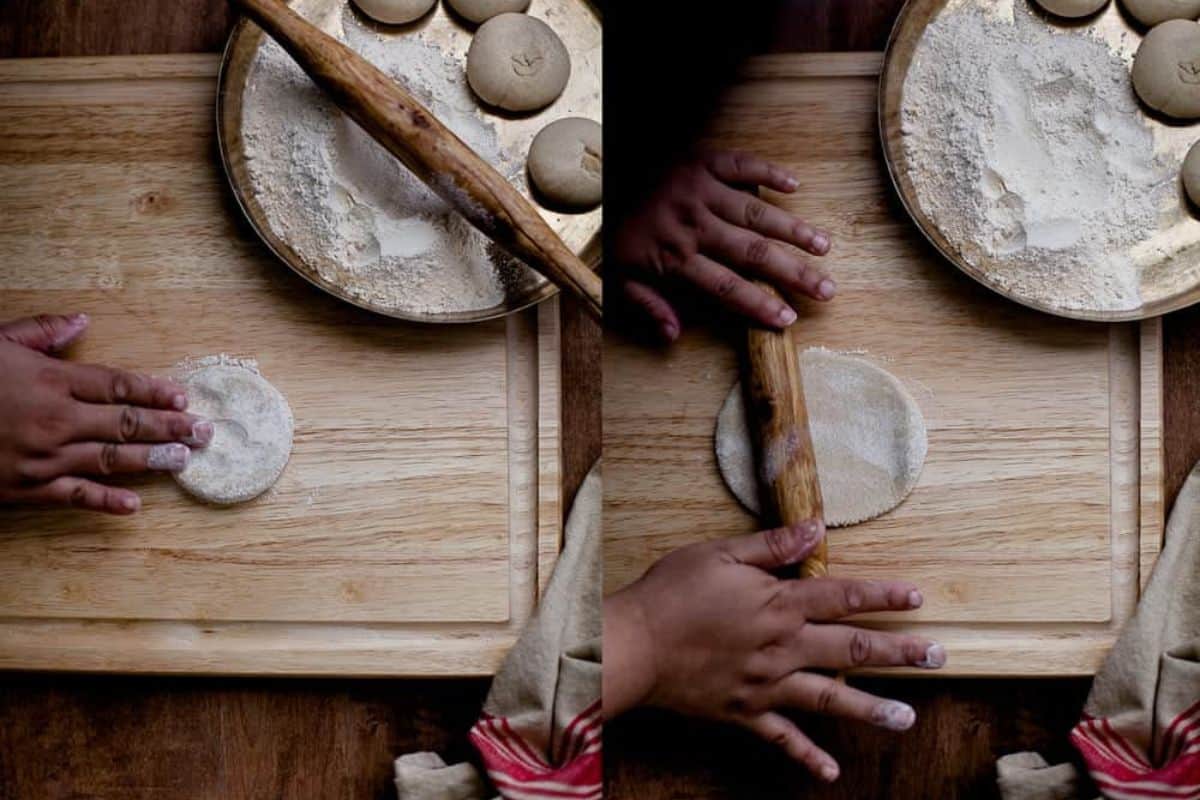
10) Flatten the dough balls. Cover the flattened ball in the loose atta on both sides. Place on a chakla (rolling stone) or pastry board. Flatten out lightly from edges using tips of your finger. Using a rolling-pin, start rolling the dough to a flat circle.
11) Dust the roti with dry flour as required when rolling. Initially, you will need to dust more but it will get easier as you continue.
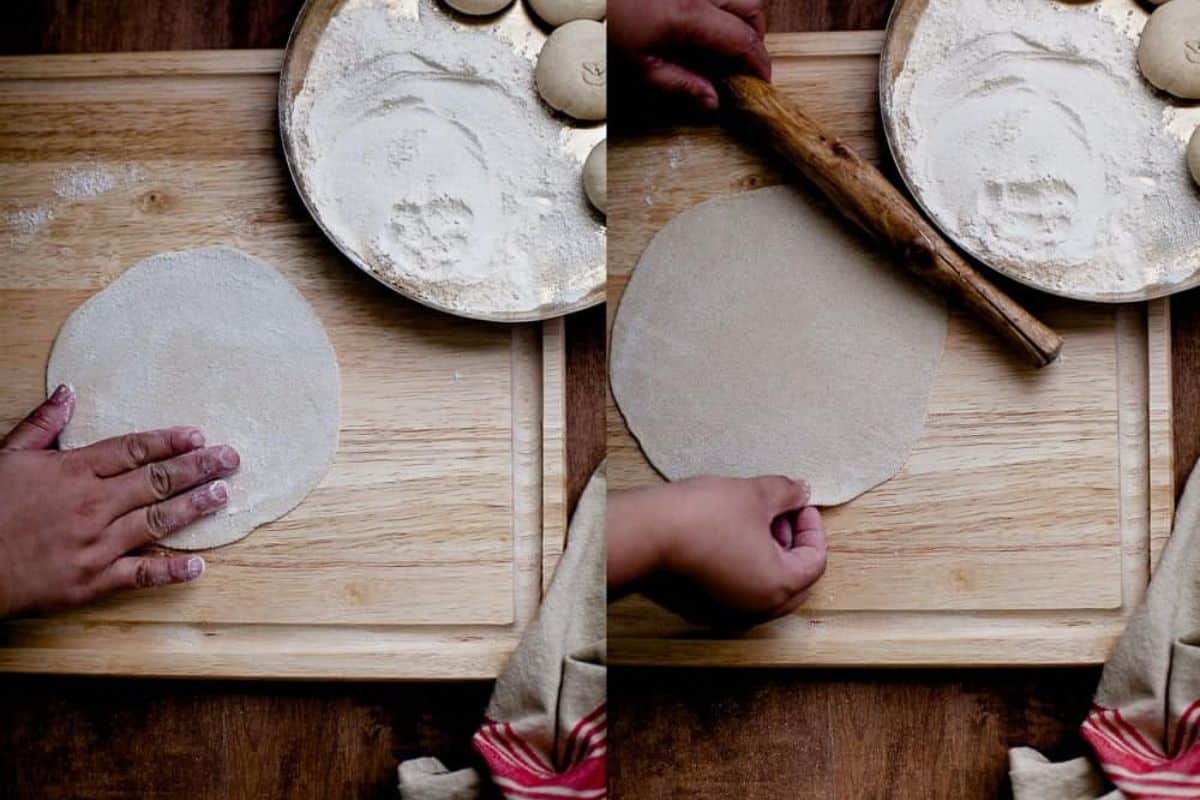
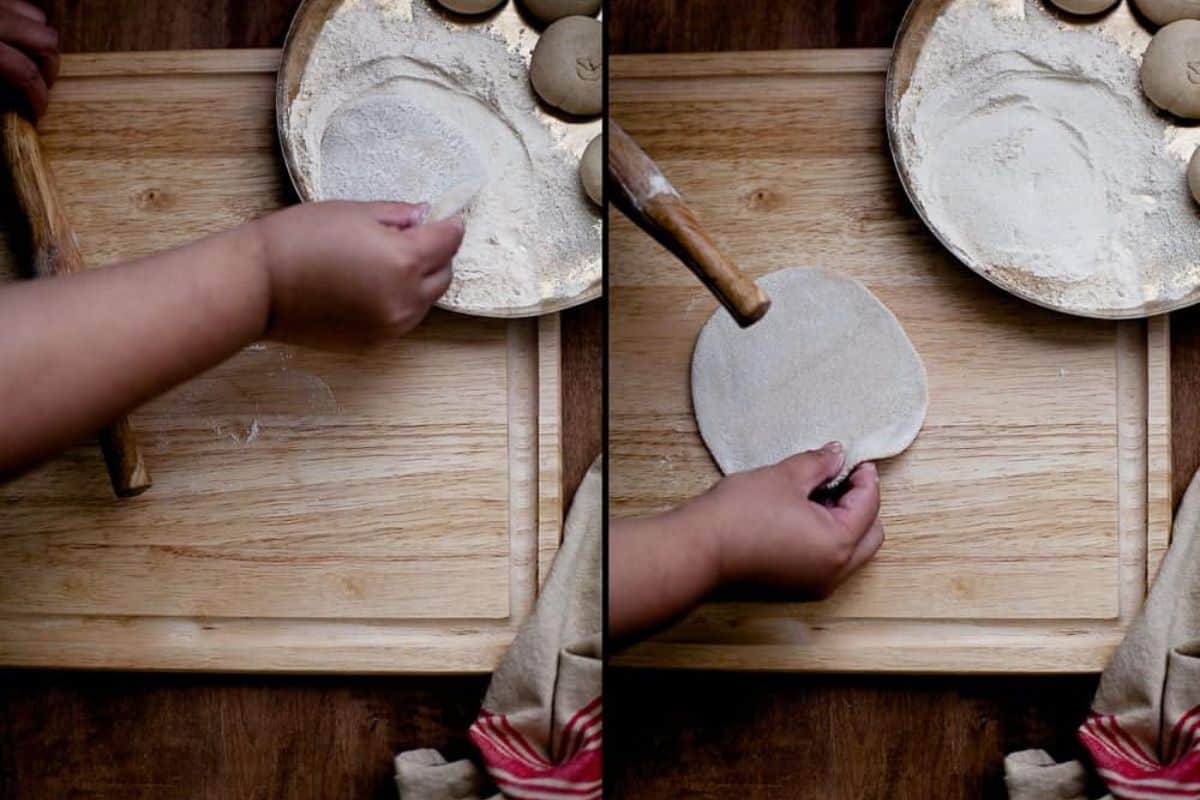
12) It takes practice to get the shape. Even if you don't get perfect rounds its okay, doesn't affect the taste. Concentrate on even thickness while rolling. While rolling move the roti 90 degress after a few rolls and roll to get a 7 inch to 8 inch round.
Tip :- One of the tricks my grandmother taught me to get thin edges of rotis is that towards the last 15-20 seconds of rolling, your rolling-pin should be half on the rolling board and half of the roti. This really helps with unifrom edges.
Cook Roti on Tawa
13) Place a tawa (cast iron griddle), I use 12" cast iron on high to heat up. Keep a contaiber or roti dabba lined with kitchen towel near by to store rotis.
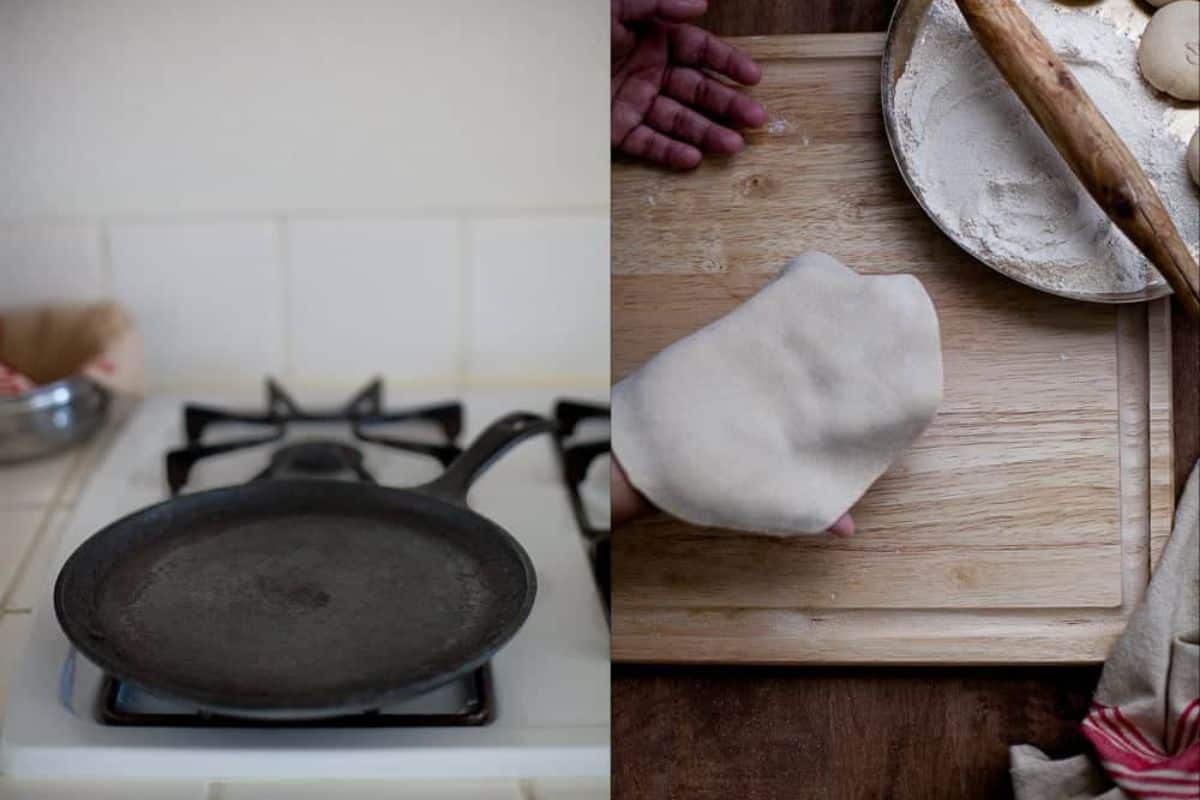
Tip:- To find out that the tawa is hot enough, sprinkle a little dry flour on the hot tawa. If the flour darkens immediately, tawa is ready for cooking rotis. Don't forget to wipe out the dry flour before placing the roti.
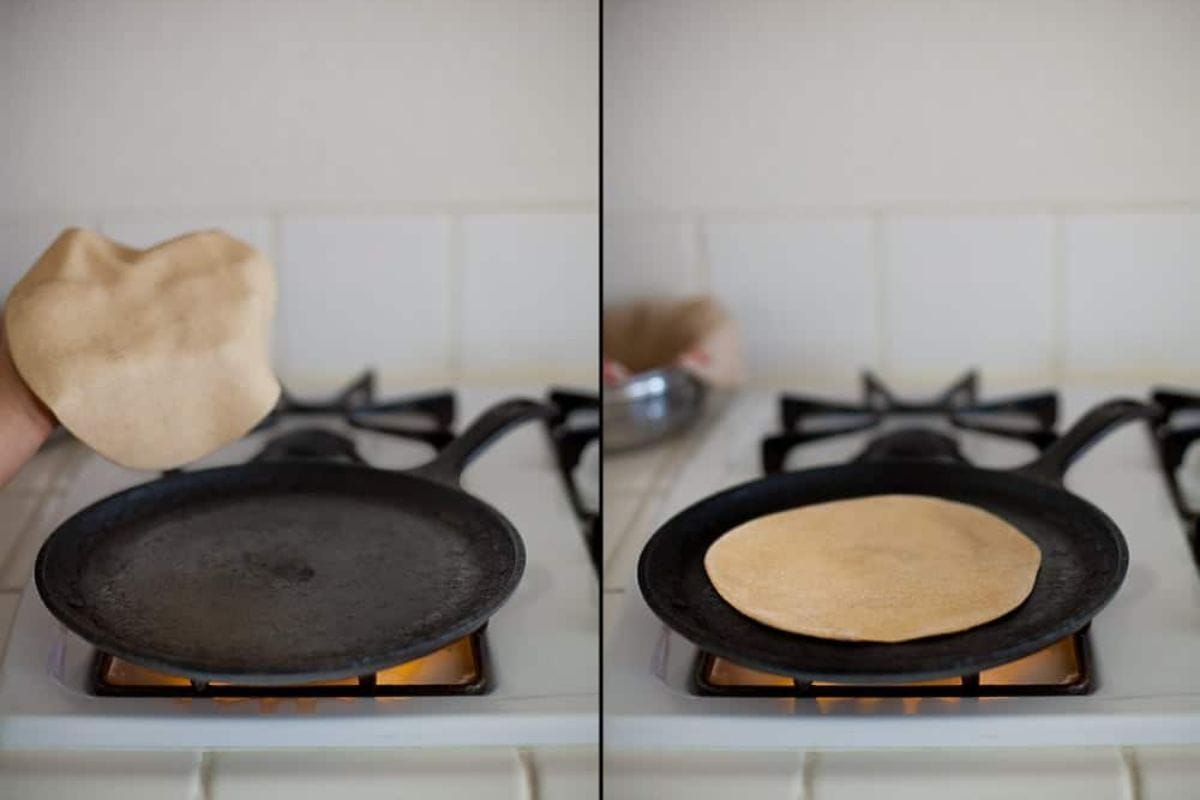
14) After rolling the roti, gently shake off any extra dry flour and place it on the hot tawa. Let it cook for about 20-25 seconds. The exact time depends on how thick your roti is. You'll notice the surface start to change color, and look slightly dry, or show small bubbles. At this point, the roti is about 25% cooked.
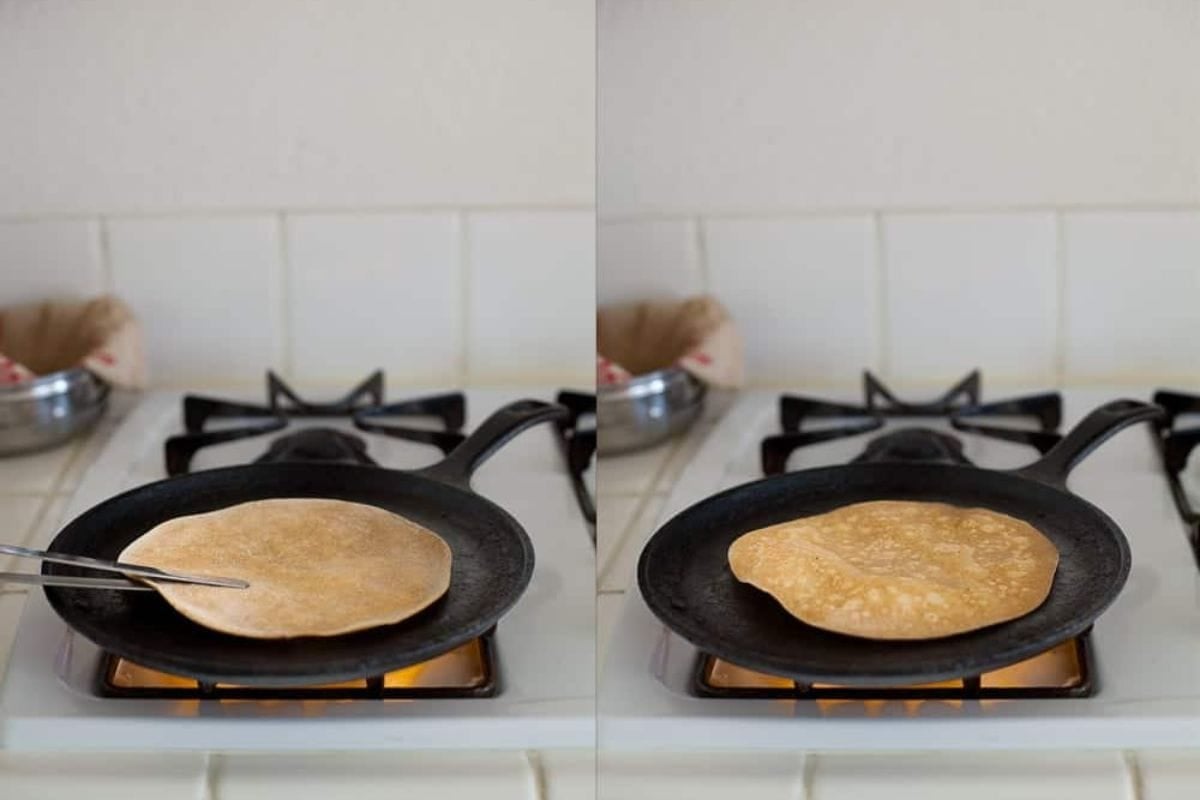
First Flip- Now it's time for the first flip. Use kitchen tongs to turn the roti to the other side. Let it cook for another 15-20 seconds. You may see a few brown spots, but don't overcook or roti become hard.
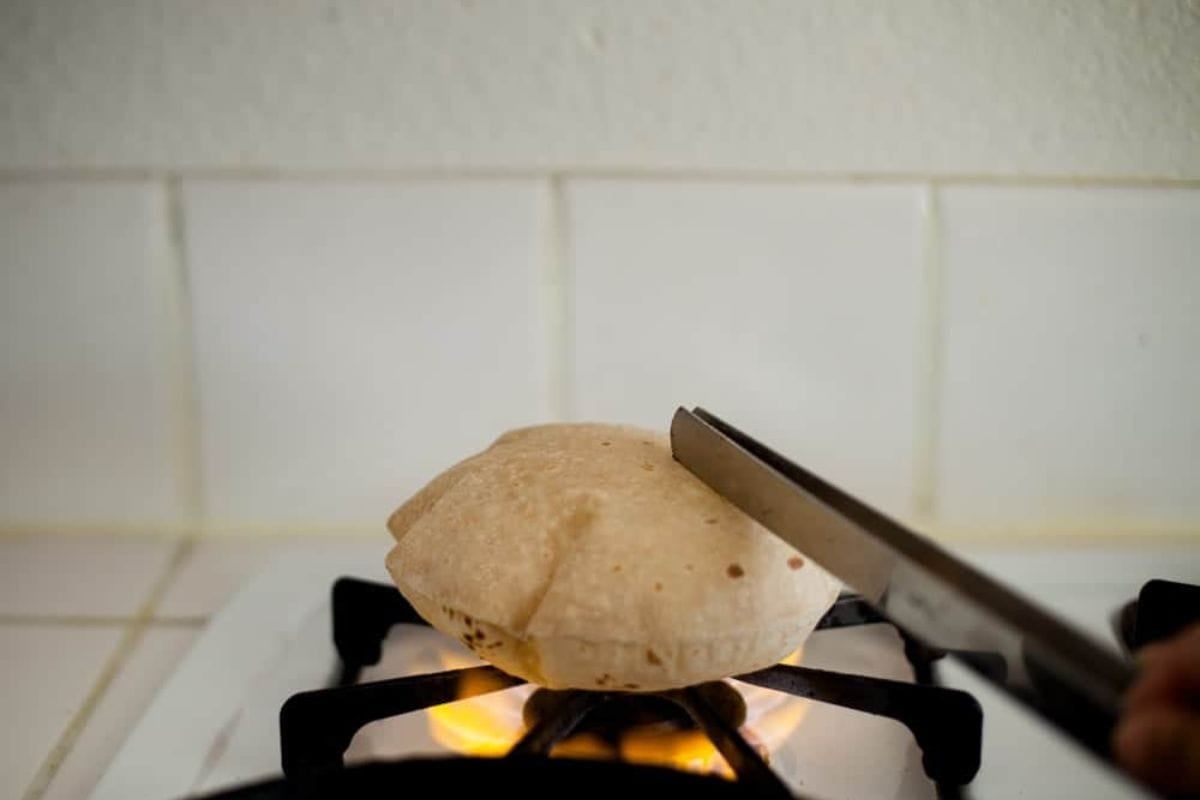
Second Flip - Next, pick up the roti with tongs and place it directly on high open flame, with the first side facing the fire. Gently press the center and edges with tongs to help it puff up. As it puffs, you will see small tears on the edges where steam escapes. If that happens, lightly press with tongs near the tear to help the roti puff evenly. Let it puff and get a light char for about 8-10 seconds.
Third Flip - Flip it again so the second side can puff and cook. Please see the images to get an idea of the process more clearly.
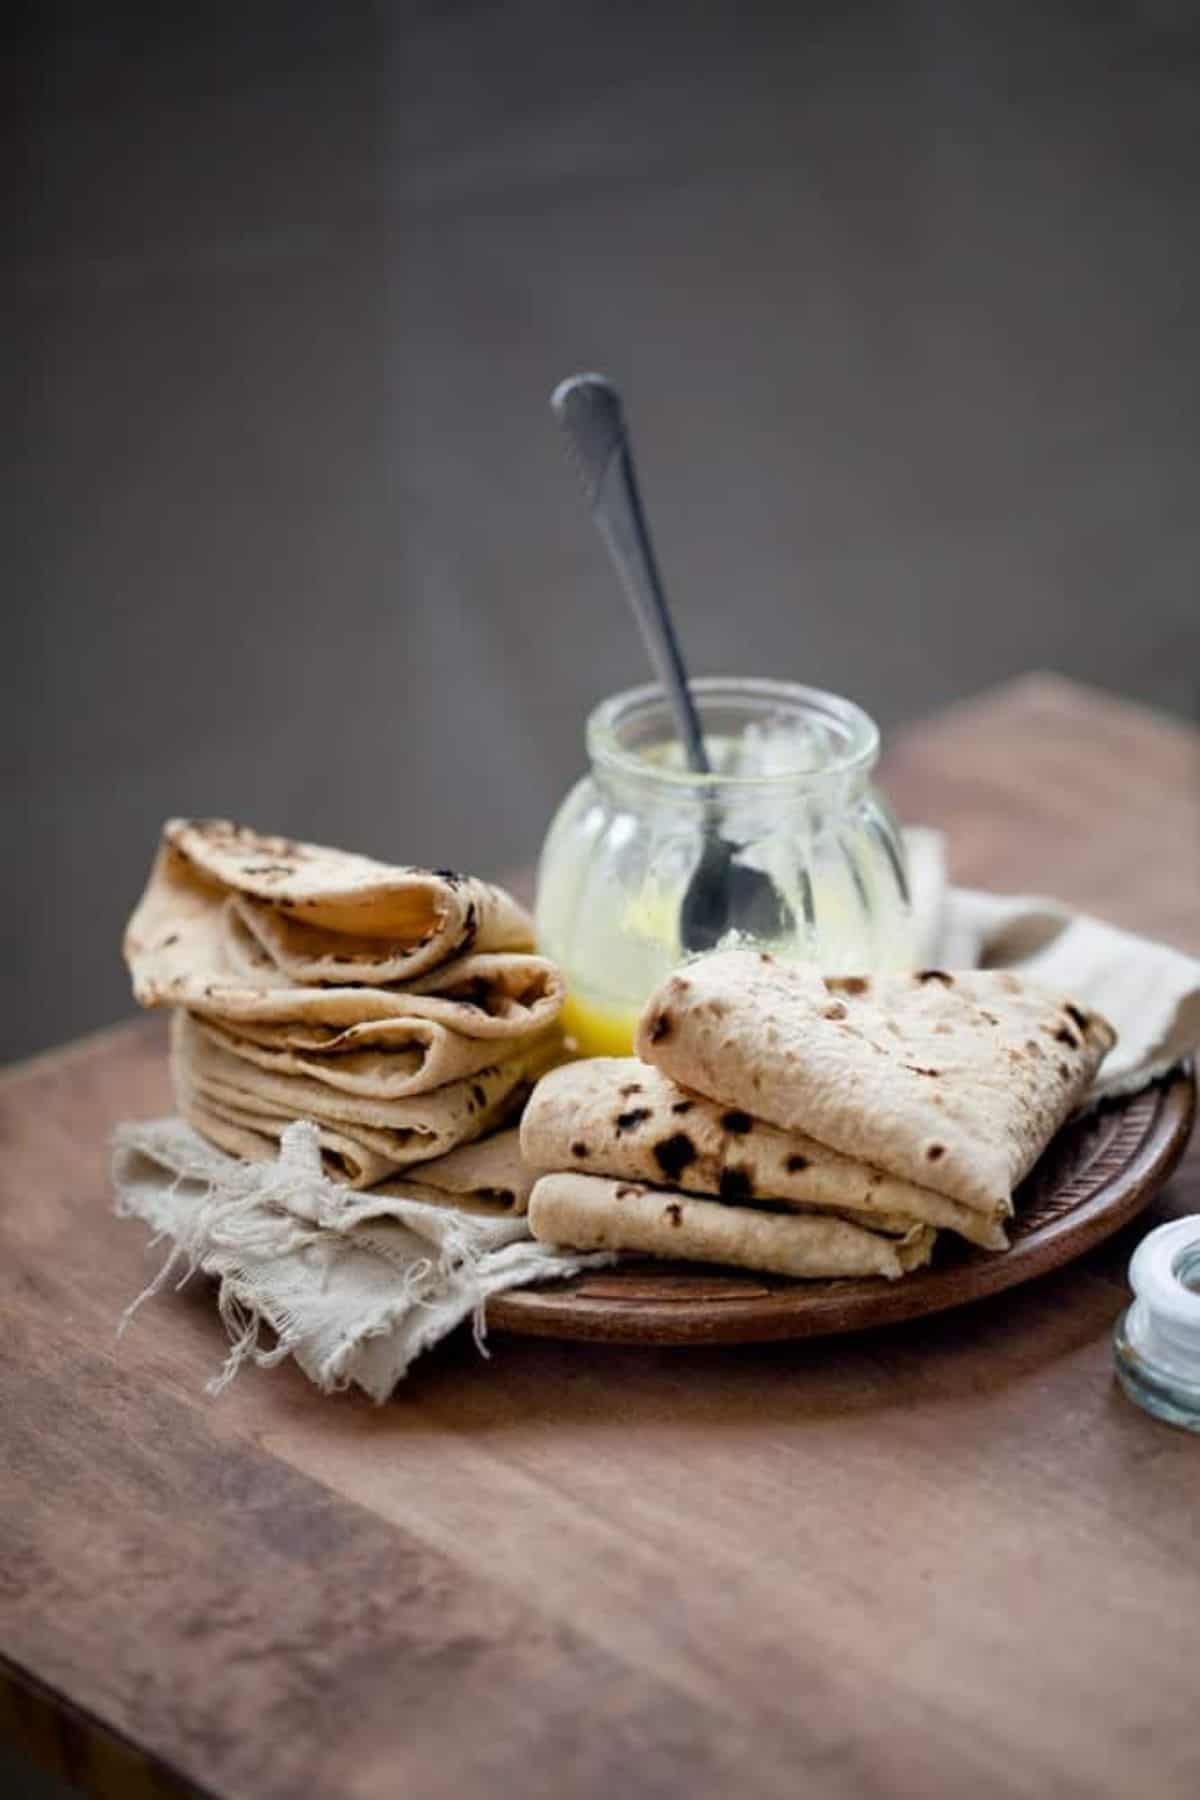
If you are storing rotis to serve a little later, don't let it char too much else it will dry up. At the same time, some people like crispy and chewy rotis, so you can char them to liking. Store warm rotis wrapped in a kitchen towel.

Serving
Typically, we serve rotis as a side bread with both vegetarian main dishes as well as non vegetarian curries, or with a bowl of dal. You can use them to make wraps with tikka and kebabs.
Steps for Freezing & Reheating Rotis
- Make all the rotis as outlined above.
- Place on a wire rack and let them cool completely to room temperature(takes about 15-20 minutes). Warm rotis, if frozen will become soggy after defrosting. Don't leave out for too long once cooled else they start drying. Don't spread ghee on rotis if you plan to freeze them.
- Stack the rotis with a sheet of parchment paper in between each one. This prevents them from sticking to each other.
- Warp the stack tightly using aluminium foil or you could also use cling wrap.
- Place the wrapped stack inside a ziplock bag and press down to squeeze as much air as possible. Then seal the ziplock bag and label it with date.
- Place the pack flat inside your freezer. You can stack for 1-2 months.
- To reheat, thaw the required number of rotis for 10-20 minutes at room temperature. Then microwave wrapped in a damp towel for 8-10 seconds. You can also reheat on a hot skillet for 15-20 seconds each side.
Soft Indian Roti Recipe (Step By Step Guide)
Equipment
- Rolling stone (chakla) or any flat and sturdy rolling surface
- Rolling Pin to roll the rotis
- Iron Tawa or Any heavy flat pan to cook the roti
- Tongs Needed for flipping roti while cooking
Ingredients
- 2 cup(280g) atta (durum whole wheat flour) + ⅓ cup for dusting
- 1 cup(~190ml) luke warm water or as needed to knead a soft dough
Optional Ingredients
- ½ tablespoon any neutral oil (to smear the dough when it rests)
- Ghee or butter quantity as desired, optional but recommended, for brushing on roti
Instructions
Make The Roti Dough
- Measure the atta flour and place it in a large mixing bowl or parat.
- Gradually pour warm water into the atta. Using your fingers, mix in a circular motion to moisten the flour. As the atta absorbs the water, it will start forming small clumps.
- Continue adding water a little at a time until all the dry flour is wet. Your hands will get messy, but a rough dough will begin to take shape. Check the moisture level by squeezing a handful of dough. It should feel soft and slightly sticky, but not wet. If it feels dry, add a small splash of water and mix again until absorbed.
- Begin kneading using your knuckles. Press the dough down with your knuckles to flatten it, then gather it back together using your palms and fingers. Repeat this motion of flattening and bringing the dough together for 5-7 minutes. Setting a timer helps.
- If the dough starts to feel tight or dry during kneading, lightly sprinkle warm water and continue kneading.In the last 1-2 minutes, use both hands to knead more vigorously until the dough becomes smooth and elastic. This helps develop the gluten. You can also add a few drops of oil at this stage for a smoother texture.
- Shape the dough into a smooth, even ball .Cover the dough with a kitchen towel and let it rest for 15-20 minutes to relax the gluten. You may spread a thin layer of melted ghee or oil on top, but it isn't necessary if the dough has the right moisture level. The dough will stay moist during resting but can begin to dry out after 20 minutes. If you're not using it right away, store it in an airtight container and refrigerate.
- When ready to make rotis, remove the dough from the refrigerator and let it sit at room temperature for 10-15 minutes. Cold dough is harder to roll and makes tougher rotis.
- Once the dough is at room temperature, uncover it and divide it into equal portions of about 50-52 grams each. This will yield around 10 rotis.
Roll(Shape) The Roti
- Take each portion of dough and roll it between your palms to form a smooth, round ball. Place ¼ to ⅓ cup dry atta on a plate or shallow dish for dusting.
- Lightly flatten a dough ball and coat it with the loose atta on both sides.et it on a chakla (rolling board) or pastry board and gently press the edges with your fingertips to slightly flatten it.
- Using a rolling pin, begin rolling the dough into a flat circle. Dust with dry flour as needed to prevent sticking. You may need more flour at first, but as you gain practice, rolling will become easier.
- Focus on maintaining an even thickness rather than a perfect round shape-uneven edges won't affect the taste. Rotate the dough about 90 degrees every few rolls to help form a circular shape. Roll until the roti measures roughly 7 to 8 inches in diameter.
Cook The Roti
- Place a tawa (I use 12 inch cast iron griddle) on high heat to preheat. Keep a container or roti dabba lined with a kitchen towel nearby to store cooked rotis.To check if the tawa is hot enough, sprinkle a pinch of dry flour on it. If the flour darkens immediately, the tawa is ready. Wipe off the flour before placing the roti.
- Shake off any excess drt flour from the rolled roti and place it gently on the hot tawa. Let it cook for about 20-25 seconds, depending on thickness. You'll see the surface start to change color, look slightly dry, and develop small bubbles-this means it's about 25% cooked.
- Flip the roti using kitchen tongs and cook the other side for 15-20 seconds. A few brown spots may appear, but avoid overcooking, as it can make the roti dry. If you're making rotis ahead of time, cook them lightly so they remain soft later.
- For the second flip, lift the roti with tongs and place it directly on a high open flame, with the first side facing the flame. Gently press the center and edges with the tongs to help it puff. If small tears form on edges, press gently near them to help the roti puff evenly. Let it cook for about 8-10 seconds until lightly charred.
- Flip once more to let the second side puff and cook for a few more seconds. Your roti should now be soft, slightly charred, and ready to serve.
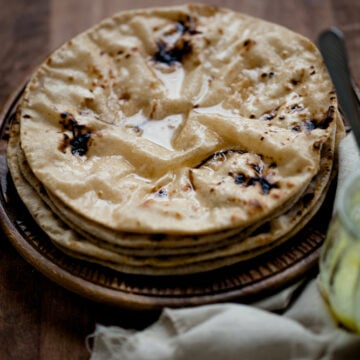
- Brush ghee on the hot rotis and serve right away or store then wrapped in a kitchen towel. I line the kitchen towel with a small piece of paper towel, this helps in preventing them from getting soggy.
Notes
- Roll the dough as evenly as possible.This helps in puffing up the rotis.
- Store the leftover dough in the refrigerator for not more than 1-2 days in an air tight container.
- If you are storing rotis to serve a little later, don't let it char too much else it will dry up. At the same time, some people like crispy and chewy rotis, so you can char them to liking.


Kiran @ KiranTarun.com says
Rotis definitely brings back so many wonderful memories. These are so delectable 🙂
indusmathew says
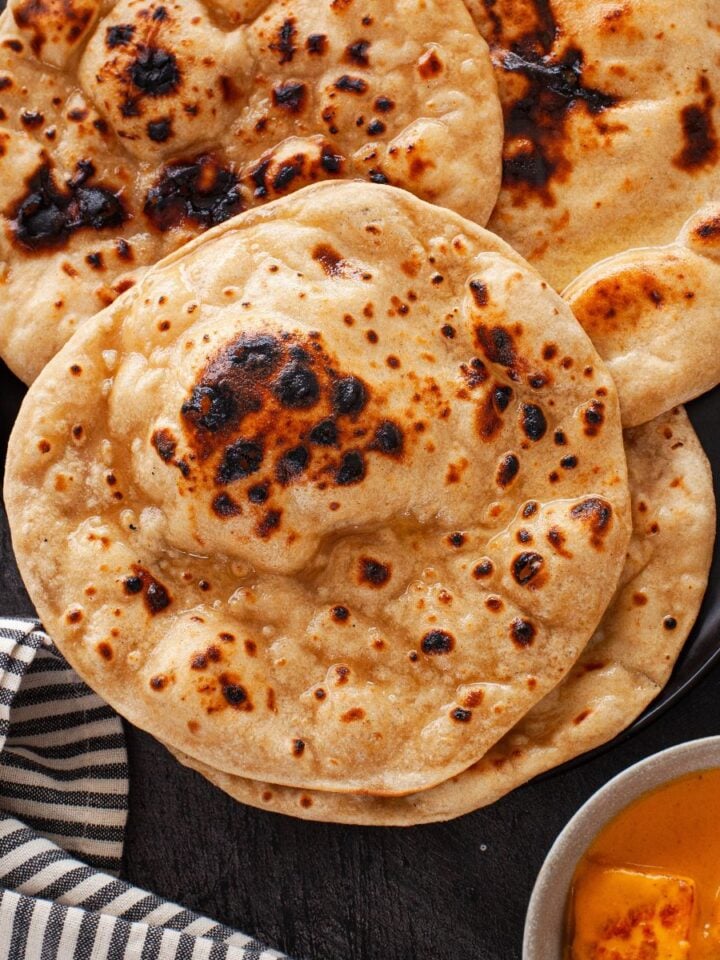
Wonderful, wonderful step by step pics. And the close up pic of the rotis with ghee on it, absolutely yum! No need of any curry on the side, if it is served hot like that!