

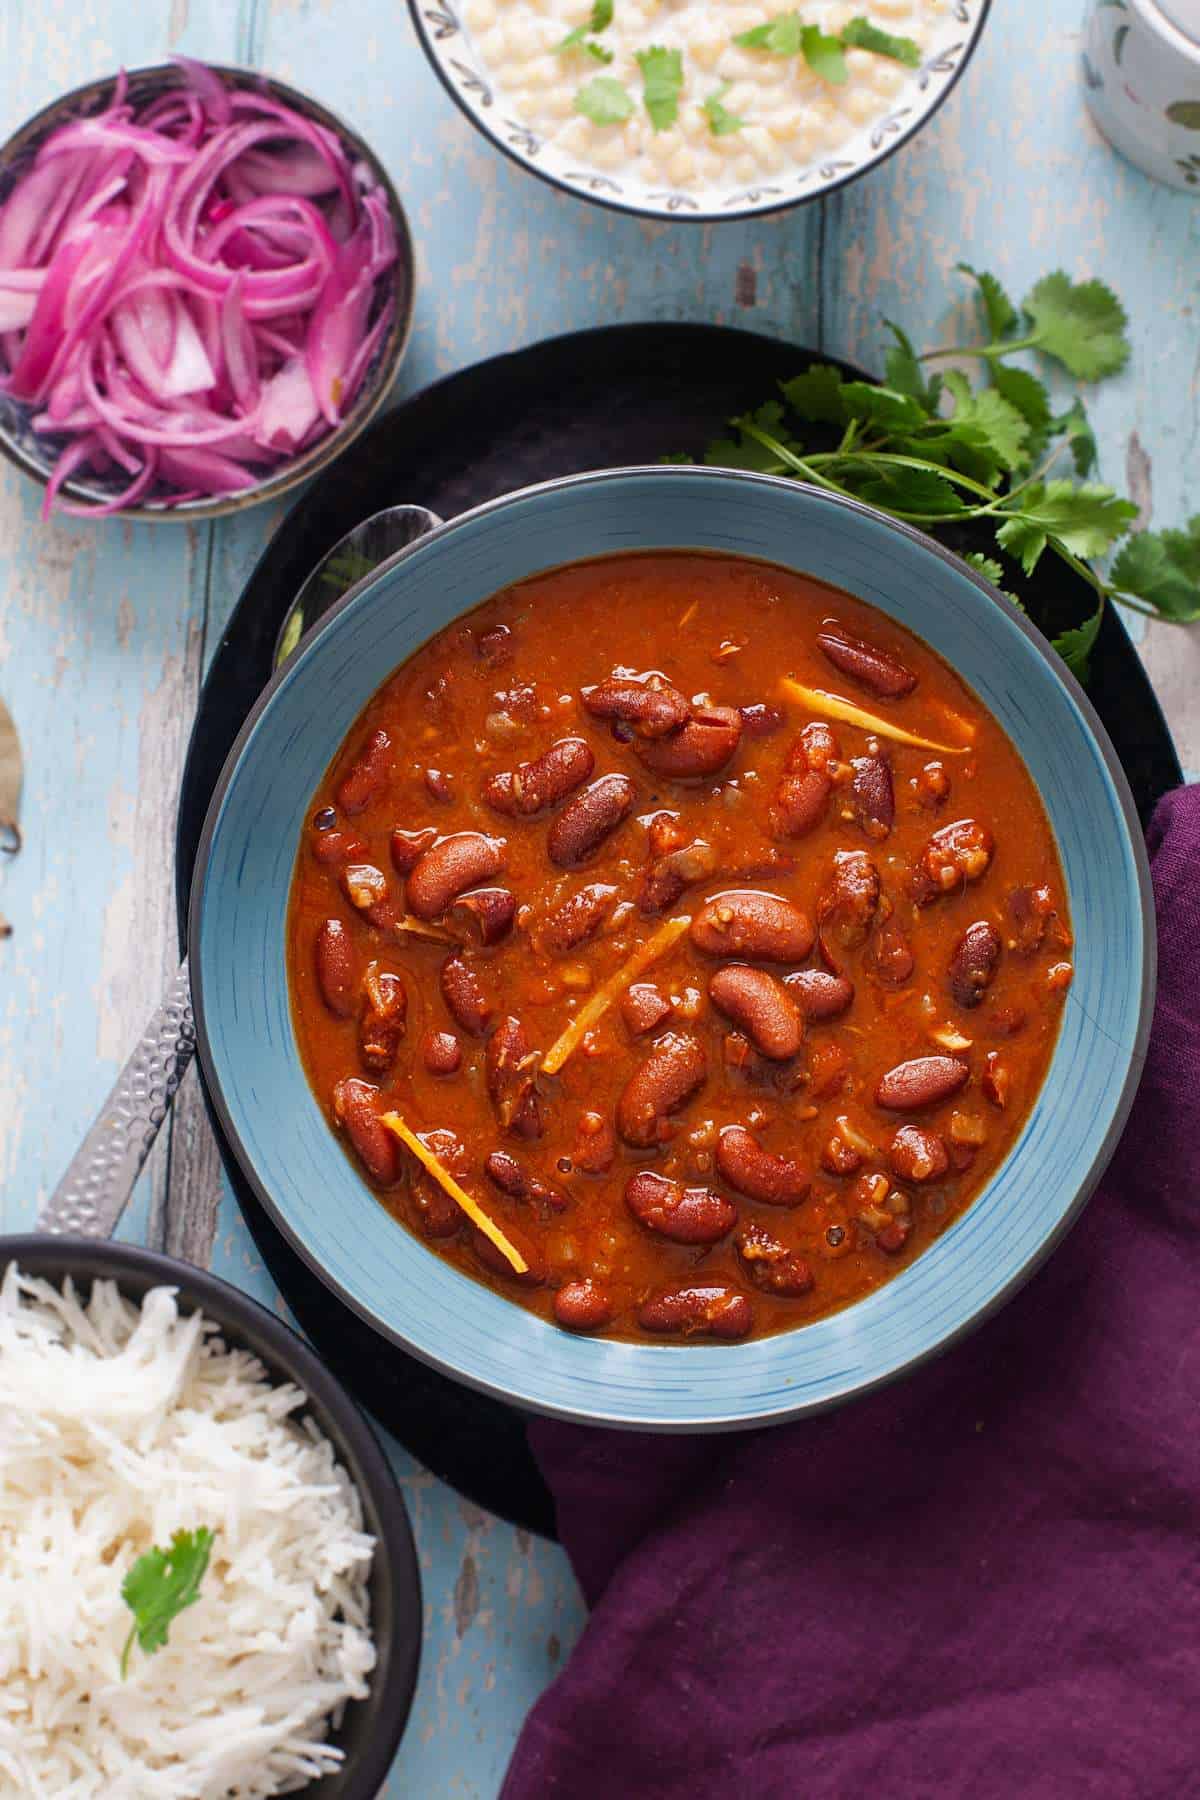
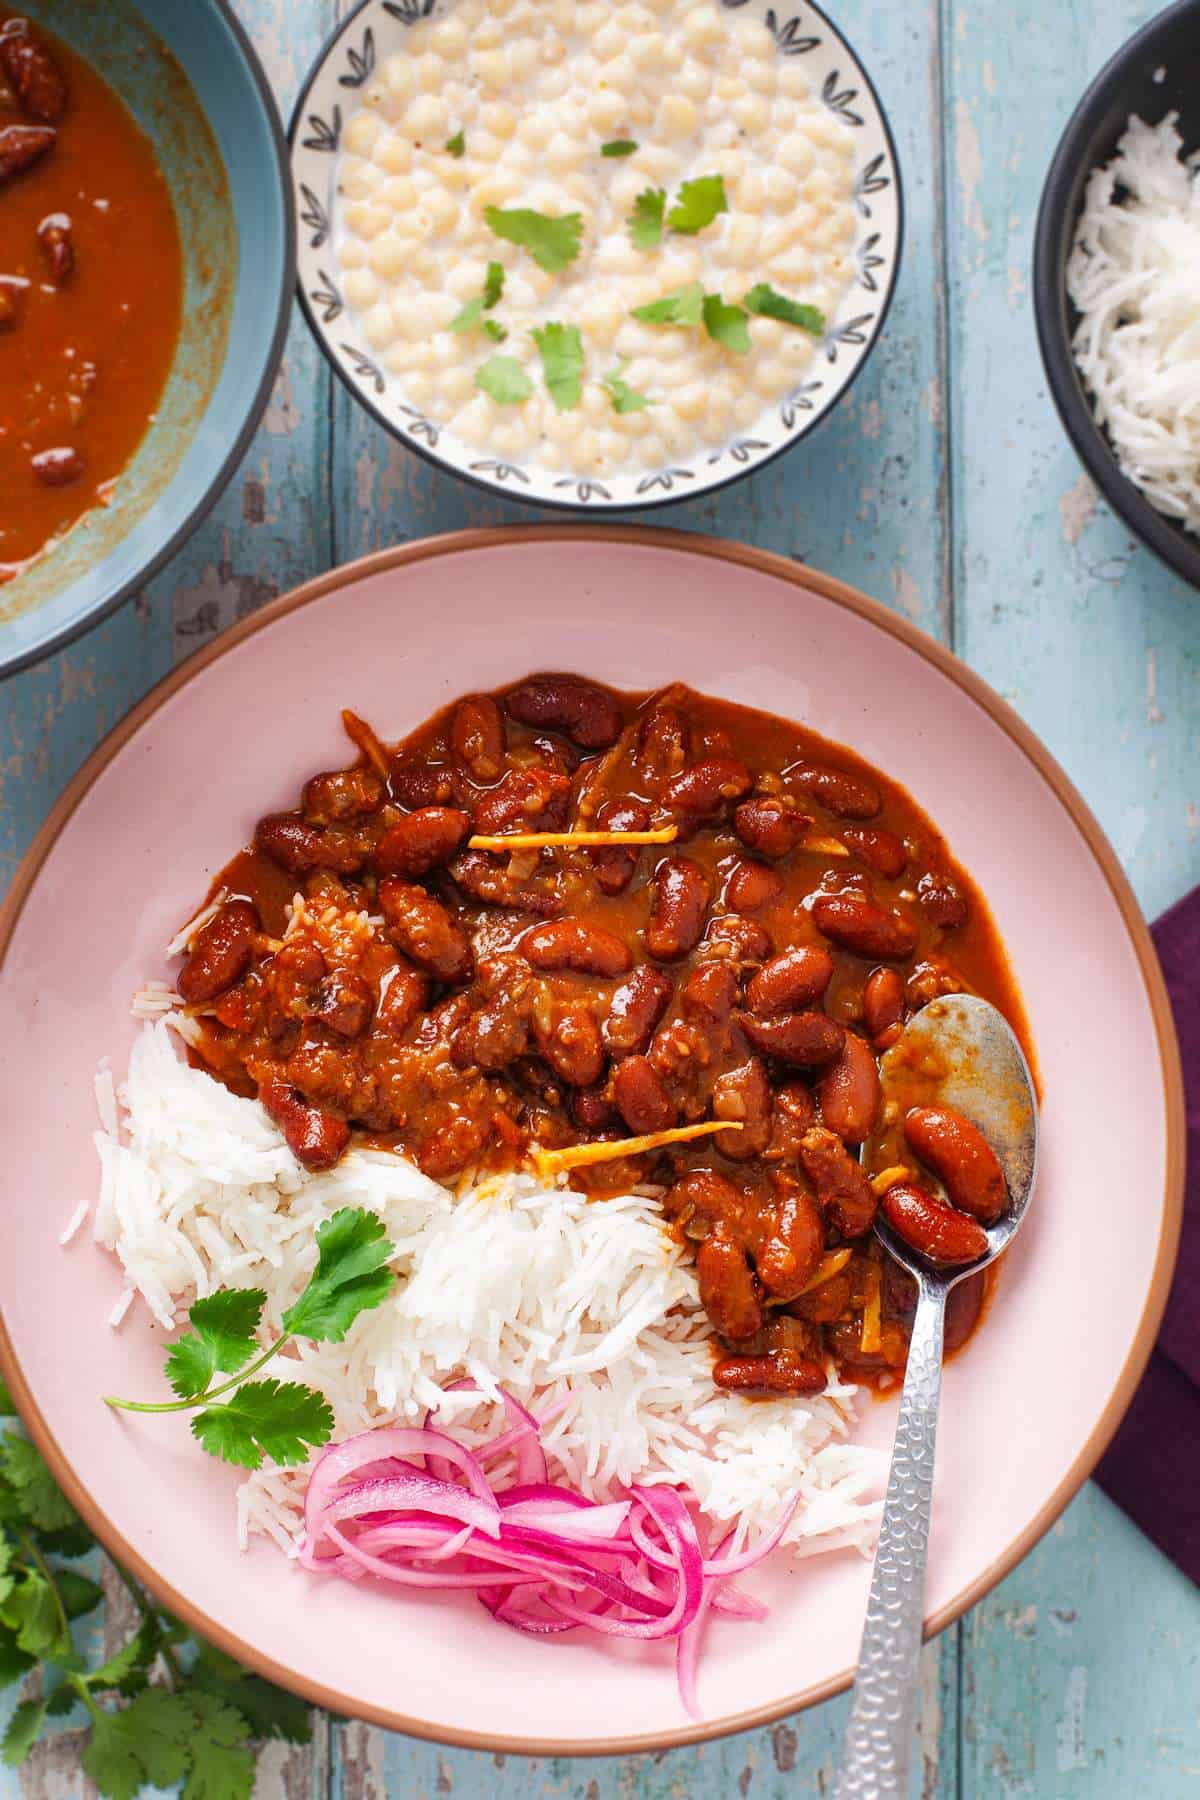
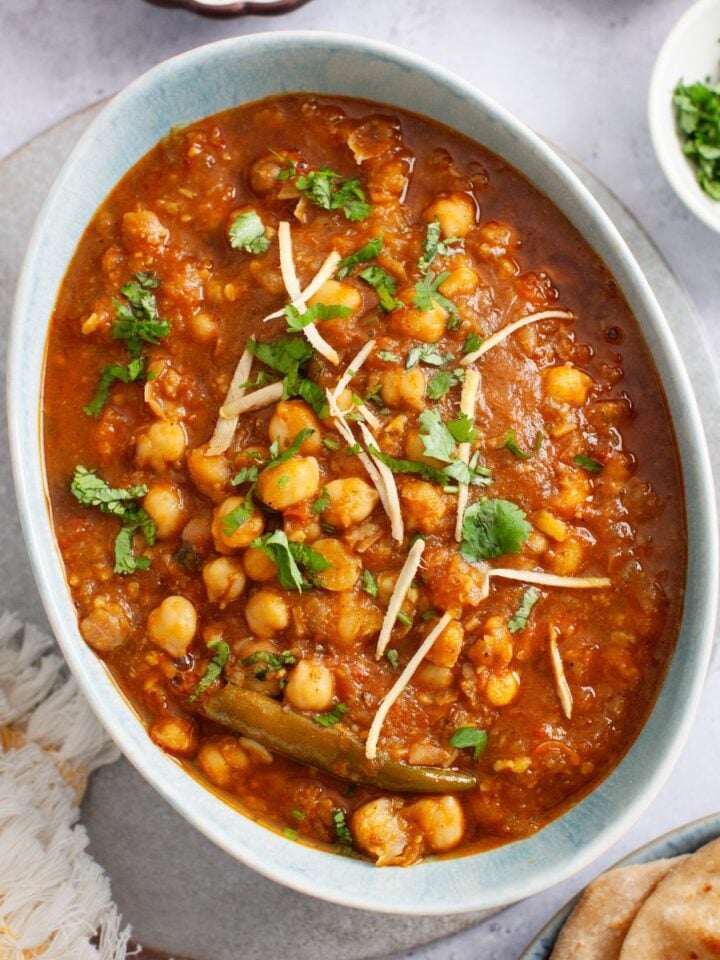
This authentic punjabi style rajma masala recipe is comforting to the tee. It's loaded with fragrant spices and has a thick and luscious onion-tomato gravy. This easy rajma recipe (north Indian red kidney beans curry) is a weekly staple in our home. We pretty much savor rajma chawal (rice) every sunday afternoon followed by a long nap which by all means is the necessary element of the brunch ritual.
You could pair it with plain steamed basmati rice, or my favorite is jeera rice.
In indian subcontinent, especially in northern india, dried bean based curries such as chana masala or rajma masala are beloved vegetarian main dishes. Not only because how simple & hearty it is but also because how uncomplicated the flavors are.
To make this easy punjabi rajma curry, you start with a simple onion tomato masala, add boiled kidney beans (scratch boiled or canned), let everything simmer and serve it with steaming rice. It is filling, full of flavor and perfect for meat-free days.
In this post, I am including the both instant pot rajma masala as well as instructions on how to make rajma on stove top(using pressure cooker).

About My Rajma Recipe
I prepare rajma masala in a simple and homely manner, refraining from overwhelming it with excessive spices or dairy, except for butter to give it an authentic punjabi essence.
Personally, I prefer the rajma beans to retain their shape rather than becoming overly mushy. The gravy is rich and thick, yet not pasty, with a delightful texture from chopped onions, ginger, and crushed tomatoes.
In Punjabi-style rajma, the quantity of onions and tomatoes tends to be higher, but feel free to adjust according to your preference. Don't make a soupy curry, rajma tastes good when it's bit thicker
Rajma Recipe is
- Gluten free
- Easy to make with pantry staples.
- Easily made vegan (skip the butter at end and in tempering, use oil instead)
- Perfect for meal prep
Ingredients You Will Need
- Rajma/Red Kidney beans - You could use any variety of rajma you like. I use dark red rajma beans in my recipe.
- Basic Ground Spices - coriander powder,red chili powder,turmeric powder
- Whole Spices - I use only cumin seeds and bay leaf. You could add whole spices like black cardamom or cinnamon for intense flavor however for homestyle rajma, I keep spices pretty simple. If you do not have cumin seeds, use cumin powder instead or vice versa.
- Flavoring Spices - I use garam masala powder and some crushed kasuri methi. If you are a fan of store bought rajma masala powder, roopak brand is my favorite.
- Ginger & garlic - I prefer adding minced garlic and ginger julienne. I am pretty sensitive to flavor of ginger and I prefer to not add it in paste forms (most of the time). Store bought ginger garlic paste is perfectly fine to use.
- Other Ingredients - chopped onions, crushed tomatoes (simply blitz few tomatoes in blender or processor, keep them coarse)
How To Make Rajma Masala (Stove Top Pressure Cooker) Stepwise Photos
Soak the Beans (Whether you are using pressure cooker or instant pot)
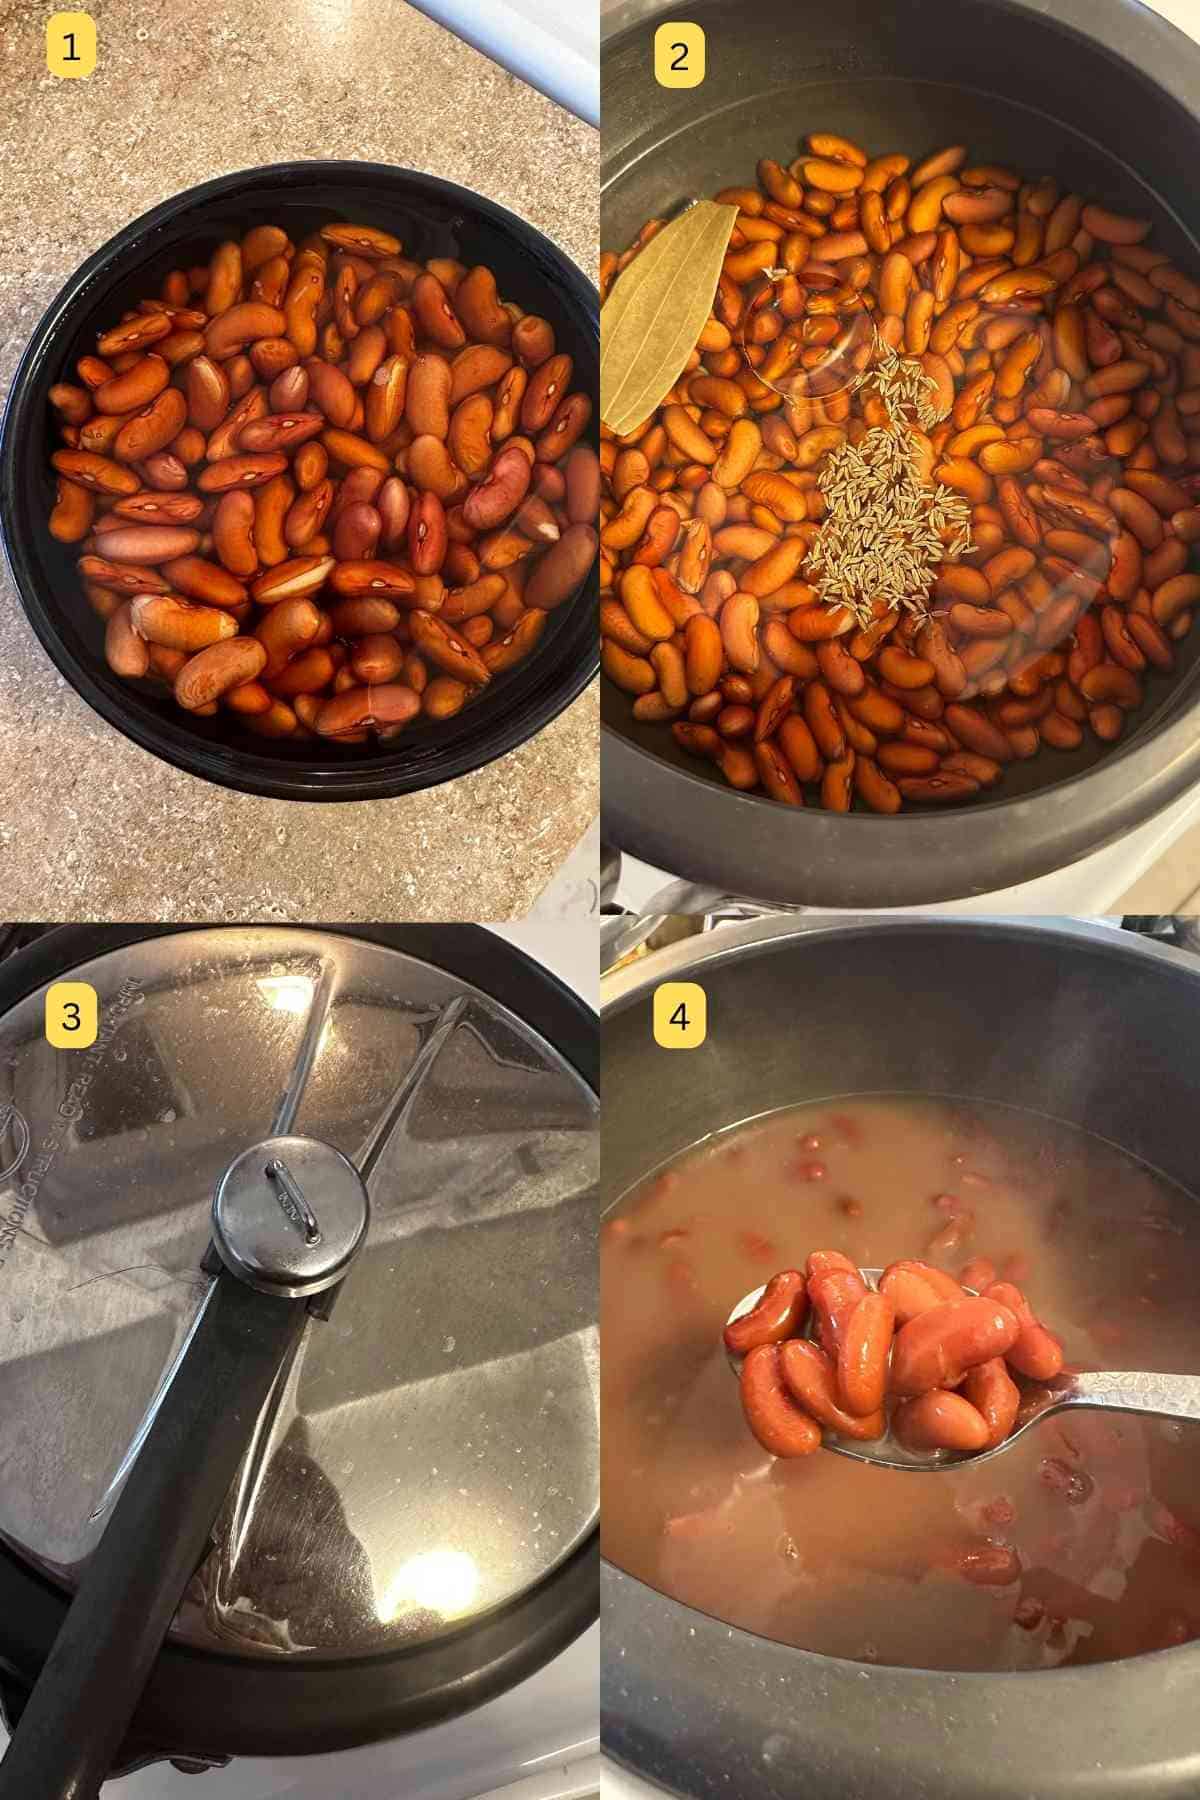
- Soak the dry beans for good 8-12 hours or until they appear swollen and the skin can be peeled off using fingers.Soaking the kidney beans helps in a softer texture of rajma and reduces the cooking time. (image1)
Read instructions on how to make rajma without soaking later in this post.
Pressure Cook the Beans
- Discard the soaking water and add the beans to a pressure cooker. Add bay leaf, cumin seeds, little oil and little salt. (image2)
- Close the lid and pressure cook on medium flame for at least 7-9 whistles. All rajma varieties are different so please adjust the time accordingly. We want soft rajma but the beans should not get mushy at this stage for they have to simmer with masala later. (image3)
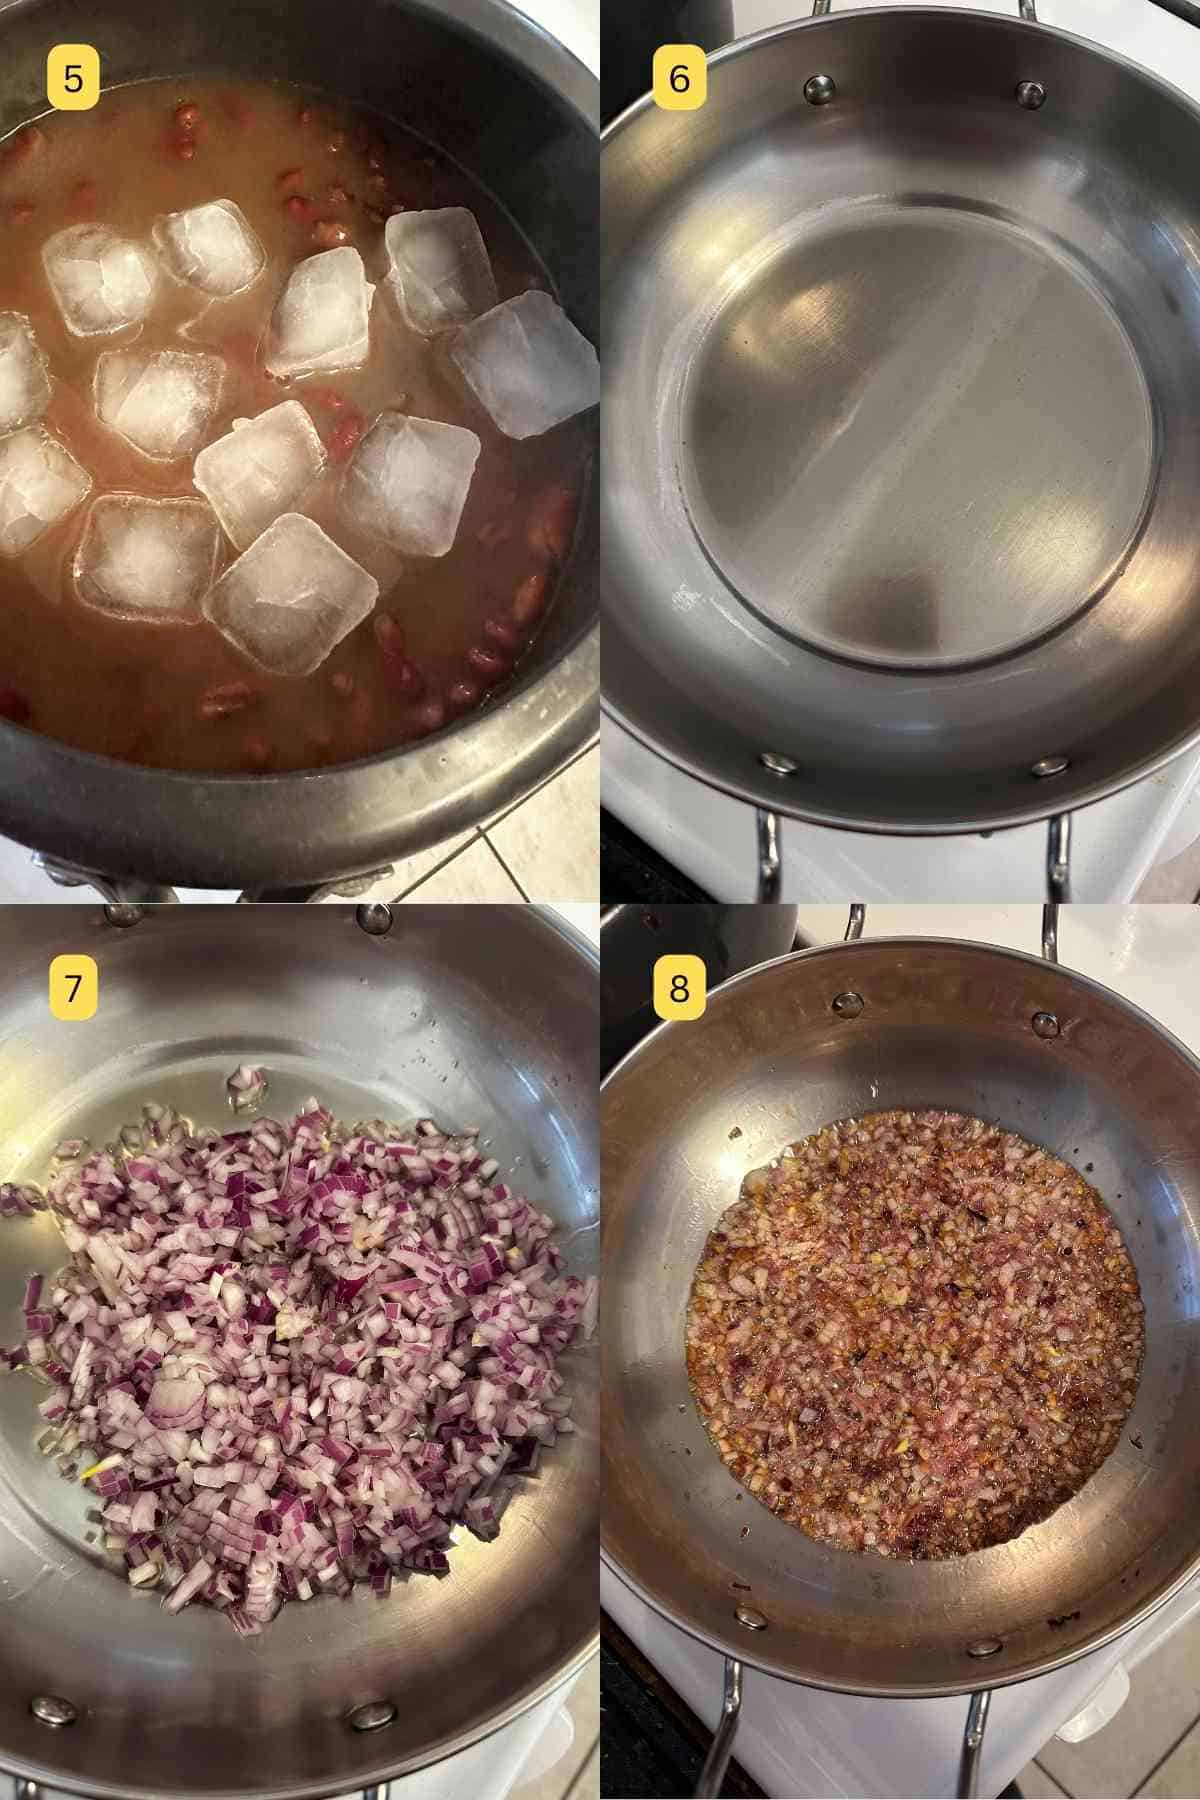
- Let pressure release naturally. Open the cooker lid and add ice cubes to the hot rajma. This prevents overcooking of beans else they will continue to soften in hot stock. (image5)
Note #1 You can do the steps 1-4 as part of meal prep 3-4 days ahead. Store the boiled rajma in an air tight container in the fridge. I recommend it during a busy week.
Note #2 - Skip the above steps if you are using canned beans. Proceed to making the masala straight away.
Make the Masala
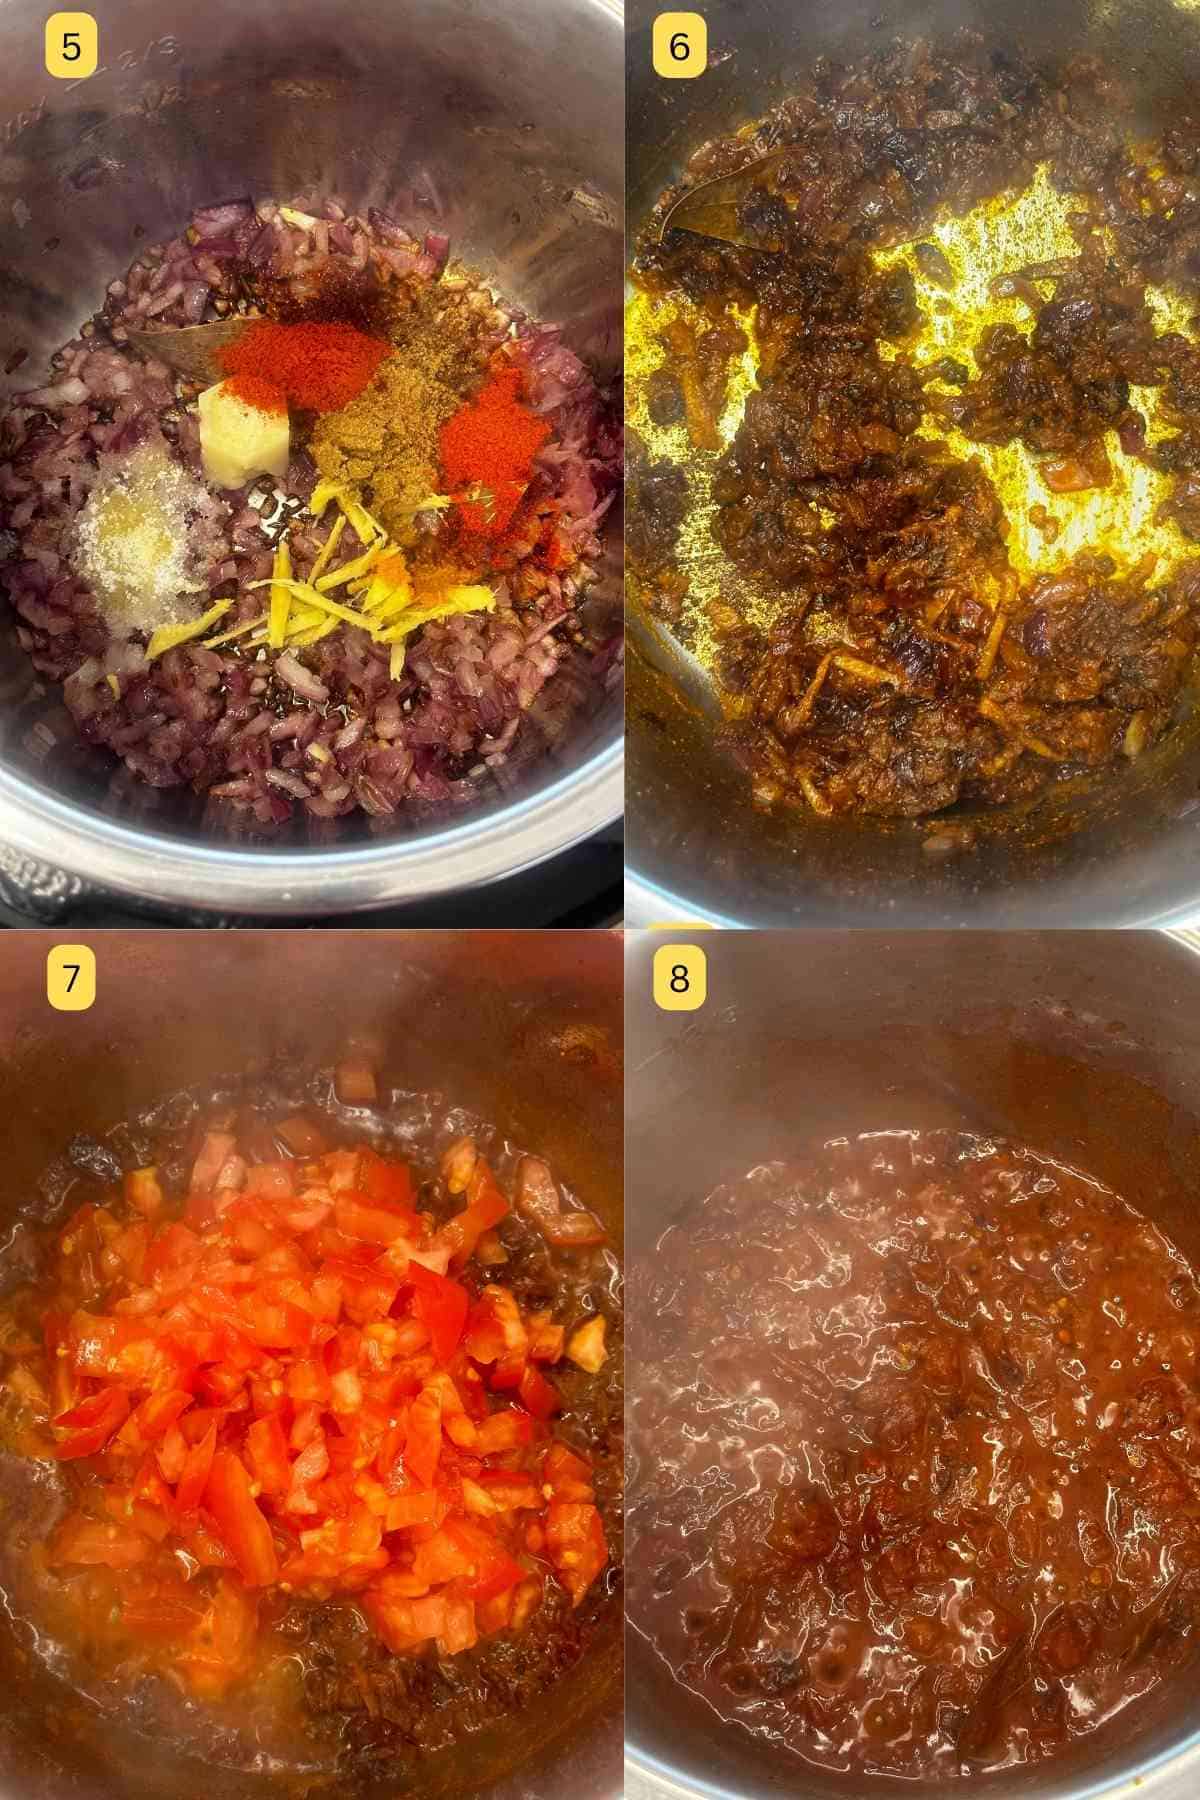
- Place a wide pan or kadai(indian wok) on stove. Add oil and heat it up. (image6)
- Add chopped onions and brown the onions. You will need to intermittently stir the onions as they brown. We want a nice golden brown (few bits of black is perfectly fine, they will add smokiness)(image7,8)
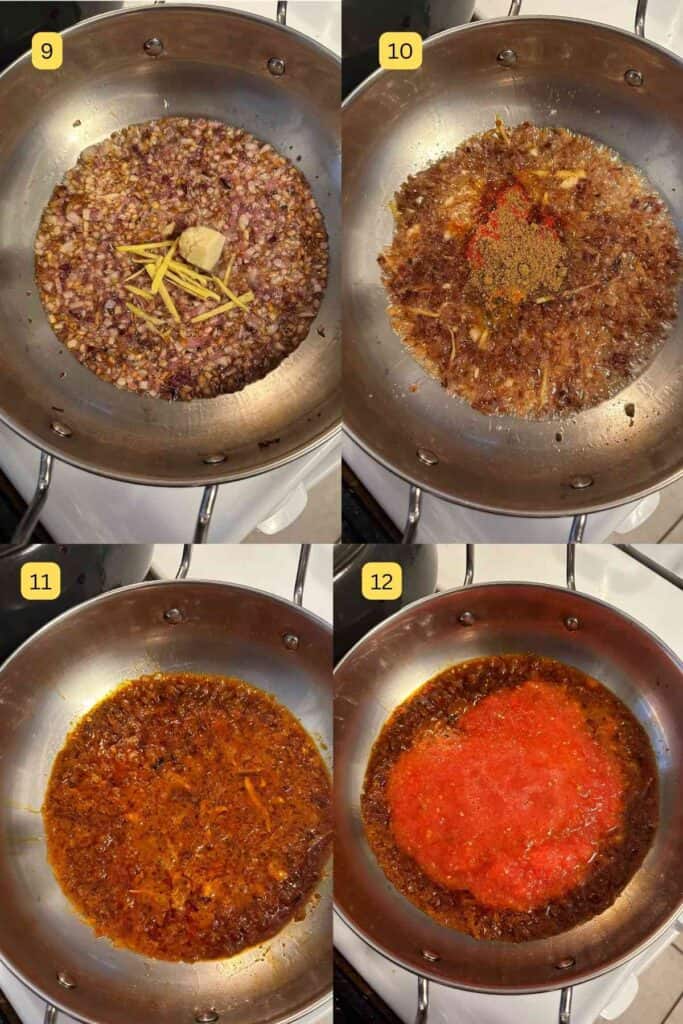
- Once the onions are browned, add the garlic paste and ginger (I prefer to julienne it). You could use ginger garlic paste. Sauce for 10-15 seconds or till the garlic smells wonderful. (image9)
- Add all the powdered spices next (except garam masala). Add 1-2 tablespoons of water and toast the spices for 30-40 seconds taking care not to burn them. (image10, 11)
- Add the crushed tomatoes next along with salt and a pinch of sugar. Fry the tomatoes for good 2 minutes or so stirring intermittently until you see tiny oil bubbles forming. (image 12, 13)
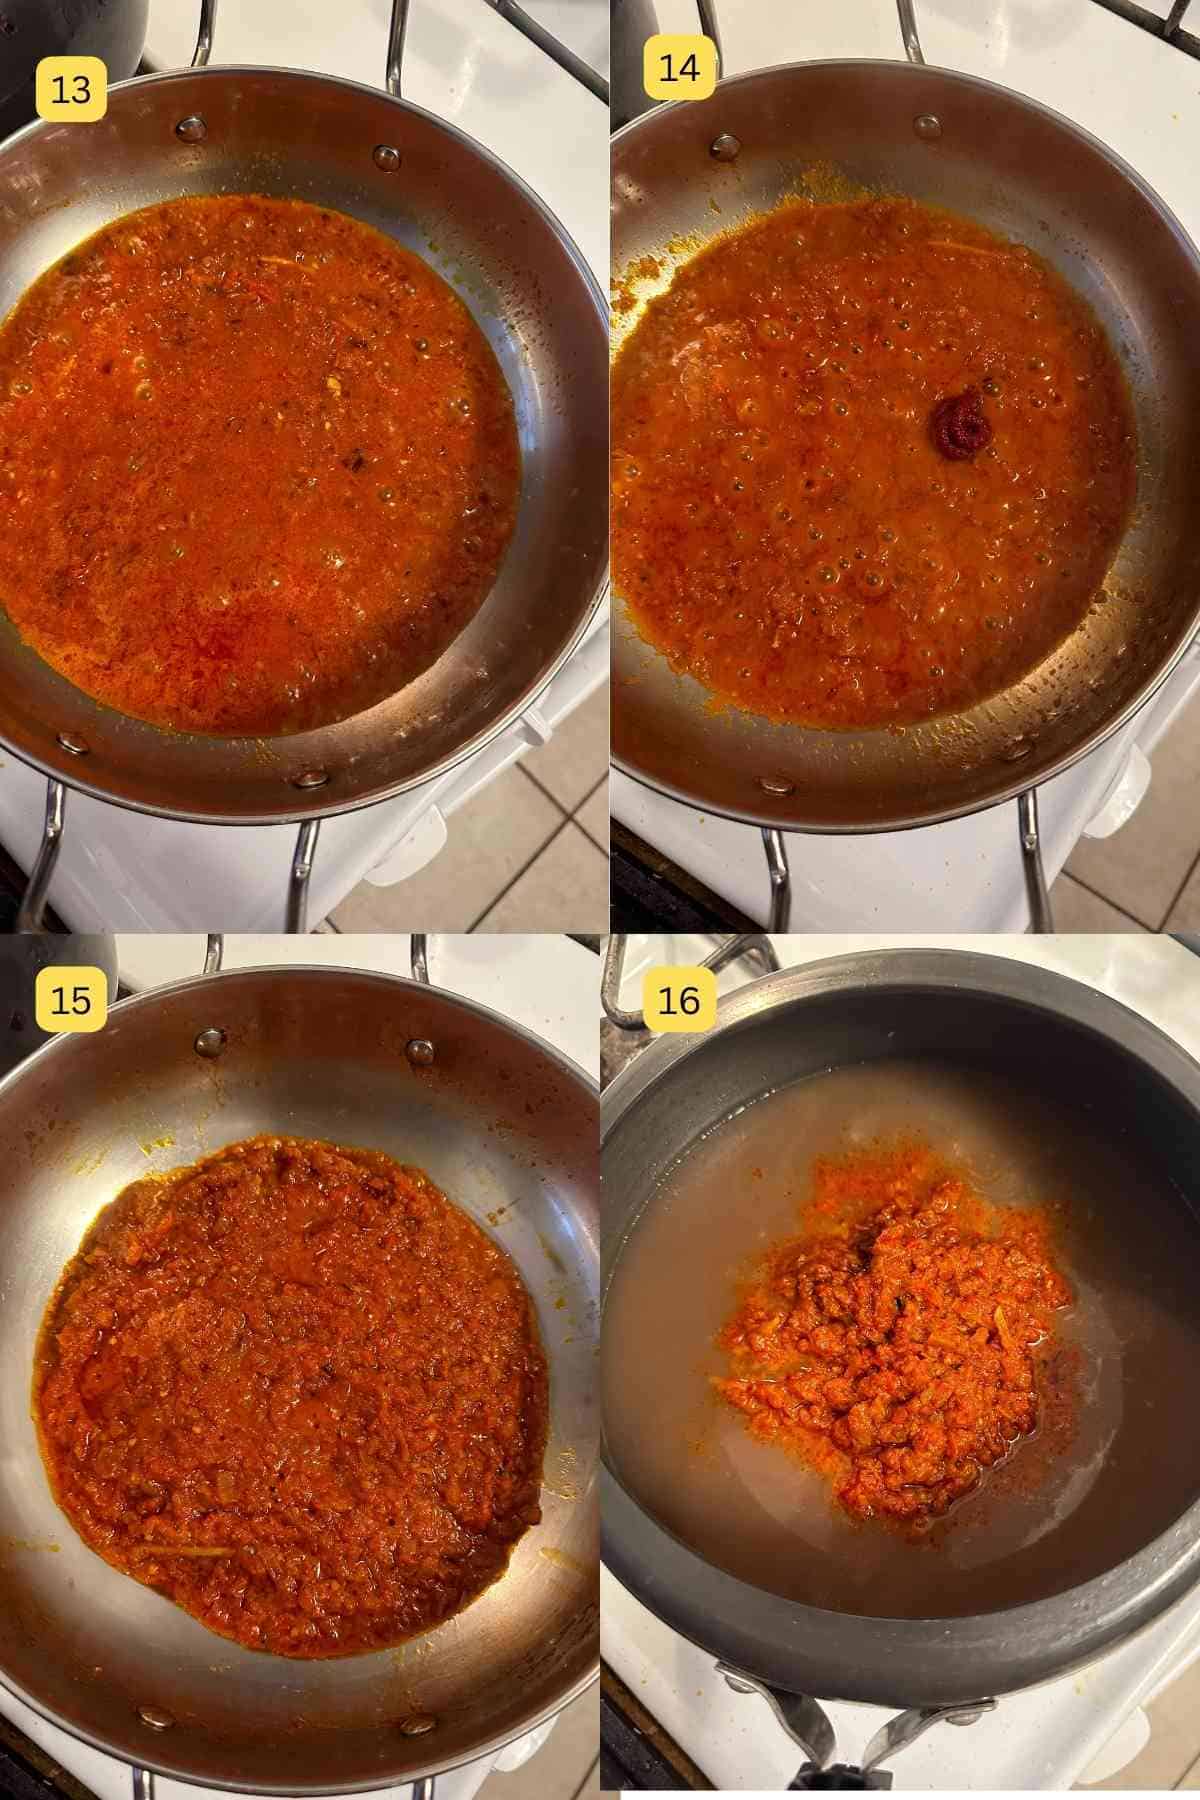
- Add tomato paste (or tomato puree/tomato sauce) (image 14) and continue to cook for another minute or so till the masala appears thickish and shiny. Don't dry out too much, we want a nicely bhuna(browned) but wet masala. (see image 15)
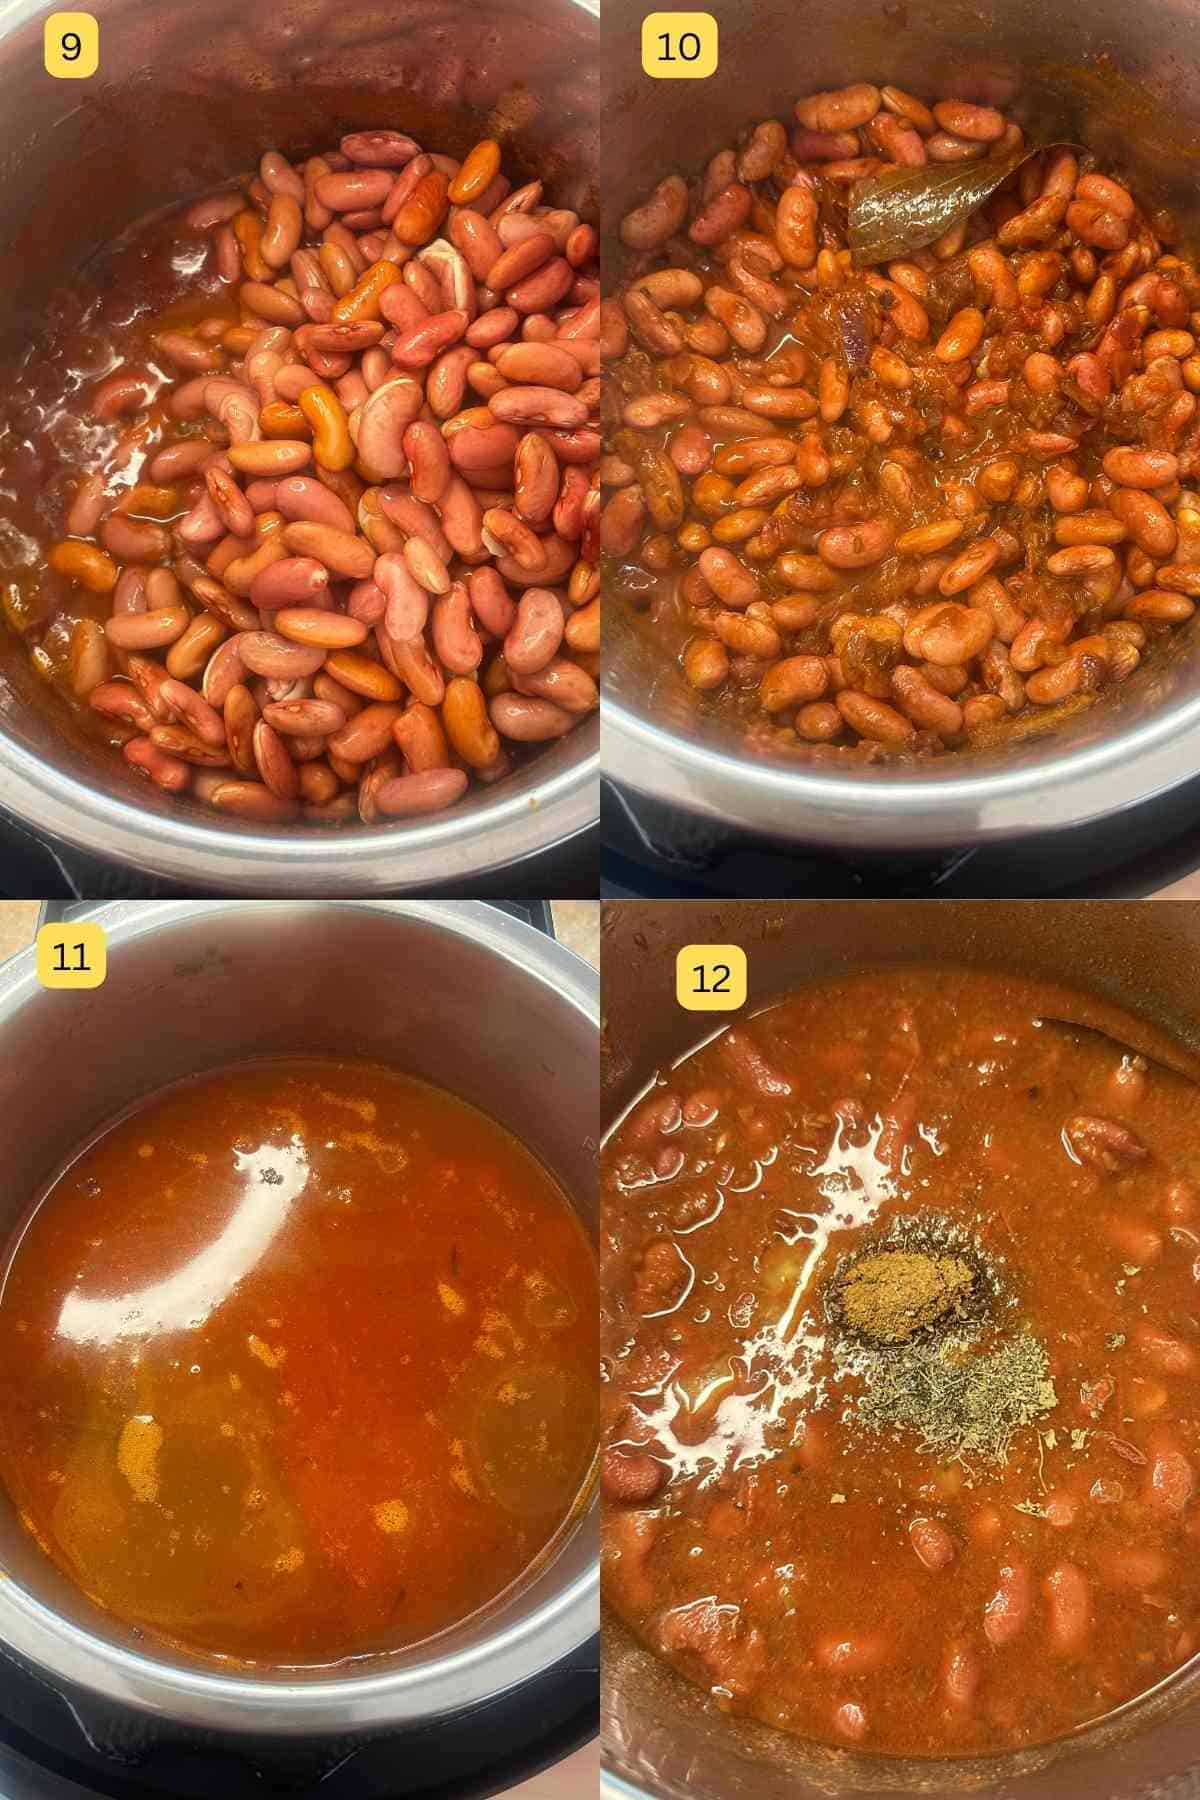
- Add the masala on top on boiled rajma. Mix well and close the lid of pressure cooker. Cook for 1 whistle.
- Once the pressure has released, open the lid and gently mash the rajma a little bit using back of spoon. This will make the gravy thickish.
- Add garam masala, extra ginger julienne, and a knob of butter (optional, skip for vegan) and mix.
Note #3 - If you are tempering rajma, don't add butter in step 12.
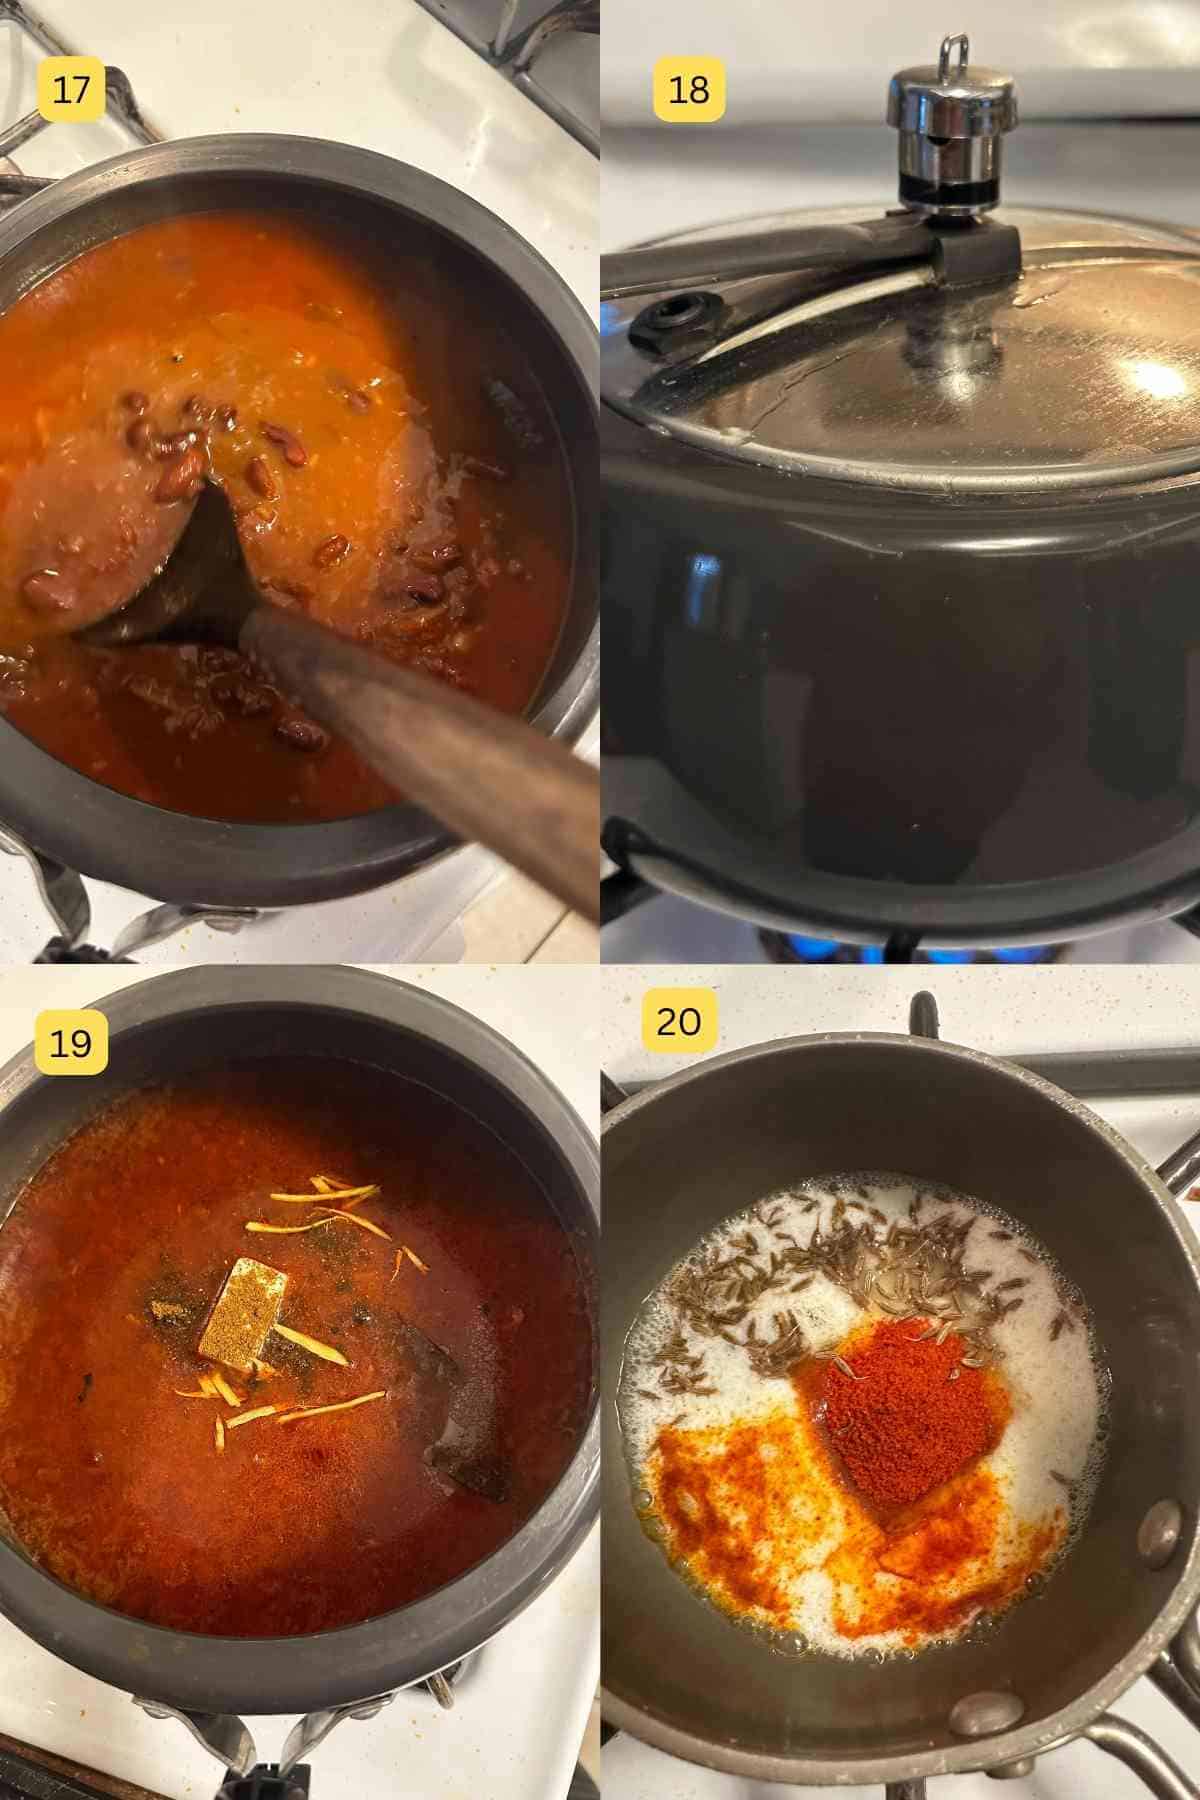
Temper The Rajma
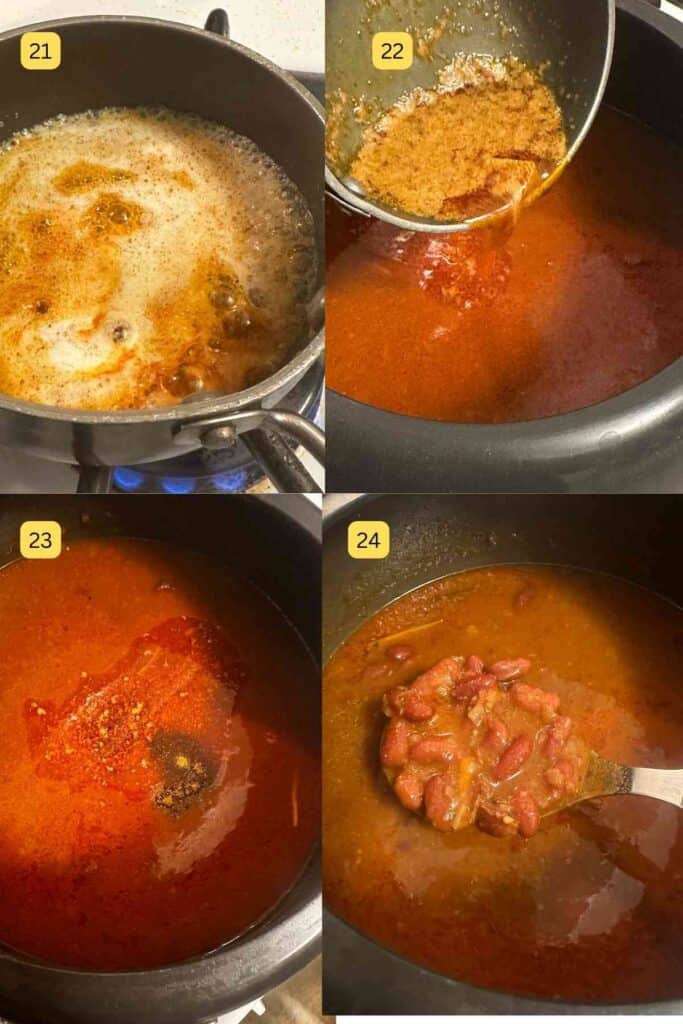
- Heat butter on low flame in a small sauce pan or tadka pan. Add red chilli powder and some cumin seeds.
- Pour the tadka on top of rajma. Mix and let rest for 20-30 minutes. Serve with warm plain rice or jeera rice.
How To Make Rajma in Instant Pot (Step Pictures)
- Press sauté button and wait to heat until it displays HOT.
- Add oil. Temper oil with bay leaf and cumin seeds.
- Next add the chopped onions and saute for about 3-5 minutes until onions look brown.
- Add the garlic, ginger and all powdered spices (except garam masala).Add 1-2 tablespoons of water and sauce the spices for 30-40 seconds.
- Add the diced tomatoes and tomato paste next along with salt and pinch of sugar. Saute for 3-4 minutes till you see that the tomatoes are glistening.
- Add the soaked rajma (discard the soaking water). Add fresh water for cooking the rajma.
- Close the lid of instant pot with in seal position. You could press bean or chilli mode that automatically sets the times to 30 minutes. I found that the rajma got a bit mushy using that mode. Instead, I press pressure cook and set the timer for 20-22 minutes. Once the timer beeps, let the pressure release naturally for at least 10-12 minutes.
- Open the lid and check the doneness of rajma (it would be super soft but hold shape). With very gentle hands, mash the rajma a little bit using back of spoon. This will make the gravy thickish.
- Add garam masala, extra ginger julienne, and a knob of butter (optional, skip for vegan).
- Temper it - follow the steps noted above to prepare the tempering and add on top of rajma.

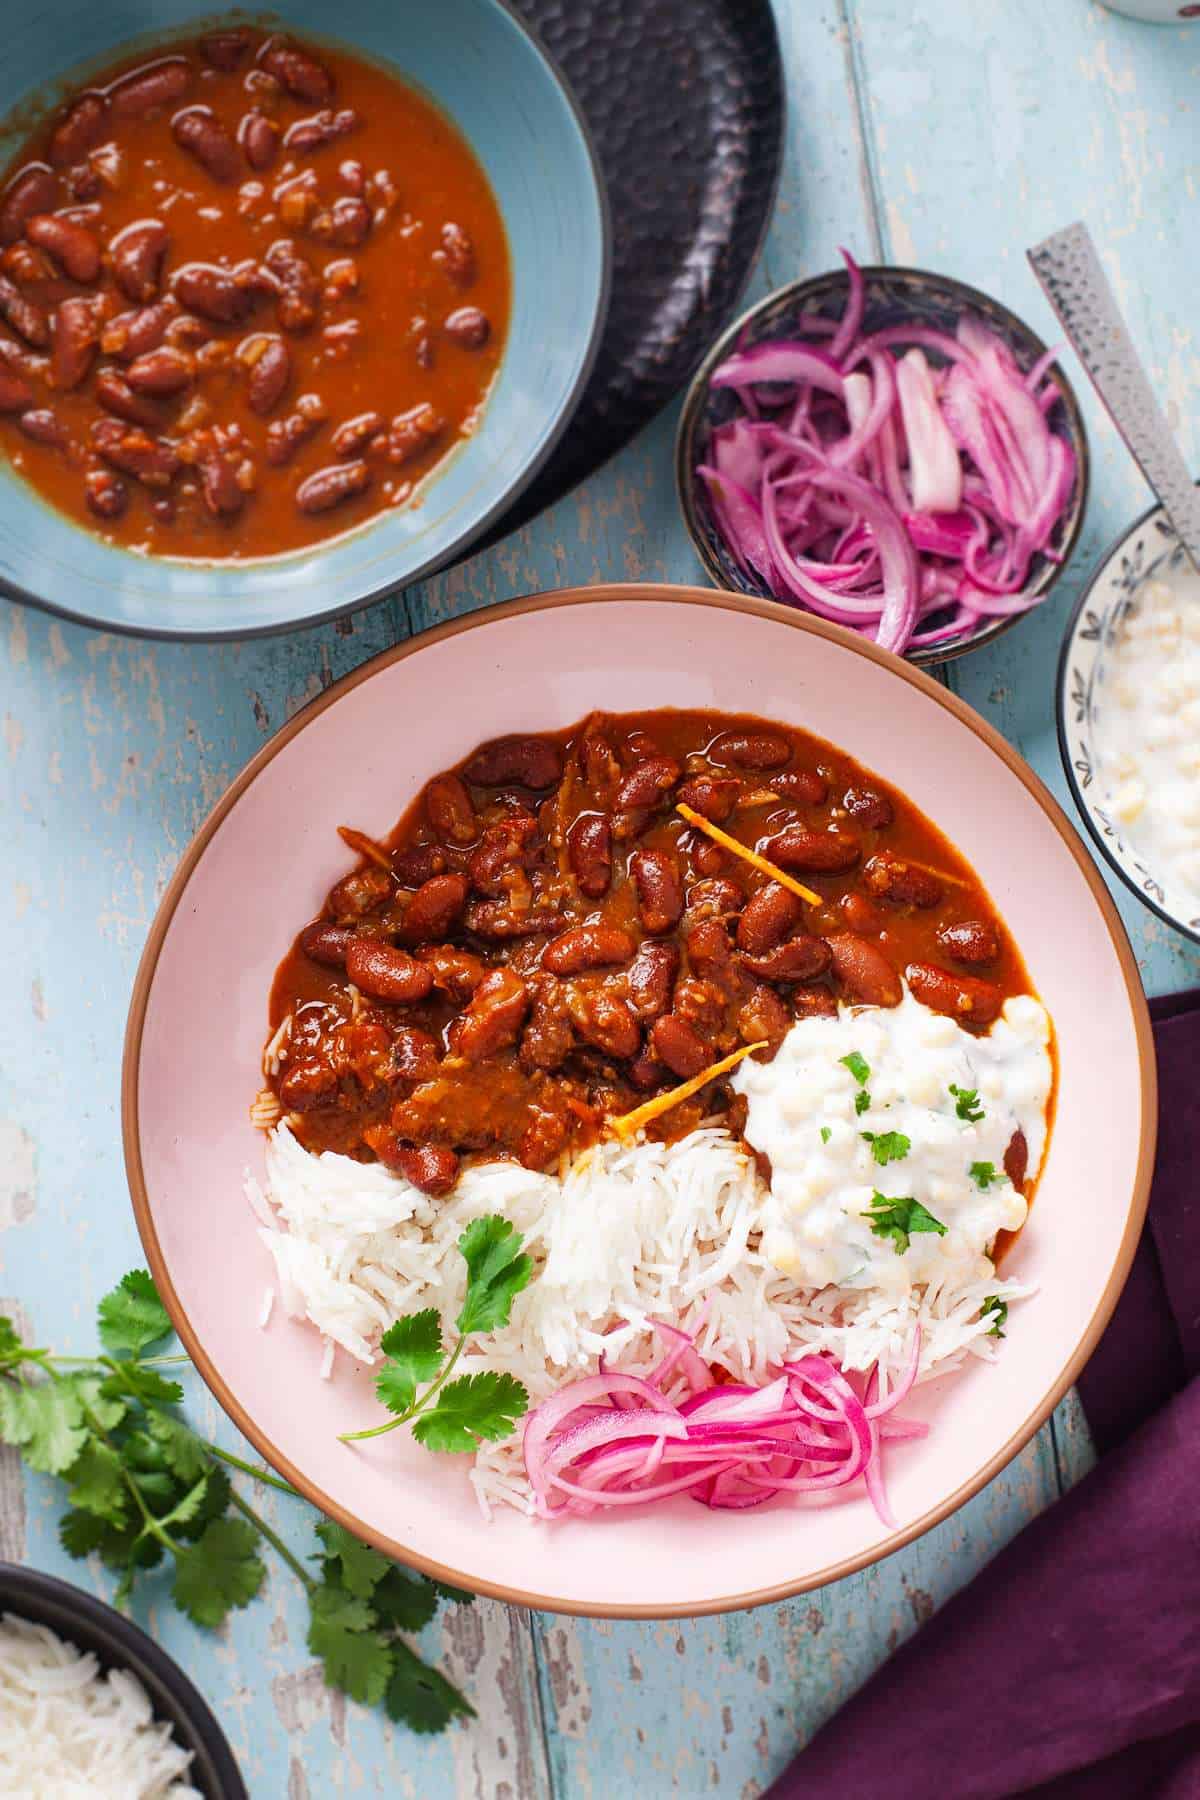
Serving - I like to serve it alongside paneer bhurji, green chutney and raita rounding off our punjabi meal.
Recipe Tips
- Pre-cooking the Beans: If you don't have a pressure cooker or Instant pot, you can still make this recipe. Pre-cook the soaked rajma beans in boiling water in a heavy bottom pot (dutch oven) until they are tender. Then, use them in the recipe along with the flavorful stock. This method takes longer than instant or electric pressure cooking, but it will still yield good results.
- Keep texture in mind - Avoid using onion pastes or pre-made smooth tomato sauce in this recipe. Punjabi rajma recipe is supposed to have texture and using chopped vegetables for the masala base is best. Use a can of diced tomatoes or crushed tomatoes if using canned tomatoes.
- Using Canned Kidney Beans -If you are cooking on stove top, start by making the masala. Add drained canned beans to the bhuna masala, add water and simmer for good 20-25 minutes for flavors to develop. Alternatively, you could pressure cook for 1-2 whistles.
- Heavy Cream or Yogurt: Add a dollop of yogurt while you are frying the masala or add a splash of heavy cream at the end to add a richness to your rajma masala.
- Tempering - I highly recommend it. Tempering adds a nice smokiness to rajma and enhances the taste and color. Totally go for it if you are serving rajma for parties.
- Plan Leftovers - Rajma tastes even better the next day since the flavors get a chance to deepen while it sits. Moreover, flavors intensify upon reheating. Make a large batch and enjoy for 2-3 days.

Rajma Masala (Kidney Beans Curry)
Ingredients
To boil the Rajma
- 1 cup (~210g) rajma red kidney beans
- 2.5-3 cup water
- ½ teaspoon cumin seeds
- 1 tablespoon oil
- 1 large bay leaf add whole spices like cinnamon or black cardamom if you wish
For The Masala
- 4 tablespoon cooking oil
- 1 medium onion (~125g) finely chopped
- 1 teaspoon garlic minced
- ½ inch ginger juliennes
- 1.5 teaspoon coriander powder
- 1 teaspoon kashmiri red chilli powder paprika
- ¾ teaspoon degi mirch (hot), adjust to taste
- 4 small tomatoes (~200g), crushed in a blender
- ⅛ teaspoon sugar
- ½ tablespoon tomato paste or 2 tablespoon tomato sauce/puree(can be skipped but gives sweet acidity to masala)
- 1 teaspoon salt adjust to taste
- 1 teaspoon garam masala powder
- ½ teaspoon kasoori methi dried fenugreek seeds
- ½ tablespoon butter to finish (skip if tempering)
For Tempering
- 1 tablespoon butter
- ½ teaspoon kashmiri red chilli powder
- ½ teaspoon cumin seeds
Instructions
Soak and Pressure Cook The Beans
- Soak the dry beans for good 8-12 hours or until they appear swollen and the skin can be peeled off using fingers.
- Discard the soaking water and add the beans to a pressure cooker. Add bay leaf, cumin seeds, little oil and little salt. Close the lid and pressure cook on medium flame for at least 7-9 whistles. All rajma varieties are different so please adjust the time accordingly. Let pressure release naturally. Open the cooker lid and add ice cubes to the hot rajma.Note #1 You can do the steps 1-4 as part of meal prep 3-4 days ahead. Store the boiled rajma in an air tight container in the fridge. I recommend it during a busy week.Note #2 - Skip the above steps if you are using canned beans. Proceed to making the masala straight away.
Make The Masala
- Place a wide pan or kadai(indian wok) on stove. Add oil and heat it up. Add chopped onions and brown the onions. You will need to intermittently stir the onions as they brown. We want a nice golden brown (few bits of black is perfectly fine, they will add smokiness).
- Once the onions are browned, add the garlic paste and ginger. You could use ginger garlic paste. Sauce for 10-15 seconds or till the garlic smells wonderful.
- Add all the powdered spices next (except garam masala). Add 1-2 tablespoons of water and toast the spices for 30-40 seconds taking care not to burn them.
- Add the crushed tomatoes next along with salt and a pinch of sugar. Fry the tomatoes for good 2 minutes or so stirring intermittently until you see tiny oil bubbles forming. Add tomato paste and continue to cook for another minute or so till the masala appears thickish and shiny. Don't dry out too much, we want a nicely bhuna(browned) but wet masala.
- Add the masala to boiled rajma. Mix well and close the lid of pressure cooker. Cook for 1 whistle. Once the pressure has released, open the lid and gently mash the rajma a little bit using back of spoon. This will make the gravy thickish. Add garam masala, extra ginger julienne, and a knob of butter (optional, skip for vegan) and mix.Note #3 - If you are tempering rajma, don't add butter in step 12
Temper The Rajma
- Heat butter on low flame in a small sauce pan or tadka pan. Add red chilli powder and some cumin seeds. Pour the tadka on top of rajma. Mix and let rest for 20-30 minutes. Serve with warm plain rice or jeera rice
Rajma Recipe In Instant Pot
- Press sauté button and wait to heat until it displays HOT. Add oil. Temper oil with bay leaf and cumin seeds.
- Next add the chopped onions and saute for about 3-5 minutes until onions look brown.
- Add the garlic, ginger and all powdered spices (except garam masala). Add 1-2 tablespoons of water and sauce the spices for 30-40 seconds.
- Add the tomatoes and tomato paste next along with salt and pinch of sugar. Saute for 3-4 minutes till you see that the tomatoes are glistening. Add the soaked rajma (discard the soaking water). Add 2.5-3 cup fresh water for cooking the rajma.
- Close the lid of instant pot with in seal position. Press pressure cook and set the timer for 20-22 minutes. Once the timer beeps, let the pressure release naturally for at least 10-12 minutes. Open the lid and check the doneness of rajma (it would be super soft but hold shape). Gently, mash the rajma a little bit using back of spoon. This will make the gravy thickish.
- Add garam masala, extra ginger julienne, and a knob of butter (optional, skip for vegan). Temper it - follow the steps noted above to prepare the tempering and add on top of rajma.
Jan Scherders says
Hi
I would like to try your recipe. My question is how to make a meal with Rajma ? Eat it like that, without anything else ? Or with rice ? Or maybe also with some vegetables ? I would like to know how people eat rajma at home (not at a restaurant). Thanks
Tanvi says
Hi Jan,
Did you know that Rajma Chawal is a north indian staple 🙂 Pair rajma with simple steamed basmati rice. A bowl of salted yogurt (if you can add some roasted cumin powder, would be awesome) and some sliced or pickled onions will do.Tangy side like yogurt or pickled onions go well with indian bean curries. If you wish, you can have some roasted fingerling potatoes (or jeera aloo) on the side too. Sorry I have been busy and havent been able to reply to your email. I will soon.
Jan Scherders says
Thank you!! Salted yoghurt .....do you mean Lassi ? Or is this very stupid of me 😉
Tanvi says
I mean raita 🙂
Edith Kire says
Hi is the Nutritional information at the end of the recipe based on 1 serving ?
thank you .
I'm using chronometer to calculate macronutrients etc.
Tanvi Srivastava says
Hi! yes, It is for one serving.
Edith Kire says
thank you